Thursday, June 18, 2015

Broken, Abandoned, and Forgotten Code, Part 8

In the previous few posts, we spent time reversing how the Netgear R6200's HTTP daemon parses a firmware header before writing the firmware image to flash. The goal was to work out how the 58-byte firmware header is constructed and how to generate a new one that can replace the header in a stock firmware. In the end we identified the purpose of all but 4 bytes. The regenerated header plus the original TRX firmware image allowed the HTTP daemon, running in emulation, to reach the stage where it would start writing data to the /dev/mtd1 flash partition. Considering this a win, we'll now circle back to analyzing upnpd.

In this and the next part, we'll compare the way upnpd parses and validates the firmware header to that of httpd. Having developed a baseline understanding of how the header is parsed by httpd, analyzing upnpd is much easier.

Updated Exploit Code

As in previous installments, the exploit code has been updated. Since we're switching back to upnpd in order to analyze how it validates the firmware, the repository contains separate modules for that. Look for janky_ambit_header.py and build_janky_fw.py. You can find the updated code and README in the part_8 directory. Now is a good time to do a pull or to clone the repository from:
https://github.com/zcutlip/broken_abandoned

More Firmware Parsing, Pretty Much Like Before

As we discovered in part 4, a firmware larger than 4MB will crash upnpd due to an undersized memory allocation. Obviously we won't be able to strap a header to the front of a stock TRX image like we did with httpd; it's way too big. Shrinking the firmware will be a challenge for later. If it turns out that we can't even get so far as writing the firmware to flash memory without crashing, it won't matter that you were able to shrink and re-pack the firmware. Instead, just dd out a little less than 4MB of random data from /dev/random and prepend a header to it. If you can get upnpd to write that image to flash, you win this stage and may advance to the next level.

Once we get past the undersized malloc() at 0x00423C24 in sa_parseRcvCmd(), the firmware is successfully base64 decoded out of the SOAP request. Then, at 0x00423C98, a function named sa_CheckBoardID() is called.

Call to sa_CheckBoardID


This function should be familiar. It's nearly identical to the abCheckBoardID() function I described in part 5. So identical, in fact, that the buffer overflow via memcpy() I described previously is in this function as well.

sa_CheckBoardID buffer overflow
Buffer overflow due to memcpy() using header size field. Sad trombone.

Even the Buffer Overflow is the Same


To recap, the memcpy() is bounded only by the size value from the header. Since we control that value, we get precise control over how many bytes are copied into the destination buffer.

I didn't go into detail about the buffer overflow before, because I wanted to wait until I could discuss it in the context of upnpd. In the HTTP server, this isn't an interesting vulnerability. In that case, it is a post-authentication vulnerability. You would need to bypass authentication or trick a user into uploading your malicious firmware. If you've accomplished either of those, there are much more useful things you can be doing with your time than exploiting buffer overflows.

In the case of upnpd, this same vulnerability doesn't require authentication, making it much more interesting. Here's what's neat about it:

  • No authentication required.
  • The payload is base64 encoded and decoded for free, so there are no bad bytes to avoid related to the transport protocol.
  • The buffer overflow is via memcpy() rather than a string handling function. There are no bad bytes to avoid related to string handling.
  • The buffer being overflowed is on the stack, making it easy to overwrite the function's return address.
This is a straightforward buffer overflow. If you're new to stack based buffer overflows, or just new to exploiting memory corruption vulnerabilities on MIPS, this is an easy one to practice with, especially if you have the debugging environment I described here set up.

However, as I said in the first part of this series, one of my self-imposed goals was to avoid exploiting bugs along the way. We're trying to flash a firmware without crashing, and any bugs along the way are obstacles to overcome.

Working through this function reveals the same header fields that we discovered in its httpd counterpart: The magic number, the size and checksum of the header, and the board ID string. These fields are found at the same header offsets as before.

Mystery Header Gets a Name

There is one new piece of information, however.

Not ambit image


At 0x00423088 there is an error message that we didn't see in httpd: "Not Ambit image ... reject!!!". This is the first indication of any sort of name for this file format. This explains why you may have noticed references to "ambit" or "ambit header" in previous code fragments I've posted.

In the next part, we get close to writing the firmware image to flash memory. We'll have to do some binary patching to work around the fact that QEMU doesn't actually have flash memory.

Monday, June 08, 2015

Broken, Abandoned, and Forgotten Code, Intermission

We're about halfway through the Broken, Abandoned series, so this is a good time to pause for a minute and take stock. At this point, things have gotten pretty technical; if you've only joined recently, you may be wondering what this series is about. I want to take a moment to summarize where we've been and where we can expect to go from here.

Overview

This series, entitled Broken, Abandoned, and Forgotten Code, is about an unauthenticated firmware update mechanism in the Netgear R6200 wireless router's UPnP service. Bypassing authentication and updating the firmware would be moderately interesting by itself. What makes this particularly interesting, however, is this capability appears only partially implemented. It's not quite dead code; more like zombie code. It's wired up just enough to kind of work. There are many artifacts of incomplete implementation that stand in the way of straightforward exploitation.

The goal: build an exploit that accounts for the many implementation bugs, which then updates the target with a custom firmware, giving us persistent control over the target device. This, of course, requires not just building the exploit, but specially crafting a firmware image.

Where We've Been

Here's a summary of what we've covered in the series up to now.

  • Part 1, part 2: Introduced the hidden SetFirmware SOAP action as well as the weird timing games needed to exploit it. We reverse engineered what HTTP headers are required to exercise this code path.
  • Part 3: We reverse engineered what the body of the SetFirmware SOAP request should look like.
  • Part 4: We discovered a crash when attempting to update to a stock firmware downloaded from Netgear's support website. The crash is due to an undersized memory allocation. We will have to shrink the firmware from nearly 9MB to 4MB in order to exploit the SetFirmware vulnerability.
  • Part 5, part 6, & part 7: It will be necessary to specially craft a firmware image if we are to take control of the target, so we reverse engineered the mystery 58-byte header at the beginning of the stock image. Because upnpd is so broken, we instead analyzed httpd, knowing that it can update a well-formed firmware image without crashing.

    Where We're Going

    From here there are still a number of challenges. We'll need to spend more time analyzing upnpd; it may not even be able to update the firmware without crashing (spoiler alert: it is). Even if it can, there may be differences in the firmware format as expected by upnpd vs the standard format parsed by httpd.

    Assuming we can get through upnpd's update process, there remains the problem from part 4: a firmware image greater than 4MB crashes upnpd. We'll need to spend some time shrinking the firmware from nearly 9MB to 4MB or less.

    Any project involving reverse engineering and customizing firmware will, at some point, result in bricked hardware. We'll devote an installment to discovering the hidden UART connection inside the R6200 that will enable recovery in the likely case of a bad firmware update.

    One installment will cover a upnpd crash after the firmware update process but before reboot. I'll discuss how to customize the firmware header to avoid the crash.

    The stage 1 firmware has a few things it must do autonomously if it is to reboot into a trojan stage 2. I'll discuss those things and how to accomplish them.

    We'll close out with an installment on post-exploitation. Once you're as far as customizing your own firmware and getting it onto your target, the world is your oyster. We'll discuss a simple technique that will yield remote, post-exploitation access, even from behind a firewall.

    While you're waiting here's a video of the exploit in action I shared in the prologue. In the left terminal you see what's going on under the hood via the serial console. In the right terminal, you see the actual exploitation taking place. Also, there's cool music.


    R6200 Firmware Upload from Zach on Vimeo.


    More to Come, so Stay Tuned

    Take a moment to go out to the lobby, stretch your legs, and use the facilities. We've covered a lot, but we're only halfway through. There's a lot more fun on the way, starting with Part 8!

    Thursday, June 04, 2015

    Broken, Abandoned, and Forgotten Code, Part 7

    In the previous post, I finished discussing the abCheckBoardID() function. I called attention to a checksum in the header generated by an unknown algorithm. I provided a python implementation of that algorithm ported from IDA disassembly. In total, I identified four fields parsed by this function, accounting for 30 bytes of the 58 byte header.

    In this part I'll give an overview of the remaining functions that parse and validate the firmware header. By the end we will be able to generate a header that allows the firmware to be programmed to flash memory. I won't discuss each header field in quite as much detail as I did previously, but if you've made it this far, it shouldn't be too hard to understand how each field is used.

    Updated Exploit Code

    The update to the exploit code for Part 6 added a module to regenerate a checksum found in the header. This update populates a couple of additional checksums as well as a few other fields. The code provided for Part 7 is sufficient to generate a firmware header that will pass the web server's validation. Given a valid kernel and filesystem image, you should be able to generate a firmware image that the web interface will happily upgrade to. If you've previously cloned the repository, now would be a good time to do a pull. You can clone the git repo from:
    https://github.com/zcutlip/broken_abandoned

    Of Checksums and Sizes

    After the abCheckBoardID() function (discussed in part 6) there are a few more functions that parse or validate portions of the header. Identifying these fields and their purpose is challenging due to the fact that values may be parsed out in one function, but not used until some other function or functions, if at all.

    The two functions that parse out values from the header are upgradeCgi_setImageInfo() at 0x004356B0 and upgradeCgiCheck() at 0x004361F8. The "setImageInfo" function is a short one. It parses several header fields, but it doesn't inspect or use any of them. The values are stored in global variables for later use. You can identify offsets of these fields using string patterns as described previously. As you identify these locations where the parsed values are located, rename the variables in IDA to something more meaningful, so you can identify them later when they are used. I renamed them to correspond with the offsets they were parsed from.

    upgradeCgi_setImageInfo
    Renaming global variables corresponding to header offsets.
    The upgradeCgiCheck() function validates a few fields parsed out previously. At 0x004362BC we see the return of our friend, calculate_checksum(). This time the checksum is computed across more than just the firmware header. At the "update" step, the data argument points to the "HDR0" portion of the firmware. This suggests the checksum is across the TRX image that follows the 58 byte header. The size argument is the sum of the values found at offsets 24 and 28. Inspecting the values at those positions in a stock firmware, we see 0x00871000 at offset 24, and 0x0 at offset 28. It's clear that bytes 24 - 27 are the size of the firmware image minus the 58 bytes at the start. Based on its use here, the bytes 28 - 31 are also a size of some sort.

    At any rate, the size passed to calculate_checksum() at the update stage at 0x004362DC is the size of the TRX image. At 0x0043630C, the checksum is compared to the value taken from offset 32. We now know three more fields in the firmware header: offsets 24, 28, and 32. That's 42 bytes down, 16 to go.

    checksuming TRX image
    Checksum of the firmware's TRX image.


    We're not done with checksums just yet. The basic block at 0x0043643C is another checksum operation. Once again the data points to "HDR0", but the size is only the value from offset 24. The size from offset 28 is not used this time. The checksum result is the same as before, but this time compared to the value at offset 16. We now know the checksum we compute and store at offset 32 must also be stored at offset 16.

    At this point we can speculate this firmware format supports multiple partitions or sections. The value at offset 24 would be the size of partition 1, and offset 28 would be the size of partition 2. The checksum at offset 16 would be calculated over partition 1, and offset 32's checksum would be calculated over partitions 1 and 2 combined.

    We're now down to 12 unidentified bytes. Let's have a look at an updated header diagram to see how things look.

    header diagram 2
    What we know so far about the firmware header.


    The diagram is starting to fill in, and things are looking quite a bit better.

    Version String

    Moving on, at 0x00436580, more data is parsed out of the firmware image. This time the values are pulled out one byte at a time. This frustrates the technique of using the 3+ byte patterns to identify offsets. Based on the format strings from subsequent sscanf() and sprintf() operations, we can speculate that these values are transformed in some way into the version string displayed in the web interface.

    Although the version string ends up being only cosmetic, and not an essential part of the firmware validation, it's still interesting enough to discuss here. Modifying the version string would be a nice way to visually demonstrate that the target is, in fact, running your custom firmware, and not the stock firmware.
    [Update: Turns out this isn't quite right. There is a string table stored in flash memory that also contains the version string, and that string is displayed in the web interface. The version field in the firmware header is only (as far as I can tell) rendered during the update process so the user can see what version they're updating to.]

    It took some debugging, but it turns out the single byte values that compose the version string don't actually get used until a few functions later, in upgradeCgi_GetParam() at 0x00436B4C.

    generating firmware version string


    What is happening here is a version string is being generated to display in the web browser so that the user can confirm what version of the firmware they're about to upgrade to.

    Firmware Version String


    The version string "V65.97.51.65_97.52.65" from the screenshot above appears to be composed of the decimal representations of ASCII characters from Bowcaster's pattern string. We can be sure by replacing bytes 8 - 15 with a string of non-repeating characters: "stuvwxyz". When we do this, the version string becomes "V116.117.118.119_120.121.122". This confirms the hypothesis; these are the decimal representations for t,u,v,w,x,y, and z. Note that "s" is not included. Even though byte 8 was parsed out along with the rest, it appears to go unused.

    Firmware Version String 2

    We can now update the header diagram to reflect the version bytes.
    header diagram 3


    (Mostly) Complete Firmware Header

    The header diagram now has only 4 bytes (5 if you count the unused version byte at offset 8) that haven't been identified. It's unclear what these bytes are for, since they are never inspected. A likely explanation is that a checksum for theoretical partition 2 belongs at offset 20. The stock firmware has 0x0 at offset 20, which jives with a partition 2 size of 0. At any rate, this header is sufficient for execution to reach the point where the uploaded firmware gets written to /dev/mtd1.

    WARNING: If you are debugging httpd on on actual hardware rather than in emulation, there's a chance your router will end up bricked if you attempt to upgrade to a customer firmware image. Eventually, we must test on actual hardware, but before then, I'll describe how to access the device's serial console using a UART to USB cable. Using the serial console, you can recover from a bad firmware update, a feature I had to use many times during my original research.

    In the next part, with a better understanding of the firmware format, we'll loop back to the UPnP daemon and pick up where we left off there. Wouldn't it be nice if we could use the now documented header format to generate a firmware that will work with the UPnP daemon using our existing exploit code?

    Thursday, May 28, 2015

    Broken, Abandoned, and Forgotten Code, Part 6

    Note: It is assumed that the reader is debugging the processes described in this and the next several posts using emulation and IDA Pro. Those topics are outside the scope of this series and are covered in detail here and here.

    In the previous post, we switched gears and started looking at the web server for the Netgear  R6200. That's because the HTTP daemon's code for upgrading the firmware is less broken and easier to analyze. We also analyzed a stock firmware image downloaded from Netgear to see how it is composed. Craig Heffner's binwalk identified three parts, a TRX header at offset 58, followed by a compressed Linux kernel, followed by a squashfs filesystem. All of those parts are well understood, which only leaves the first 58 bytes to analyze.

    With the goal of recreating the header using a stock TRX header, Linux kernel, and filesystem, I described how we can use Bowcaster to create fake header data to aid in debugging. When we left off, I had started discussing httpd's abCheckBoardID() function at 0x0041C3D8, which partially parses the firmware header. We identified a magic signature that should be at the firmware image's offset 0, as well as some sort of size field that should be at offset 4. We also discovered this header should be big endian encoded even though the target system is little endian.

    In this part, we'll clarify the purpose of the size field as well as identify a checksum field. Identification of the checksum algorithm is tricky if you don't have an eye for that sort of thing (I do not). I'll show how to deal with that. By the end of this part, we will have identified four fields, accounting for 30 bytes of the 58-byte firmware header.

    Updated Exploit Code

    I last updated the exploit code for part 5, which added several Python modules to aid in reverse engineering and reconstructing a firmware image. In this part I've added a module to regenerate checksums found in the header (see below). Additionally, the MysteryHeader class populates a couple of new fields that we will cover this post. If you've previously cloned the repository, now would be a good time to do a pull. You can clone the git repo from:
    https://github.com/zcutlip/broken_abandoned

    Header Size

    We know the field at offset 4 is a size field of some sort because it's used as the size for a memcpy() operation[1]. Let's take a look at a stock firmware image to see what value is in that field. It might correlate to something obvious.

    stock firmware hex dump

    Above, we see the stock value is 0x0000003A, or 58 in decimal. Since 58 is also the amount of unidentified data before the TRX header, it's a safe bet this field is the overall size of this unidentified header. It's also a safe bet that this header is variable in size. The TRX header, whose size is fixed, does not have a size field for the header alone, only for the header plus data.

    call to calculate_checksum()
    Checksumming the firmware header.

    Checksum Fun

    From abCheckBoardID() there are several calls to the calculate_checksum() function. This is an imported symbol and is not in the httpd binary itself. Strings analysis of libraries on the R6200's filesystem reveals that this function is in the shared library libacos_shared.so. We can disassemble this binary and analyze the function.


    libacos_shared.so calculate_checksum()
    Disassembly of calculate_checksum().
    There's no need to completely reverse engineer this function. Sure, it would be convenient to know what checksum algorithm this is[2] and if there was a built-in python module to use. All we really need, however, is code that calculates the same values this function does. It's easier in this case to just reimplement the algorithm. I duplicated this function one-for-one, where each line of MIPS disassembly became a line of Python. It's a small function, so it didn't take long to do. That module is included in this week's update to the git repo.

    Checksum Python reimplementation
    Python code fragment that looks suspiciously like IDA Pro disassembly.


    A checksum is calculated across the first 58 bytes of the header. Then at 0x0041C5BC the checksum gets compared to 0x41623241, a value extracted from the firmware data. Using Bowcaster's find_offset(), it is revealed that offset 36 of the firmware header should contain the checksum of the header itself. We'll need to calculate that value for the header and insert it at this location. In abCheckBoardID() the checksum field is zeroed out before the value is calculated. We should do the same before calculating our own. The updated code in the git repository performs this operation.

    Board ID String

    With the header checksum in place, we can move forward to the next few basic blocks. A few checks are performed to verify the "board_id" string of the firmware. There are a couple of hard-coded board_id strings that are referenced. If neither of those match, NVRAM is queried to find out the running device's board_id. It's possible to verify the proper board ID is "U12H192T00_NETGEAR" by extracting the NVRAM parameters from a live device[3]. Even if we didn't have that information, we could still analyze a stock firmware, where we find the same string embedded in the header.

    R6200-V1.0.0.28_1.0.24.chk


    As before, by looking at the pattern string that is compared, we can identify the offset into the header where the board_id should be placed.


    strcmp board_id


    $ ./buildfw.py find=b3Ab4Ab5Ab6Ab7Ab8A kernel.lzma squashfs.bin
     [@] Building firmware from input files: ['kernel.lzma', 'squashfs.bin']
     [@] TRX crc32: 0x0ee839c0
     [@] Creating ambit header.
     [+] Building header without checksum.
     [+] Calculating header checksum.
     [@] Calculated header checksum: 0x840d0ddd
     [+] Building header with checksum.
     [@] Finding offset of b3Ab4Ab5Ab6Ab7Ab8A
     [+] Offset: 40


    The string b3Ab4Ab5Ab6Ab7Ab8A is located at offset 40.

    It is worth noting that we suspected the header was variable length given the presence of a size field. The board_id is a string and is the last field in the header; it is likely responsible for the header's variable length.

    At any rate, this is easy to add as a string section using Bowcaster. This is the last check in abCheckBoardID().

    The Mystery Header So Far

    Here's a diagram of what we know about the header so far.
    header diagram 1


    That's four fields identified, for a total of 30 bytes. 28 bytes remain. Although the abCheckBoardID() function only inspected these four fields, it did populate several integers in the global header_buf structure. It remains to be seen how these fields get used.

    Based on this information we can enhance the Python code to add the necessary fields. Updated code in part_6 of the git repo looks similar to:


    from bowcaster.development import OverflowBuffer
    from bowcaster.development import SectionCreator
    
    class MysteryHeader(object):
        MAGIC="*#$^"
        MAGIC_OFF=0
        
        HEADER_SIZE=58
        HEADER_SIZE_OFF=4
        
        HEADER_CHECKSUM_OFF=36
        
        BOARD_ID="U12H192T00_NETGEAR"
        BOARD_ID_OFF=40
        
        def __init__(self,endianness,image_data,size=HEADER_SIZE,board_id=BOARD_ID,logger=None):
            self.endianness=endianness
            self.size=size
            self.board_id=board_id
            
            
            chksum=0;
            logger.LOG_INFO("Building header without checksum.")
            header=self.__build_header(checksum=chksum,logger=logger)
            logger.LOG_INFO("Calculating header checksum.")
            chksum=self.__checksum(header)
            logger.LOG_INFO("Building header with checksum.")
            header=self.__build_header(checksum=chksum,logger=logger)
            self.header=header
            
        def __build_header(self,checksum=0,logger=None):
            
            SC=SectionCreator(self.endianness,logger=logger)
            SC.string_section(self.MAGIC_OFF,self.MAGIC,
                                description="Magic bytes for header.")
            SC.gadget_section(self.HEADER_SIZE_OFF,self.size,"Size field representing length of header.")
            
            SC.gadget_section(self.HEADER_CHECKSUM_OFF,checksum)
            SC.string_section(self.BOARD_ID_OFF,self.board_id,
                                description="Board ID string.")
            buf=OverflowBuffer(self.endianness,self.size,
                                overflow_sections=SC.section_list,
                                logger=logger)
    
        def __checksum(self,header):
            data=str(header)
            size=len(data)
            chksum=LibAcosChecksum(data,size)
            return chksum.checksum
    

    In the next post I'll discuss other functions that parse portions of the header. I'll show how to identify what fields get used where. By the end of the next installment we'll be able to generate a header sufficient to get our firmware image written to flash.

    -------------------------------
    [1] Wah wah...Buffer overflow.
    [2] I'm pretty sure it's Fletcher32. I believe this because I asked Dion Blazakis, and he thinks it is, and that dude is smart. Also I found a Fletcher32 implementation on Google Code by Ange Albertini that gives the same result as mine. And that guy is also smart.
    [3] The NVRAM configuration can be extracted from /dev/mtd14. This, plus libnvram-faker is covered independently of this series, in Patching, Emulating, and Debugging a Netgear Embedded Web Server

    Thursday, May 21, 2015

    Broken, Abandoned, and Forgotten Code, Part 5

    In previous installments I shared proof-of-concept code that would exercise the Netgear R6200's hidden (and badly broken) SetFirmware SOAP action. It satisfied the various wonky conditions necessary to get into the 
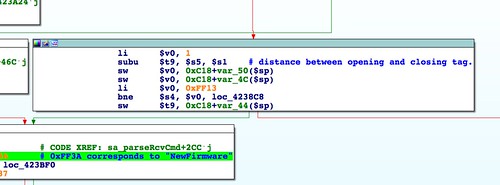
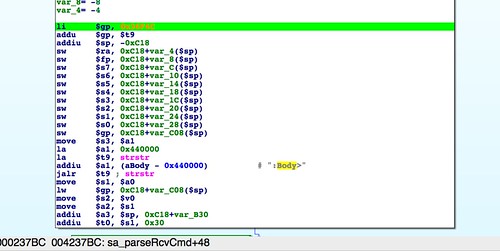
sa_parseRcvCmd() function. Then I showed where in that function a firmware would be decoded from the SOAP request and written to flash. I showed how to identify a code path that leads to firmware writing. In 
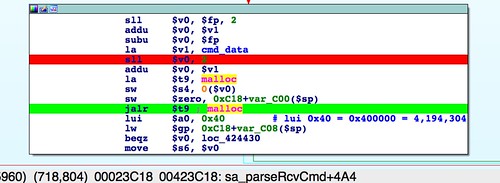
part four, I showed how an undersized malloc() means a stock firmware crashes upnpd. Although we'll work around that bug later, for this and the next several installments we'll be working out how the firmware image gets parsed so we can create our own.

    Updated Exploit Code

    I last updated the exploit code for part 3, in which I showed how to form the complete SOAP request. In this part, I've added several Python modules to aid in reverse engineering and reconstructing a firmware image. If you've previously cloned the repository, now would be a good time to do a pull. You can clone the git repo from:

    Analyzing httpd

    We know that the code path in upnpd that accepts a firmware and writes it to flash memory is severely broken. When given a legitimate firmware obtained from Netgear, it crashes. In order to reverse engineer the firmware format, it may be easier to analyze a program that is known to work properly when upgrading: the web interface.

    In the next several posts I'll describe analysis of the embedded HTTP daemon to understand how it processes a firmware image file. I'll also describe how to use the Bowcaster exploit development framework to aid in dynamic analysis and to develop an understanding of the firmware header composition. The goal is to generate a firmware image out of an existing filesystem and kernel. Bonus points if we can either create a firmware image that is identical to the original or if we can explain what the differences are and why those differences don't get in the way.

    You can debug the web server by copying GDB to the physical R6200 router, or you can debug the embedded httpd in emulation. The first option requires less up-front effort, but the second option is more convenient once you have it working. Running upnpd and httpd in emulation requires faking some hardware and some binary patching. Before proceeding, you may want to read my previous posts on debugging with QEMU and IDA Pro and on patching, emulating and debugging using IDA Pro (which specifically addresses httpd). If you're playing along at home, I strongly recommend getting the web server and the UPnP daemon up and running in QEMU and debugging them with IDA Pro. During the next several posts, there will be a few aspects I don't explain in depth. These these things will be relatively straightforward if you have your working environment set up like mine.

    Firmware Composition

    Before we actually upload a firmware to the web interface, let's first see how a firmware image file is composed, and identify any sections that are already understood and don't need reverse engineering.

    A good starting point is Craig Heffner's binwalk.


    zach@devaron:~/code/wifi-reversing/netgear/r6200 (0) $ binwalk R6200-V1.0.0.28_1.0.24.chk
    
    DECIMAL    HEX        DESCRIPTION
    -------------------------------------------------------------------------------------------------------------------
    58         0x3A       TRX firmware header, little endian, header size: 28 bytes, image size: 8851456 bytes, CRC32: 0xEE839C0 flags: 0x0, version: 1
    86         0x56       LZMA compressed data, properties: 0x5D, dictionary size: 65536 bytes, uncompressed size: 3920006 bytes
    1328446    0x14453E   Squashfs filesystem, little endian, non-standard signature,  version 3.0, size: 7517734 bytes,  853 inodes, blocksize: 65536 bytes, created: Wed Sep 19 19:27:19 2012
    

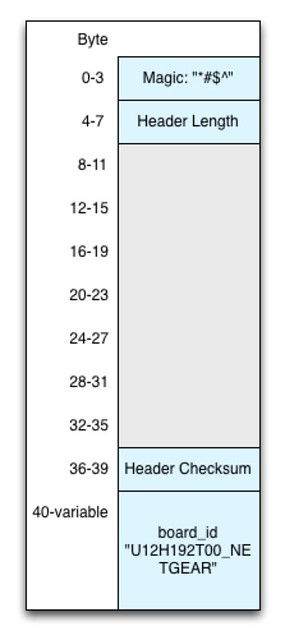
    Binwalk identifies three sections: A TRX header at offset 58, an LZMA section at offset 86, and a Squashfs filesystem at offset 1328446. The TRX header is well understood. It's a firmware header format that dates back to at least the venerable Linksys WRT54g.

    Here's a diagram (courtesy of the OpenWRT wiki) of the TRX header's format:

    0                   1                   2                   3   
      0 1 2 3 4 5 6 7 8 9 0 1 2 3 4 5 6 7 8 9 0 1 2 3 4 5 6 7 8 9 0 1 
     +---------------------------------------------------------------+
     |                     magic number ('HDR0')                     |
     +---------------------------------------------------------------+
     |                  length (header size + data)                  |
     +---------------+---------------+-------------------------------+
     |                       32-bit CRC value                        |
     +---------------+---------------+-------------------------------+
     |           TRX flags           |          TRX version          |
     +-------------------------------+-------------------------------+
     |                      Partition offset[0]                      |
     +---------------------------------------------------------------+
     |                      Partition offset[1]                      |
     +---------------------------------------------------------------+
     |                      Partition offset[2]                      |
     +---------------------------------------------------------------+


    There's no need for analysis here. In the part_5 directory in the git repo, I've provided a module that generates a TRX header.

    We also don't need to analyze the Squashfs filesystem. At least not yet. Although there are many variations of Squashfs, there are also a lot of tools that will generate Squashfs images. We'll investigate more closely later, but for now, this is a known quantity.

    When there is only one LZMA section, and it's near the beginning of an image--after the TRX header and before the filesystem--that is often the compressed Linux kernel. That's easy to verify. Extract out that section and decompress it to see if it's a Linux kernel.


    zach@devaron:~/code/wifi-reversing/netgear/r6200 (130) $ binwalk R6200-V1.0.0.28_1.0.24.chk
    DECIMAL    HEX        DESCRIPTION
    -------------------------------------------------------------------------------------------------------------------
    58         0x3A       TRX firmware header, little endian, header size: 28 bytes, image size: 8851456 bytes, CRC32: 0xEE839C0 flags: 0x0, version: 1
    86         0x56       LZMA compressed data, properties: 0x5D, dictionary size: 65536 bytes, uncompressed size: 3920006 bytes
    1328446    0x14453E   Squashfs filesystem, little endian, non-standard signature,  version 3.0, size: 7517734 bytes,  853 inodes, blocksize: 65536 bytes, created: Wed Sep 19 19:27:19 2012
    
    zach@devaron:~/code/wifi-reversing/netgear/r6200 (0) $ dd if=R6200-V1.0.0.28_1.0.24.chk skip=86 count=`expr 1328446 - 86` bs=1 of=kernel.7z
    1328360+0 records in
    1328360+0 records out
    1328360 bytes (1.3 MB) copied, 0.953731 s, 1.4 MB/s
    zach@devaron:~/code/wifi-reversing/netgear/r6200 (0) $ p7zip -d kernel.7z
    
    7-Zip (A) [64] 9.20  Copyright (c) 1999-2010 Igor Pavlov  2010-11-18
    p7zip Version 9.20 (locale=en_US.UTF-8,Utf16=on,HugeFiles=on,4 CPUs)
    
    Processing archive: kernel.7z
    
    Extracting  kernel
    
    Everything is Ok
    
    Size:       3920006
    Compressed: 1328360
    zach@devaron:~/code/wifi-reversing/netgear/r6200 (0) $ strings kernel | grep Linux
    Linux version 2.6.22 (peter@localhost.localdomain) (gcc version 4.2.3) #213 PREEMPT Thu Sep 20 10:22:07 CST 2012
    

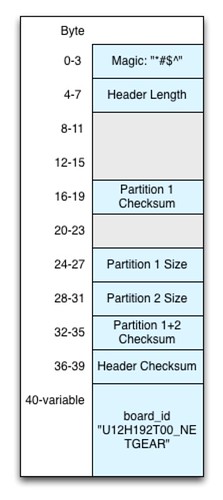
    So we have the TRX header, compressed Linux kernel, and the squashfs filesystem. The TRX header starts at offset 58, leaving only 58 bytes of unidentified data. Not bad! What are the chances that this 58-byte header is just a haiku about a man from Nantucket?

    It's possible this header is documented somewhere, but if so, I'm not aware of it. Even if it is, it's worth going to the trouble of reversing it. Doing so is instructional. It also exposes interesting bugs in the HTTP and UPnP daemons.

    Part 5's example code takes advantage of a project I created, called Bowcaster. Bowcaster has a class called OverflowBuffer that generates a pattern string for debugging buffer overflows. It also gives you the ability to replace sections of that string with things like ROP gadgets, fixed strings, and other data types. The pattern string Bowcaster generates for you looks like:

    Aa0Aa1Aa2Aa3Aa4Aa5Aa6Aa7Aa8Aa9Ab0Ab1Ab2Ab3Ab4Ab5Ab6Ab7Ab8A


    In the pattern string, no sequence of three or more characters is ever repeated. OverflowBuffer provides a find_offset() method. This makes it easy to identify at what offset a given value seen in a register or in memory during a debugging session is found.

    Even though we're not debugging a buffer overflow, the OverflowBuffer class is still useful. As we identify each field and what value it should contain, it's easy to plug in those values at the right offsets as if they are ROP gadgets.

    The following code fragment, taken from part 5's exploit code, uses Bowcaster to generate a stand-in for the header:


    from bowcaster.development import OverflowBuffer
    from bowcaster.development import SectionCreator
    
    class MysteryHeader(object):
        def __init__(self,endianness,size):
            SC=SectionCreator(endianness,logger=logger)
            self.header=OverflowBuffer(endianness,size,
                                overflow_sections=SC.section_list,
                                logger=logger)


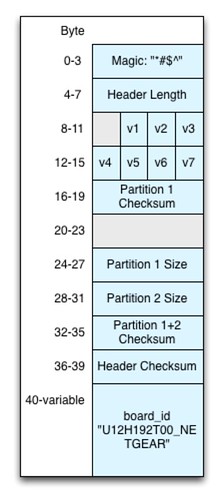
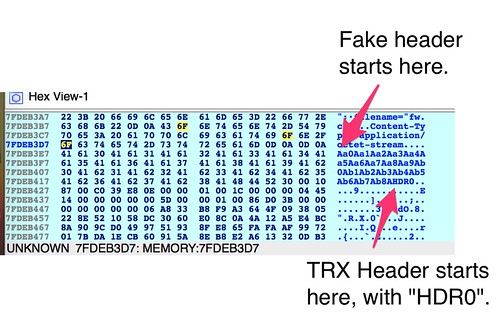
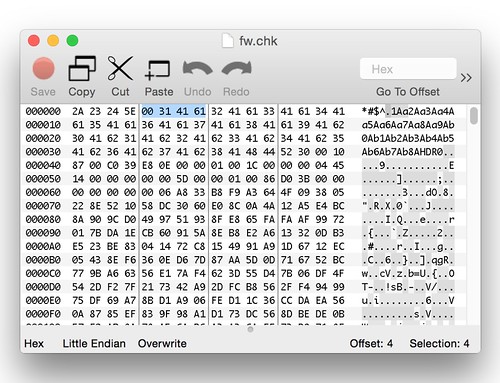
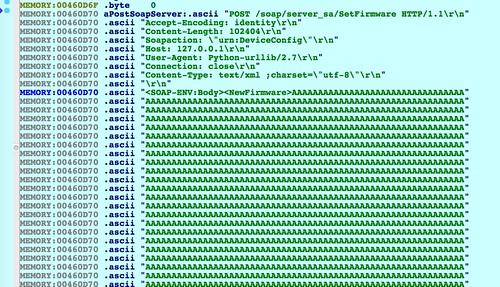
    The stand-in header is shown below:

    fake header in memory
    Above we see Bowcaster's pattern string in memory just prior to the TRX header.

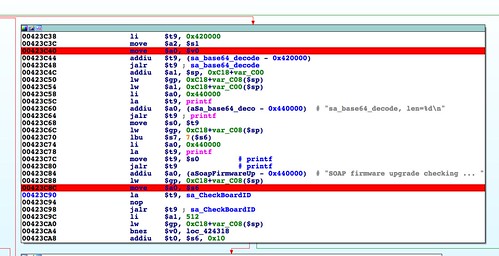
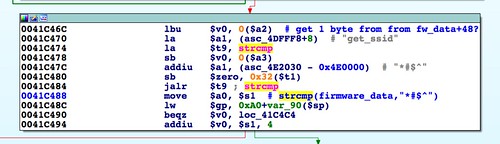
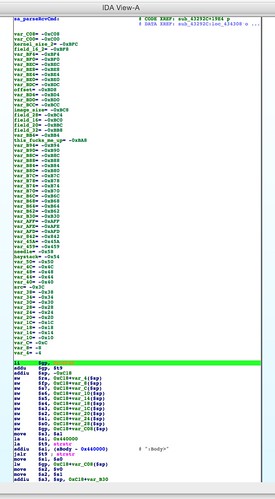
    The first parsing of this header takes place in the function abCheckBoardID(), called by http_d(). In this function the first header field that is inspected is a strcmp() between the string "*#$^" and the firmware data starting at offset 0.
    check magic signature


    This appears to be a magic number or signature. Adding it to our Python header class:

    from bowcaster.development import OverflowBuffer
    from bowcaster.development import SectionCreator
    
    class MysteryHeader(object):
        MAGIC="*#$^\x00"
        MAGIC_OFF=0
        def __init__(self,endianness,size):
            SC=SectionCreator(endianness,logger=logger)
            #add the magic signature "*#$^"
            SC.string_section(self.MAGIC_OFF,self.MAGIC,
                                description="Magic bytes for header.")
                                
            self.header=OverflowBuffer(endianness,size,
                                overflow_sections=SC.section_list,
                                logger=logger)


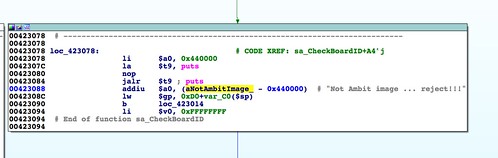
    If the firmware doesn't have this signature, no other parsing takes place. Also, note that the signature string must be null terminated since the comparison is performed using a strcmp().

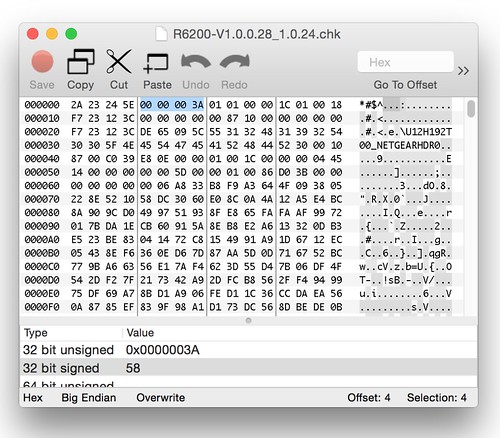
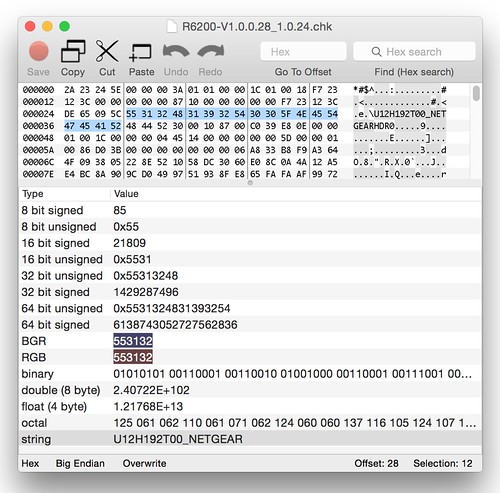
    The next few things worth pointing out involve what appears to be a size field right after the signature string. Here's a look at a hex dump of our generated firmware header:
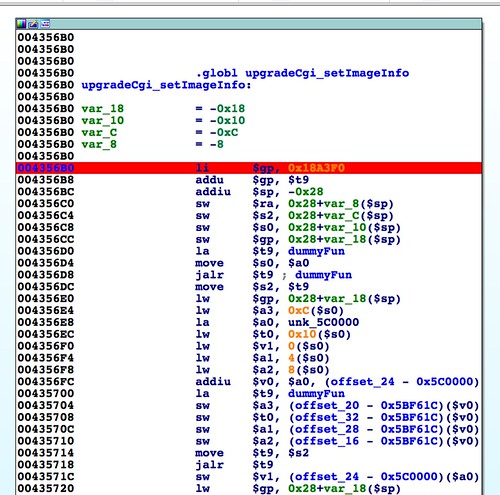
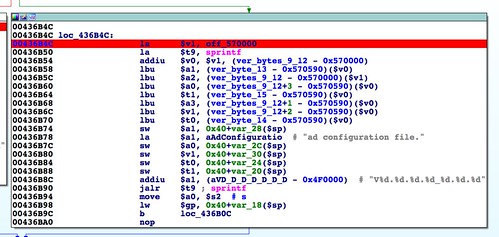
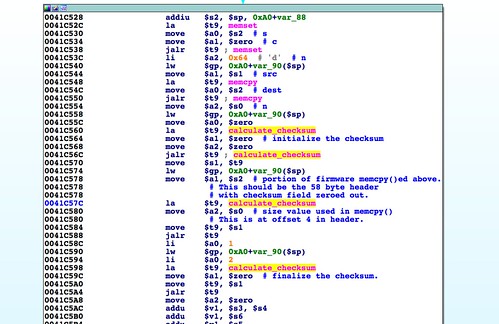
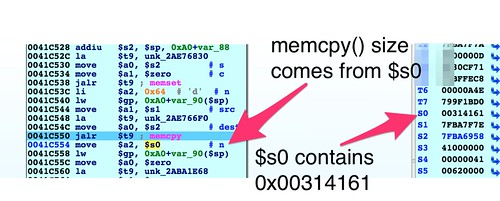
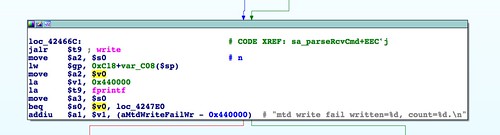
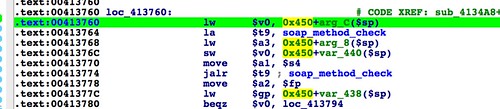
    hex dump of firmware


    Below we see a memcpy() at address 0x0041C550 that uses the size field highlighted in the above hex dump:
    memcpy header size


    There are a few things worth calling out here. First is the byte order. This is a little endian system, so we would expect to see 0x61413100 in register $s0. The byte order in the register matching the byte order on disk means this data is interpreted as big endian. A couple of basic blocks prior to the location of the memcpy() are where the byte-swapping occurs to convert this big endian value to little endian. This is the first sign that the 58-byte leading header should be big endian even though the rest of the file, and indeed the target hardware itself, is little endian.

    Another thing; the null terminator of the "*#$^" string overlaps with the high byte of the size field. It is serendipitous that the size field is big endian encoded and its value is small enough to have a leading zero (the stock firmware's size field contains 0x0000003a). This appears to be an innocuous bug. Instead of a strcmp() to check the signature string, a memcmp() or an integer comparison should have been used.

    But wait, there's more! If you haven't guessed already, this is a buffer overflow. It would be a really nice one, too, except that it requires authentication. I won't discuss it in detail here, because we'll see an identical one when we circle back to upnpd. But if you're playing along at home, feel free check it out. Exploitation is straightforward.

    The last thing worth noting is the OverflowBuffer class's find_offset() method. The value found in register $s0 is a combination of a null terminator plus three characters of the pattern sequence: "\x001Aa". We can use find_offset() to figure out where in the header this value came from:


    zach@devaron:~/code/broken_abandoned/part_5 (0) $ ./buildfw.py find=0x00314161 kernel.lzma squashfs.bin
     [@] Building firmware from input files: ['kernel.lzma', 'squashfs.bin']
     [@] TRX crc32: 0x0ee839c0
     [@] Creating ambit header.
     [@] Finding offset of 0x00314161
     [+] Offset: 4
    

    It's easy to encode the size value into the header using Bowcaster:

    #observed size in real-world examples.
    #this may be variable
    HEADER_SIZE=58
    HEADER_SIZE_OFF=4
    
    SC.gadget_section(self.HEADER_SIZE_OFF,self.size,"Size field representing length of ambit header.")
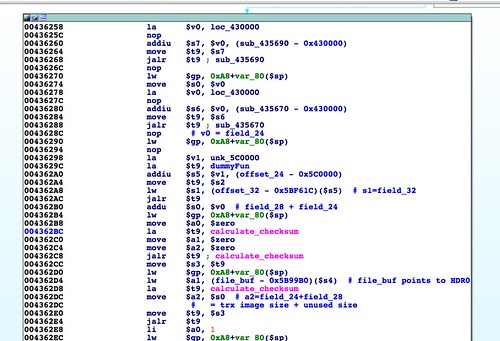
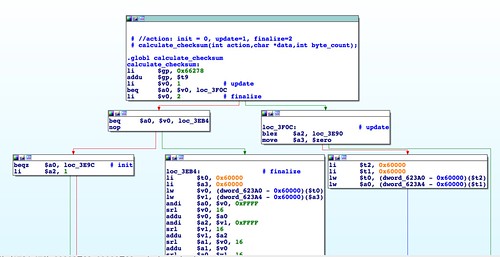
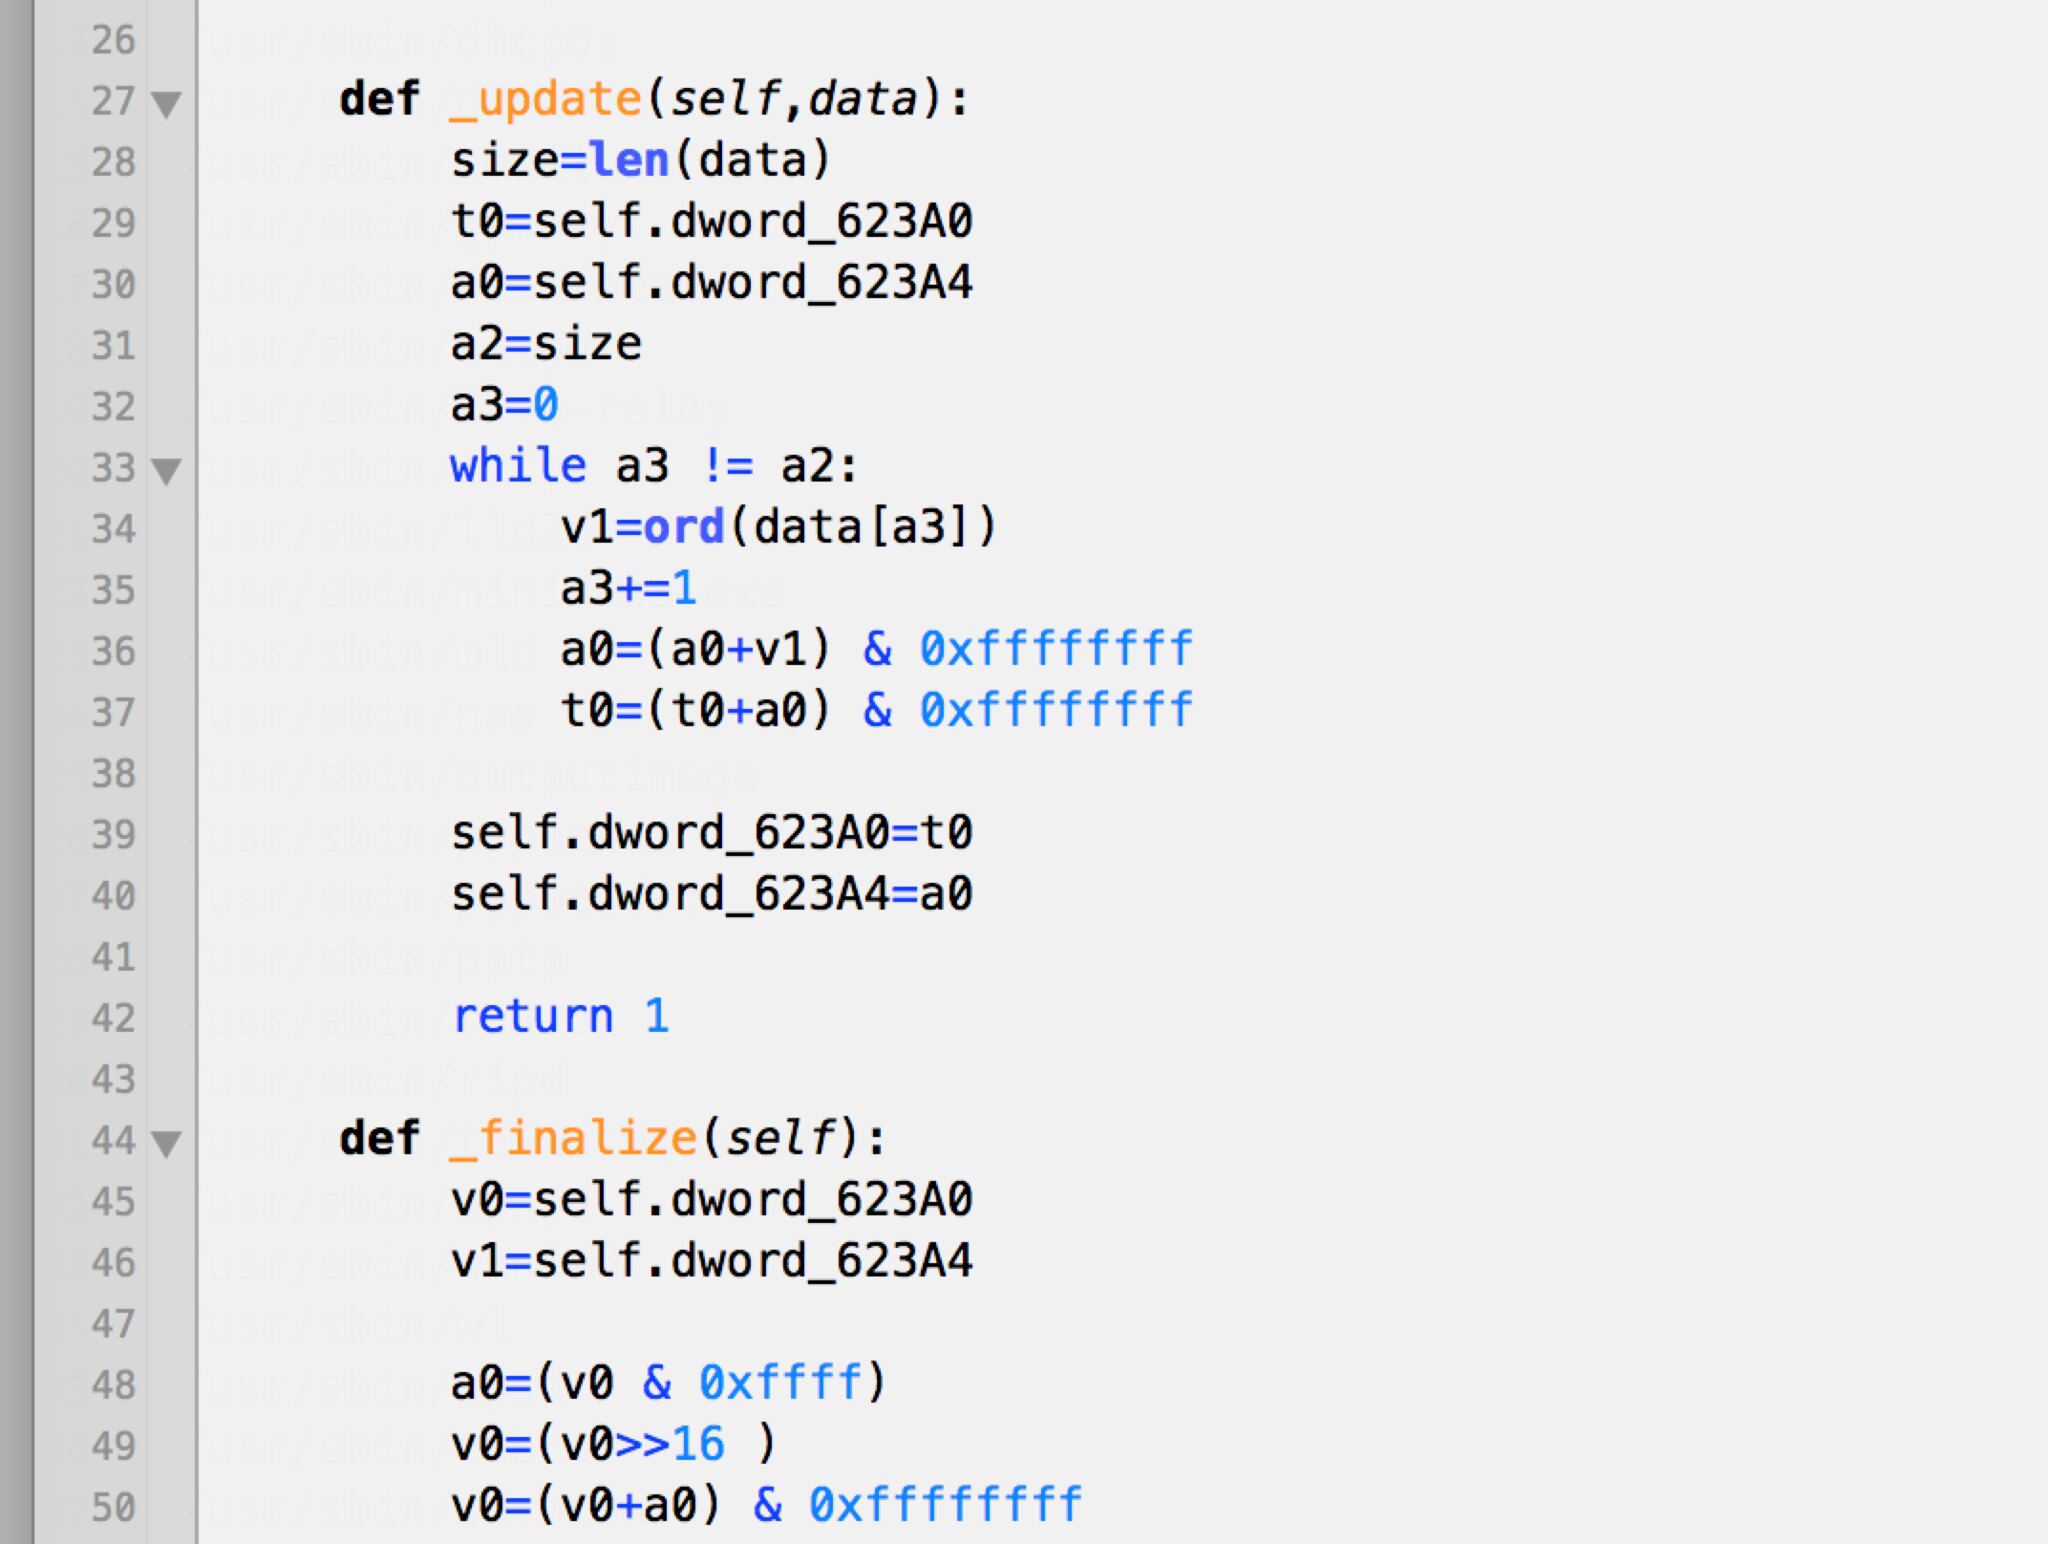
    

    In the next part, I'll continue discussing the abCheckBoardID() function. I'll also discuss a checksum function whose algorithm is difficult to identify and how we deal with that. Then I'll discuss what other functions also are responsible for inspecting and parsing the firmware header.

    Thursday, May 14, 2015

    Broken, Abandoned, and Forgotten Code, Part 4

    In the last post, I described how upnpd's sa_parseRcvCmd() function finds the body of a SOAP request and how it parses that SOAP request. This is a large and complicated function that processes many types of SOAP requests. I demonstrated how to work out the desired path of execution to decode and write firmware. At the end I made an educated guess as to how the SOAP request should be formed, and how the firmware should be represented in the request body.

    In this post, we'll start with some prototype code that will exercise the portions of upnpd we have analyzed so far. It satisfies the conditions that I described in parts 1, 2, and 3. Including:

    • The necessary timing games described in parts 1 and 2
    • The minimum Content-Length described in Part 1
    • The HTTP headers I described in Part 2
    • The SOAP request body I described in part 3

    PoC Exploit Code

    In the previous installment, I updated the git repository with working exploit code that satisfies the above conditions. There is no update to the code for Part 4; the previous part's code is sufficient for now. You can clone the repo from:
    https://github.com/zcutlip/broken_abandoned

    Emulation and Debugging

    Strictly speaking, you don't need to debug upnpd for this installment, although it may help a little. In the next several installations of this series, however, it is assumed that readers who are following along will be emulating and debugging the target processes. If you are following along, it's worth checking out my post on remote debugging with QEMU and IDA Pro. In that article, I walk you through running upnpd in emulation and attaching IDA Pro for debugging.

    The exploit code from Part 3 allows you to specify an optional file as a command line argument to encode into the request. If you don't provide an input file, then the entire firmware data will consist of a string "A"s. This is a good starting point as a long string of "A"s is easy to identify in a debugger's memory trace.

    soap request in memory
    Debugger memory trace showing the SOAP request just before base64 decoding.


    Crash! Hopes and Dreams Wrecked

    When I got to this point in my analysis, naturally the first thing I did was encode a legitimate firmware file into the request, in hopes the firmware would be successfully written. Surprise. This was not successful. The upnpd deamon crashed processing the request. It was at this point in the summer of 2013 that I chucked my laptop into the river and seriously considered a career change.

    Don't chuck your laptop into the river. Instead, let's figure out why the program crashes when given a legitimate firmware. I encoded a legitimate firmware file (obtained from Netgear's support website) into the SOAP request. When I sent that request to the UPnP daemon, the daemon crashed in sa_base64_decode(). My initial assumption was that this was a non-standard, possibly buggy, base64 decoder. I spent some time reversing the base64 decoding function. There was no obvious problem with it. Laptops were chucked.

    It turns out, the problem isn't with the base64 decoder, but something more obvious. The problem is with the buffer that the firmware gets decoded into.

    undersized malloc
    Allocate a 4MB buffer for decoding

    In the above screenshot, we see memory being allocated. The resulting buffer is used to hold the base64 decoded firmware. Note the instruction right after the jump to malloc() (On MIPS, the instruction right after a jump gets executed at the same time as the jump):
    lui    $a0, 0x40
    For those less familiar with MIPS assembly, the lui instruction means "load upper immediate." This will load 0x40 into the upper half of the $a0 register. That means $a0 will contain 0x400000, or 4194304 in decimal. By convention, the $a0 register contains the first argument to a function, in this case malloc(), resulting in a 4MB[1] buffer to decode the firmware into. The size of a typical firmware image for this device is over 8MB:

    zach@devaron:~/code/wifi-reversing/netgear/r6200 (0) $ ls -l R6200-V1.0.0.28_1.0.24.chk
    -rw-r--r-- 1 zach zach 8851514 Jan 27  2014 R6200-V1.0.0.28_1.0.24.chk
    

    In fact it's closer to 9MB. This is what crashes the program. It's unclear why the decoding isn't done in place or why the distance between the opening and closing <NewFirmware> tags, which is calculated right before this operation, isn't used to allocate the buffer.

    distance between open & closing tags


    In any case, this is the surest sign yet that the SetFirmware SOAP action isn't completely implemented, and likely never actually worked in production firmware. If we're going to exercise this functionality without crashing the program, it will be necessary to generate a replacement firmware image than is dramatically smaller[2] than the stock firmware. While possible, this is a non-trivial effort and will come with severe limitations. I'll discuss shrinking the firmware in a later post.

    Before spending time on making a smaller firmware, we have a few other things to work through. We need to work out (1) what sort of validation, if any, is done on the decoded firmware, and (2) how to satisfy that validation. Further, there may be additional bugs in upnpd preventing a firmware from being written to flash memory. If so, there will be no point in figuring out how to shrink the firmware.

    We'll start reverse engineering the firmware format in the next post.

    -----------------------------
    [1] Technically this should be 4MiB, but in order to write that you have to say "mebibytes," which is dumb. If you hear anyone saying "mebibyte" in public, you should punch them in the face. So I'm kicking it old-school with "MB."

    [2] This is the first of two potential buffer overflows that I am aware of in the firmware processing code. Some may see an opportunity here to exploit a heap-based buffer overflow. The approach I went with was to shrink the firmware to avoid crashing upnpd.

    Thursday, May 07, 2015

    Broken, Abandoned, and Forgotten Code, Part 3

    In the previous posts, I talked about the hidden "SetFirmware" SOAP action in the Netgear R6200's UPnP daemon, and the weird timing games we have play to deal with UPnP daemon's broken networking code. I also discussed the haphazard parsing of the HTTP headers across multiple functions. I made a guess at what headers might get our SetFirmware SOAP request passed to the sa_parseRcvCmd() function where hopefully an encapsulated firmware image will be decoded.

    In this post I'll discuss how the sa_parseRcvCmd() function actually parses, or attempts to parse, the SOAP request body.

    Updated Exploit Code

    Previously, I published a git repository containing proof-of-concept code that demonstrates what I discussed in part 2. The repository has been updated for part 3, so if you've cloned it, now is good time to do a pull. The new code will generate the complete SetFirmware SOAP request to flash an updated firmware to the router. You can get the repo here:

    Parsing the SOAP Request Body

    The sa_parseRcvCmd() function is large and difficult to describe. Attempting to reverse engineer the entire function would be tiresome.

    graph view of sa_parseRecvCmd
    Graph view of the sa_parseRcvCmd function
    The above figure is a bird's eye view of this function. To give some perspective, the following figure is the first basic block, which includes the function prologue that sets up a long list of local variables in addition to the first bit of parsing of the SOAP request body.

    prologue of sa_parseRcvCmd
    Check out all those local variables.


    Rather than try to understand the entire function, an easier approach is to decide where in the function we want execution to reach and work backwards from there. This way offers a better chance of finding out if the desired code is reachable, and if it is, what paths will lead there.

    If we spend some time browsing the disassembly, we start to see what appears to be a group of blocks responsible for decoding the firmware from the SOAP request body and writing it to flash memory.

    annotated firmare write


    Looking even closer, we can identify the actual block where the firmware is written to flash.

    write firmware to flash


    It's easy to guess that this block writes to flash memory based on the blocks that lead up to it (an earlier block opens /dev/mtd1 for writing) as well as the error string that will be printed if the write fails. This block at 0x0042466C is our goal and the path that leads to it is how we must get there.

    Working backwards, we come to a block at 0x00423C38 that appears, based on symbols and error strings, to base64 decode the firmware image.

    base64 decoding firmware


    From this we can guess that the firmware image should be base64 encoded into the SOAP request body. We might also guess that the sa_CheckBoardID() function in the above figure performs some sort of parsing of the decoded firmware. Once we've worked out the code path that gets to this block, we'll start working forwards again and spend some time investigating this function.

    Working backwards even further, we find a cluster of blocks with many outbound paths. One of these paths (the block at 0x004238C8) leads to the base64 decoding section. This part of the function is particularly tortured, so here's the summary. This cluster appears to be a part of a large loop. On each pass through the loop, a variable is checked against a number of constants. Each comparison, if a match, results in a branch to a different path of execution. The constant that leads to the base64 decoding operation is 0xFF3A. While not actionable at the moment, this is worth noting.

    Check for 0xFF3A
    Looking for several constants. 0xFF3A leads to firmware decoding.


    From there we can go backwards a little further and reach the function prologue, discussed earlier. With a general idea of the path that is required to get the firmware decoded and written, we can start working forwards again. We now have a better idea of what code paths to focus on and what ones can be ignored.

    It is at the start of sa_parseRcvCmd() where we find the first hints at how the actual body of the SOAP request should be structured. At the very beginning of this function, a substring search for ":Body>" is performed. This would find the canonical <SOAP-ENV:Body> XML tag that surrounds a SOAP message body. It would also find the non-canonical <HOLY-SHIT-THIS-CODE-IS-SHITTY:Body> XML tag. So, you know, whatever.

    Search for Body xml tag
    Naive string search for ":Body>".


    Once the body is located, the function loops over a table of strings, called s_keyword. This is the loop described earlier that checks for a series of constants on each iteration. The s_keyword table is an array of structs that are formed approximately like the following:


    struct k_struct
    {
        uint32_t action;
        char *keyword;
        uint32_t what_the_shit_is_this;
    };
    

    For each of these structures, the request body is searched for an opening and closing XML tag constructed from the corresponding keyword. If a tag is found then the keyword's corresponding action code is checked to determine the code path to take.

    s_keword loop

    Searching Haystack for s_keyword strings
    Perform a strstr() for the first string in the s_keyword table.

    Inspecting the s_keyword table reveals the keyword that corresponds to the magic 0xFF3A action code: "NewFirmware".

    NewFirmware in s_keyword table


    If a <NewFirmware> tag is found inside the soap body tag, then execution proceeds to allocate memory for the decoded firmware, and then on to writing it to flash memory as discussed above.

    In the previous part, I made a guess at what HTTP headers would get the request into the sa_parseRecvCmd function. At this point we now have enough information to speculate as to how the body of the SOAP request should be formed.


    POST /soap/server_sa/SetFirmware HTTP/1.1
    Accept-Encoding: identity
    Content-Length: 102401
    Soapaction: "urn:DeviceConfig"
    Host: 127.0.0.1
    User-Agent: Python-urllib/2.7
    Connection: close
    Content-Type: text/xml ;charset="utf-8"
    
    <SOAP-ENV:Body>
        <NewFirmware>
            <!-- Base64-encoded firmware image goes here? -->
        </NewFirmware>
    </Body>


    If this guess is right, the function first looks for the opening Body tag. Then it looks for one of a variety of inner tags, NewFirmware being the one we're interested in. And inside that, hopefully, it will find our base64 encoded firmware image and will decode and write it to flash. Are we almost home free? Stay tuned.

    Thursday, April 30, 2015

    Broken, Abandoned, and Forgotten Code, Part 2

    In the part 1, I showed how the Netgear R6200's upnpd binary contains what appears to be a hidden SOAP action related to the string "SetFirmware". I also showed how we can get into the upnp_receive_firmware_packets() function if we play timing games and send our request in multiple parts.

    In this part I'll describe additional timing considerations needed to avoid hanging the server. I'll also discuss sloppy parsing of the SOAP request, and I'll make some guesses as to how that request should be formed.

    If you're following along, the first proof-of-concept code is available. Clone my git repo from:
    https://github.com/zcutlip/broken_abandoned

    Each installment in this series that has new or updated code will have a separate directory in the repository. This week's code is under part_2.

    Receiving Firmware Bytes

    The conditions I described previously are:
    • The request should be broken up into two or more parts, with the first being no larger than 8,190 bytes.
    • "Content-length:" should be somewhere in the data, presumably in the HTTP headers (because this would make sense), but not necessarily.
    • The content length should be greater than 102,401 bytes.
    • The string "SetFirmware" should be somewhere in the data.
    If those conditions are satisfied, then upnp_receive_firmware_packets() gets called from upnp_main() at 0x4144E4. In this function, a select(), recv(), and memcpy() loop receives the remainder of the request. This proceeds fairly sanely, with one problem.

    upnp receive firmware select loop
    The select() and recv() loop doesn't check for closed connections

    If the client closes the connection immediately after sending the request, this function gets caught in an infinite loop. The cause for this is a little tricky to explain.

    From the select(2) Linux man page:
    A file descriptor is considered ready if it is possible to perform the corresponding I/O operation (e.g., read(2)) without blocking.

    If the peer has closed its end of the connection, then select() indicates the socket is ready because a recv() would not block. The way Unix TCP sockets work, when the remote end of a connection closes, a recv() on that socket returns zero. In the loop, the return value from recv() is checked for errors (negative values), but if there are no errors, it is assumed that data was received, and the loop returns to select(). This results in the function looping indefinitely if the client shuts down the connection too soon.

    The only two ways this loop ever terminates are (a) if select() or recv() return an error, or (b) if select() returns zero, indicating a timeout with no file descriptors ready for I/O. This means the requesting client must not close the connection immediately after it has sent the request. It should send the request, and then pause before closing the connection. Sleeping a few seconds should suffice.

    However, there's an additional implication. Recall from before that we had to sleep 1-2 seconds in upnp_main() in order to get into this function. It turns out that if we slept longer, then the select() would time out, returning zero, and the loop would end before we had sent the rest of the request. So, while it's critical to sleep a second or two, it's also critical to sleep no more than that.

    In review, the steps should be:

    • Send 8,190 bytes or fewer, but hold the connection open
    • Sleep 1-2 seconds, but no more
    • Send the rest of the request, but hold the connection open
    • Sleep a few more seconds
    • Close the connection


    The following code fragment sends chunks with appropriate sizes and sleep periods to get us into upnp_receive_firmware_packets() and to avoid getting into an infinite loop with select():


    def special_upnp_send(addr,port,data):
        sock=socket.socket(socket.AF_INET,socket.SOCK_STREAM)
        sock.connect((addr,port))
        #only send first 8190 bytes of request
        sock.send(data[:8190]) 
        #sleep to ensure first recv()
        #only gets this first chunk.
        time.sleep(2) 
        #Hopefully in upnp_receiv_firmware_packets()
        #by now, so we can send the rest.
        sock.send(data[8190:])  
        #Sleep a bit more so server doesn't end up
        #in an infinite select() loop.
        #Select's timeout is set to 1 sec,
        #so we need to give enough time
        #for the loop to go back to select,
        #and for the timeout to happen,
        #returning an error.
        time.sleep(10)
        sock.close()
    

    More Broken and Lazy Parsing

    Once the entire request has been received, it is parsed, or "parsed" as it were, piecemeal, across several functions. The upnp_receive_firmware_packets() function calls sub_4134A8(). This function inspects the beginning of the received request (the first 1023 bytes, to be precise) for for the HTTP method. If the request is a POST, the soap_method_check() function is called at 0x413774.

    Check for POST HTTP method
    Checking for the POST HTTP method


    Call to soap_method_check
    Calling soap_method_check()


    In soap_method_check() several naive stristr() calls search for a series of strings across the entire request buffer. Based on several of the more recognizable strings, such as "Public_UPNP_C1", these strings are UPnP control URLs that might be requested by the POST. Although these strings may be placed literally anywhere (starting to sound familiar?) in the request and still trigger their respective code paths, presumably a typical request would be structured like so:

    POST /Public_UPNP_C1 HTTP/1.1

    One of the control URLs that is checked is "soap/server_sa". If that URL is found in the request, the function sa_method_check() is called. Note that we still don't know for certain where the UPnP daemon actually expects the "SetFirmware" string to be located. However, based on other, similar string references, it seems likely that this string should be part of the UPnP control URL: "soap/server_sa/SetFirmware".

    call to sa_method_check
    A call to sa_method_check if "soap/server_sa" is found
    The sa_method_check() function loops over a list of valid strings corresponding to the "SOAPAction:" header, and for each string in the list performs a naive stristr() across the entire request buffer. The string "DeviceConfig", if found anywhere in the request, results in a call to sub_43292C(). This enormous function repeatedly calls sa_findKeyword(), passing it the request buffer as well as various keys to be looked up in the "s_Event" dictionary.

    graph view of sub_43292C
    The enormous graph of sub_43292c(). This function looks for keywords in the SOAP request.


    The sa_findKeyword() function searches the request buffer for the corresponding string from the "s_Event" dictionary. The original "SetFirmware" string is referenced by the key 49. If it is found, again, anywhere in the request, the function sa_parseRcvCmd() is called.

    search for SetFirmware string
    Repeated calls of sa_findKeyword(). Index 49 corresponds to "SetFirmware."


    The following HTTP request headers should, based on what we have observed so far, get the request into the sa_parseRcvCmd() function.


    request="".join["POST /soap/server_sa/SetFirmware HTTP/1.1\r\n",
                     "Accept-Encoding: identity\r\n",
                     "Content-Length: 102401\r\n",
                     "Soapaction: \"urn:DeviceConfig\"\r\n",
                     "Host: 127.0.0.1\r\n",
                     "Connection: close\r\n",
                     "Content-Type: text/xml ;charset=\"utf-8\"\r\n\r\n"]


    Forming an HTTP request that would exercise the proper code path was an exercise in guesswork due to the many naive string searches littered along the way and an absence of anything resembling structured parsing.

    It is in the sa_parseRcvCmd() function that an encoded firmware image is extracted and decoded from the request body, and assuming the right conditions are met, written to the router's flash storage, replacing the existing firmware.

    Up until now, it has remained at least possible, however improbable, that the vendor may have designed a client to send the magic SOAP requests and to play the timing games necessary to exercise the firmware updating functionality. In the next part I'll start discussing sa_parseRcvCmd(),  a complicated function with lots of code paths and lots of bugs. It is also this function where it becomes even clearer that the firmware updating capability of this UPnP server is not completely implemented and cannot actually work under normal conditions.