sa_parseRcvCmd() function. Then I showed where in that function a firmware would be decoded from the SOAP request and written to flash. I showed how to identify a code path that leads to firmware writing. In part four, I showed how an undersized malloc() means a stock firmware crashes upnpd. Although we'll work around that bug later, for this and the next several installments we'll be working out how the firmware image gets parsed so we can create our own.Updated Exploit Code
I last updated the exploit code for part 3, in which I showed how to form the complete SOAP request. In this part, I've added several Python modules to aid in reverse engineering and reconstructing a firmware image. If you've previously cloned the repository, now would be a good time to do a pull. You can clone the git repo from:
Analyzing httpd
We know that the code path in upnpd that accepts a firmware and writes it to flash memory is severely broken. When given a legitimate firmware obtained from Netgear, it crashes. In order to reverse engineer the firmware format, it may be easier to analyze a program that is known to work properly when upgrading: the web interface.In the next several posts I'll describe analysis of the embedded HTTP daemon to understand how it processes a firmware image file. I'll also describe how to use the Bowcaster exploit development framework to aid in dynamic analysis and to develop an understanding of the firmware header composition. The goal is to generate a firmware image out of an existing filesystem and kernel. Bonus points if we can either create a firmware image that is identical to the original or if we can explain what the differences are and why those differences don't get in the way.
You can debug the web server by copying GDB to the physical R6200 router, or you can debug the embedded
httpd in emulation. The first option requires less up-front effort, but the second option is more convenient once you have it working. Running upnpd and httpd in emulation requires faking some hardware and some binary patching. Before proceeding, you may want to read my previous posts on debugging with QEMU and IDA Pro and on patching, emulating and debugging using IDA Pro (which specifically addresses httpd). If you're playing along at home, I strongly recommend getting the web server and the UPnP daemon up and running in QEMU and debugging them with IDA Pro. During the next several posts, there will be a few aspects I don't explain in depth. These these things will be relatively straightforward if you have your working environment set up like mine.Firmware Composition
Before we actually upload a firmware to the web interface, let's first see how a firmware image file is composed, and identify any sections that are already understood and don't need reverse engineering.A good starting point is Craig Heffner's binwalk.
zach@devaron:~/code/wifi-reversing/netgear/r6200 (0) $ binwalk R6200-V1.0.0.28_1.0.24.chk

DECIMAL    HEX        DESCRIPTION
-------------------------------------------------------------------------------------------------------------------
58         0x3A       TRX firmware header, little endian, header size: 28 bytes, image size: 8851456 bytes, CRC32: 0xEE839C0 flags: 0x0, version: 1
86         0x56       LZMA compressed data, properties: 0x5D, dictionary size: 65536 bytes, uncompressed size: 3920006 bytes
1328446    0x14453E   Squashfs filesystem, little endian, non-standard signature,  version 3.0, size: 7517734 bytes,  853 inodes, blocksize: 65536 bytes, created: Wed Sep 19 19:27:19 2012
Binwalk identifies three sections: A TRX header at offset 58, an LZMA section at offset 86, and a Squashfs filesystem at offset 1328446. The TRX header is well understood. It's a firmware header format that dates back to at least the venerable Linksys WRT54g.
Here's a diagram (courtesy of the OpenWRT wiki) of the TRX header's format:
0                   1                   2                   3
  0 1 2 3 4 5 6 7 8 9 0 1 2 3 4 5 6 7 8 9 0 1 2 3 4 5 6 7 8 9 0 1
 +---------------------------------------------------------------+
 |                     magic number ('HDR0')                     |
 +---------------------------------------------------------------+
 |                  length (header size + data)                  |
 +---------------+---------------+-------------------------------+
 |                       32-bit CRC value                        |
 +---------------+---------------+-------------------------------+
 |           TRX flags           |          TRX version          |
 +-------------------------------+-------------------------------+
 |                      Partition offset[0]                      |
 +---------------------------------------------------------------+
 |                      Partition offset[1]                      |
 +---------------------------------------------------------------+
 |                      Partition offset[2]                      |
 +---------------------------------------------------------------+
There's no need for analysis here. In the
part_5 directory in the git repo, I've provided a module that generates a TRX header.We also don't need to analyze the Squashfs filesystem. At least not yet. Although there are many variations of Squashfs, there are also a lot of tools that will generate Squashfs images. We'll investigate more closely later, but for now, this is a known quantity.
When there is only one LZMA section, and it's near the beginning of an image--after the TRX header and before the filesystem--that is often the compressed Linux kernel. That's easy to verify. Extract out that section and decompress it to see if it's a Linux kernel.
zach@devaron:~/code/wifi-reversing/netgear/r6200 (130) $ binwalk R6200-V1.0.0.28_1.0.24.chk
DECIMAL    HEX        DESCRIPTION
-------------------------------------------------------------------------------------------------------------------
58         0x3A       TRX firmware header, little endian, header size: 28 bytes, image size: 8851456 bytes, CRC32: 0xEE839C0 flags: 0x0, version: 1
86         0x56       LZMA compressed data, properties: 0x5D, dictionary size: 65536 bytes, uncompressed size: 3920006 bytes
1328446    0x14453E   Squashfs filesystem, little endian, non-standard signature,  version 3.0, size: 7517734 bytes,  853 inodes, blocksize: 65536 bytes, created: Wed Sep 19 19:27:19 2012

zach@devaron:~/code/wifi-reversing/netgear/r6200 (0) $ dd if=R6200-V1.0.0.28_1.0.24.chk skip=86 count=`expr 1328446 - 86` bs=1 of=kernel.7z
1328360+0 records in
1328360+0 records out
1328360 bytes (1.3 MB) copied, 0.953731 s, 1.4 MB/s
zach@devaron:~/code/wifi-reversing/netgear/r6200 (0) $ p7zip -d kernel.7z

7-Zip (A) [64] 9.20  Copyright (c) 1999-2010 Igor Pavlov  2010-11-18
p7zip Version 9.20 (locale=en_US.UTF-8,Utf16=on,HugeFiles=on,4 CPUs)

Processing archive: kernel.7z

Extracting  kernel

Everything is Ok

Size:       3920006
Compressed: 1328360
zach@devaron:~/code/wifi-reversing/netgear/r6200 (0) $ strings kernel | grep Linux
Linux version 2.6.22 (peter@localhost.localdomain) (gcc version 4.2.3) #213 PREEMPT Thu Sep 20 10:22:07 CST 2012
So we have the TRX header, compressed Linux kernel, and the squashfs filesystem. The TRX header starts at offset 58, leaving only 58 bytes of unidentified data. Not bad! What are the chances that this 58-byte header is just a haiku about a man from Nantucket?
It's possible this header is documented somewhere, but if so, I'm not aware of it. Even if it is, it's worth going to the trouble of reversing it. Doing so is instructional. It also exposes interesting bugs in the HTTP and UPnP daemons.
Part 5's example code takes advantage of a project I created, called Bowcaster. Bowcaster has a class called
OverflowBuffer that generates a pattern string for debugging buffer overflows. It also gives you the ability to replace sections of that string with things like ROP gadgets, fixed strings, and other data types. The pattern string Bowcaster generates for you looks like:
Aa0Aa1Aa2Aa3Aa4Aa5Aa6Aa7Aa8Aa9Ab0Ab1Ab2Ab3Ab4Ab5Ab6Ab7Ab8A
In the pattern string, no sequence of three or more characters is ever repeated.
OverflowBuffer provides a find_offset() method. This makes it easy to identify at what offset a given value seen in a register or in memory during a debugging session is found.Even though we're not debugging a buffer overflow, the
OverflowBuffer class is still useful. As we identify each field and what value it should contain, it's easy to plug in those values at the right offsets as if they are ROP gadgets.The following code fragment, taken from part 5's exploit code, uses Bowcaster to generate a stand-in for the header:
from bowcaster.development import OverflowBuffer
from bowcaster.development import SectionCreator

class MysteryHeader(object):
    def __init__(self,endianness,size):
        SC=SectionCreator(endianness,logger=logger)
        self.header=OverflowBuffer(endianness,size,
                            overflow_sections=SC.section_list,
                            logger=logger)
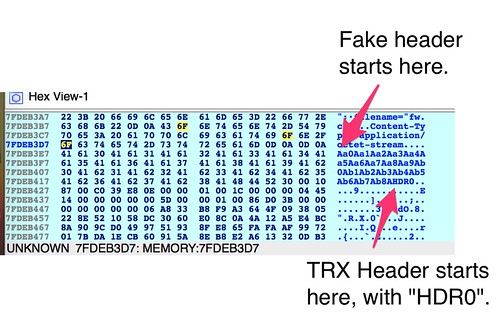
The stand-in header is shown below:
Above we see Bowcaster's pattern string in memory just prior to the TRX header.
The first parsing of this header takes place in the function
abCheckBoardID(), called by http_d(). In this function the first header field that is inspected is a strcmp() between the string "*#$^" and the firmware data starting at offset 0.This appears to be a magic number or signature. Adding it to our Python header class:
from bowcaster.development import OverflowBuffer
from bowcaster.development import SectionCreator

class MysteryHeader(object):
    MAGIC="*#$^\x00"
    MAGIC_OFF=0
    def __init__(self,endianness,size):
        SC=SectionCreator(endianness,logger=logger)
        #add the magic signature "*#$^"
        SC.string_section(self.MAGIC_OFF,self.MAGIC,
                            description="Magic bytes for header.")

        self.header=OverflowBuffer(endianness,size,
                            overflow_sections=SC.section_list,
                            logger=logger)
If the firmware doesn't have this signature, no other parsing takes place. Also, note that the signature string must be null terminated since the comparison is performed using a
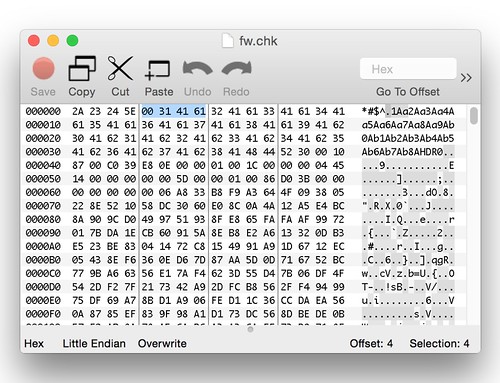
strcmp().The next few things worth pointing out involve what appears to be a size field right after the signature string. Here's a look at a hex dump of our generated firmware header:
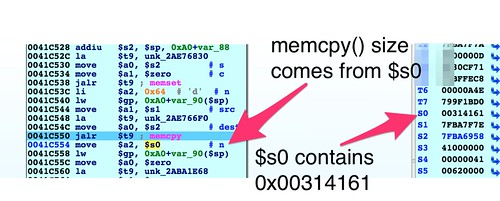
Below we see a
memcpy() at address 0x0041C550 that uses the size field highlighted in the above hex dump:There are a few things worth calling out here. First is the byte order. This is a little endian system, so we would expect to see 0x61413100 in register
$s0. The byte order in the register matching the byte order on disk means this data is interpreted as big endian. A couple of basic blocks prior to the location of the memcpy() are where the byte-swapping occurs to convert this big endian value to little endian. This is the first sign that the 58-byte leading header should be big endian even though the rest of the file, and indeed the target hardware itself, is little endian.Another thing; the null terminator of the "
*#$^" string overlaps with the high byte of the size field. It is serendipitous that the size field is big endian encoded and its value is small enough to have a leading zero (the stock firmware's size field contains 0x0000003a). This appears to be an innocuous bug. Instead of a strcmp() to check the signature string, a memcmp() or an integer comparison should have been used.But wait, there's more! If you haven't guessed already, this is a buffer overflow. It would be a really nice one, too, except that it requires authentication. I won't discuss it in detail here, because we'll see an identical one when we circle back to
upnpd. But if you're playing along at home, feel free check it out. Exploitation is straightforward.The last thing worth noting is the
OverflowBuffer class's find_offset() method. The value found in register $s0 is a combination of a null terminator plus three characters of the pattern sequence: "\x001Aa". We can use find_offset() to figure out where in the header this value came from:zach@devaron:~/code/broken_abandoned/part_5 (0) $ ./buildfw.py find=0x00314161 kernel.lzma squashfs.bin [@] Building firmware from input files: ['kernel.lzma', 'squashfs.bin'] [@] TRX crc32: 0x0ee839c0 [@] Creating ambit header. [@] Finding offset of 0x00314161 [+] Offset: 4
It's easy to encode the size value into the header using Bowcaster:
#observed size in real-world examples.
#this may be variable
HEADER_SIZE=58
HEADER_SIZE_OFF=4

SC.gadget_section(self.HEADER_SIZE_OFF,self.size,"Size field representing length of ambit header.")
In the next part, I'll continue discussing the
abCheckBoardID() function. I'll also discuss a checksum function whose algorithm is difficult to identify and how we deal with that. Then I'll discuss what other functions also are responsible for inspecting and parsing the firmware header.


