An upcoming series of posts will focus on reverse engineering the UPnP daemon for one of Netgear's more popular wireless routers. This post will describe how to run that daemon in system emulation so that it can analyzed in a debugger.
Prerequisites
First, I'd recommend reading the description I posted of my workspace and tools that I use. Here's a link.You'll need an emulated MIPS Linux environment. For that, I'll refer readers to my previous post on setting up QEMU.
You'll also need a MIPS Linux cross compiler. I won't go into the details of setting this up because cross compilers are kind of a mess. Sometimes you need an older toolchain, and other times you need a newer toolchain. A good starting point is to build both big endian and little endian MIPS Linux toolchains using the uClibc buildroot project. In addition to that, whenever I find other cross compiling toolchains, I save them. A good source of older toolchains is the GPL release tarballs that vendors like D-Link and Netgear make available.
Once you have a cross compiling toolchain for your target architecture, you'll need to build GDB for that target. At the very least, you'll need gdbserver statically compiled for the target. If you want to remotely debug using GDB, you'll need gdb compiled to run on your local architecture (e.g., x86-64) and to debug your target architecture (e.g., mips or mipsel). Again, I won't go into building these tools, but if you have your toolchains set up, it shouldn't be too bad.
I use IDA Pro, so that's how I'll describe remote debugging. However, if you want to use gdb check out my MIPS gdbinit file: https://github.com/zcutlip/gdbinit-mips
Emulating a Simple Binary
Assuming you've gotten the tools described above set up and working properly, you should now be able to SSH into your emulated MIPS system. As described in my Debian MIPS QEMU post, I like to bridge QEMU's interface to VMWare's NAT interface so I can SSH in from my Mac, without first shelling into my Ubuntu VM. This also allows me to mount my Mac's workspace right in the QEMU system via NFS. That way whether I'm working in the host environment, in Ubuntu, or in QEMU, I'm working with the same workspace.
zach@malastare:~ (130) $ ssh root@192.168.127.141
root@192.168.127.141's password:
Linux debian-mipsel 2.6.32-5-4kc-malta #1 Wed Jan 12 06:13:27 UTC 2011 mips

root@debian-mipsel:~# mount
/dev/sda1 on / type ext3 (rw,errors=remount-ro)
malastare:/Users/share/code on /root/code type nfs (rw,addr=192.168.127.1)
root@debian-mipsel:~# cd code
root@debian-mipsel:~/code#
Once shelled into your emulated system, cd into the extracted file system from your device's firmware. You should be able to chroot into the firmware's root file system. You need to use chroot since the target binary is linked against the firmware's libraries and likely won't work with Debian's shared libraries.
root@debian-mipsel:~# cd code/wifi-reversing/netgear/r6200/extracted-1.0.0.28/rootfs/
root@debian-mipsel:~/code/wifi-reversing/netgear/r6200/extracted-1.0.0.28/rootfs# file ./bin/ls
./bin/ls: symbolic link to `busybox'
root@debian-mipsel:~/code/wifi-reversing/netgear/r6200/extracted-1.0.0.28/rootfs# file ./bin/busybox
./bin/busybox: ELF 32-bit LSB executable, MIPS, MIPS32 version 1 (SYSV), dynamically linked (uses shared libs), stripped
root@debian-mipsel:~/code/wifi-reversing/netgear/r6200/extracted-1.0.0.28/rootfs# chroot . /bin/ls -l /bin/busybox
-rwxr-xr-x    1 10001    80         276413 Sep 20  2012 /bin/busybox
root@debian-mipsel:~/code/wifi-reversing/netgear/r6200/extracted-1.0.0.28/rootfs#
In the above example, I have changed into the root directory of the extracted file system. Then using the file command I show that busybox is a little endian MIPS executable. Then I chrooted into the extracted root directory and ran bin/ls, which is a symlink to busybox.
If you attempt to simply start a chrooted shell with "chroot .", it won't work. Your user's default shell is bash, and most embedded devices don't have bash.
root@debian-mipsel:~/code/wifi-reversing/netgear/r6200/extracted-1.0.0.28/rootfs# chroot .
chroot: failed to run command `/bin/bash': No such file or directory
root@debian-mipsel:~/code/wifi-reversing/netgear/r6200/extracted-1.0.0.28/rootfs#
Instead you can chroot and execute bin/sh:
root@debian-mipsel:~/code/wifi-reversing/netgear/r6200/extracted-1.0.0.28/rootfs# chroot . /bin/sh


BusyBox v1.7.2 (2012-09-20 10:26:08 CST) built-in shell (ash)
Enter 'help' for a list of built-in commands.

#
#
# exit
root@debian-mipsel:~/code/wifi-reversing/netgear/r6200/extracted-1.0.0.28/rootfs#
Hardware Workarounds
Even with the necessary tools and emulation environment set up and working properly, you can still run into roadblocks. Although QEMU does a pretty good job of emulating the core chipset, including the CPU, there is often hardware the binary you're trying to run is expecting that QEMU can't provide. If you try to emulate something simple like /bin/ls, that will usually work fine. But something more complicated such as the UPnP daemon will almost certainly have particular hardware dependencies that QEMU isn't going to satisfy. This is especially true for programs whose job it is to manage the embedded system's hardware, such as turning wireless adapters on or off.
The most common problem you will run into when running system services such as the web server or UPnP daemon is the lack of NVRAM. Non-volatile RAM is usually a partition of the device's flash storage that contains configuration parameters. When a daemon starts up, it will usually attempt to query NVRAM for its run-time configuration. Sometimes a daemon will query NVRAM for tens or even hundreds of parameters.
To work around the lack of NVRAM in emulation, I wrote a library called nvram-faker. The nvram-faker library should be preloaded using LD_PRELOAD when you run your binary. It will intercept calls to nvram_get(), normally provided by libnvram.so. Rather than attempting to query NVRAM, nvram-faker will query an INI-style configuration file that you provide.
The included README provides a more complete description. Here's a link to the project:
Even with NVRAM solved, the program may make assumptions about what hardware is present. If that hardware isn't present, the program may not run or, if it does run, it may behave differently than it would on the target hardware. In this case, you may need to patch the binary. The specifics of binary patching vary from one situation to another. It really depends on what hardware is expected, and what the behavior is when it is absent. You may need to patch out a conditional branch that is taken if hardware is missing. You may need to patch out an ioctl() to a special device if you're trying to substitute a regular file for reading and writing. I won't cover patching in detail here, but I did discuss it briefly in my BT HomeHub paper and the corresponding talk I gave at 44CON. Here is a link to those resources:
http://shadow-file.blogspot.com/2013/09/44con-resources.html
Attaching the Debugger
Once you've got your binary running in QEMU, it's time to attach a debugger. For this, you'll need gdbserver. Again, this tool should be statically compiled for your target architecture because you'll be running it in a chroot. You'll need to copy it into the root directory of the extracted filesystem.
# ./gdbserver
Usage: gdbserver [OPTIONS] COMM PROG [ARGS ...]
 gdbserver [OPTIONS] --attach COMM PID
 gdbserver [OPTIONS] --multi COMM

COMM may either be a tty device (for serial debugging), or
HOST:PORT to listen for a TCP connection.

Options:
  --debug               Enable general debugging output.
  --remote-debug        Enable remote protocol debugging output.
  --version             Display version information and exit.
  --wrapper WRAPPER --  Run WRAPPER to start new programs.
  --once                Exit after the first connection has closed.
#
You can either attach gdbserver to a running process, or use it to execute your binary directly. If you need to debug initialization routines that only happen once, you'll want to do the latter.
On the other hand, you may want to wait until the daemon forks. As far as I know there's no way to have IDA follow forked processes. You need to attach to them separately. If you do it this way, you can attach to the already running process from outside the chroot.
The following shell script will execute upnpd in a chroot. If DEBUG is set to 1, it will attach to upnpd and pause for a remote debugging session on port 1234.
#!/bin/sh
ROOTFS="/root/code/wifi-reversing/netgear/r6200/extracted-1.0.0.28/rootfs"
chroot $ROOTFS /bin/sh -c "LD_PRELOAD=/libnvram-faker.so /usr/sbin/upnpd"

#Give upnpd a bit to initialize and fork into the background.
sleep 3;

if [ "x1" = "x$DEBUG" ];
then

 $ROOTFS/gdbserver --attach 0.0.0.0:1234 $(pgrep upnpd)
fi
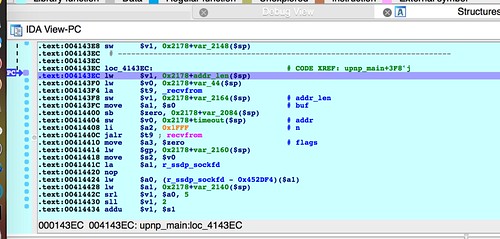
You can create a breakpoint right before the call to recvfrom() and then verify the debugger breaks when you send upnpd an M-SEARCH packet.
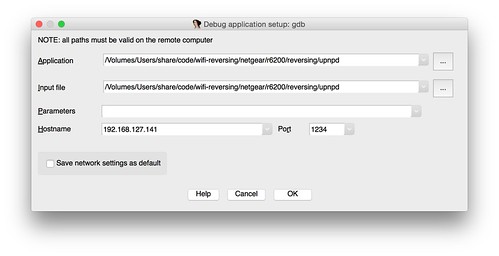
Then, in IDA, go to Process Options under the Debugger menu. Set "hostname" to the IP address of your QEMU system, and set the port to the port you have gdbserver listening on. I use 1234.
Accept the settings, then attach to the remote debugging session with IDA's ctrl+8 hotkey. Hit ctrl+8 again to resume execution. You should be able to send an M-SEARCH packet[1] and see the debugger hit the breakpoint.
There is obviously a lot more to explore, and there are lots of situations that can come up that aren't addressed here, but hopefully this gets you started.
[1] I recommend Craig Heffner's miranda tool for UPnP analysis:
https://code.google.com/p/miranda-upnp/


