upnpd after spending some time analyzing httpd. The HTTP daemon provided an understanding of how the firmware header is supposed to be constructed. We found a header parsing function in upnpd that was similar to its httpd counterpart. So similar that it has the same memcpy() buffer overflow. This overflow was more interesting this time around, as it did not require authentication. Additionally, we discovered a reference to the "Ambit image" via an error message string. Presumably an ambit image is a firmware format analogous to TRX. In this case, however, the ambit image encapsulates a TRX image.In this part we will identify more fields of the Ambit header, as well as run up against a limitation of QEMU: attempts to open and write to the flash memory device will fail since, in emulation, there is no actual flash memory. We'll need to patch the
upnpd binary in order to work around this. I previously covered binary patching for emulation here.Updated Exploit Code
The
janky_ambit_header.py module has been updated to reflect the additional fields we add to the header in this part. You can find the updated code and README in the part_9 directory. Now is a good time to do a pull or to clone the repository from:We Should Have Checked the Firmware Size Before Now
Thesa_CheckBoardID() function, analogous to abCheckBoardID() from httpd, returns success if the following is true:- The ambit magic number is found at offset 0.
- The header size field doesn't overflow during the
memcpy()operation - The checksum in the ambit header matches the header's actual checksum,
- The proper board ID string is found and the end of the ambit header.
sa_CheckBoardID(), at 0x00423CAC, we see several 32-bit fields parsed out. It remains to be seen how these values get used; presumably they are the same fields and get used the same way as in the httpd firmware validation. Then the size field from offset 24 is checked. It must be less than 0x400001, or 4194305, or firmware validation fails.Somewhat ironically, this check can never fail, assuming the size field is truthful. If the firmware image is larger than this size, then
upnpd will crash, having overflowed the 4MB buffer allocated for base64 decoding. In our proof-of-concept code, the size field contains a bogus value, and execution skips down to an error message.The error message belies someone's continued confusion over exactly how this capability is supposed to work. If the size validation fails, the error message is "The kernel image is over 512Kbytes!", although the test was against a 4MB upper limit.
Inserting the proper TRX image size (or "kernel size" as the error message indicates) at offset 24 gets past this step. After the check, a function is called at 0x0042428C,
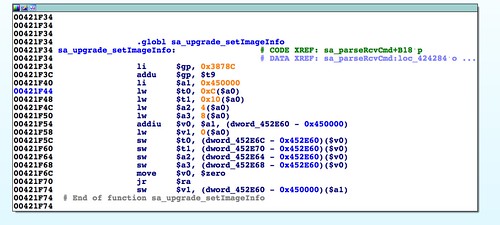
sa_upgrade_setImageInfo(), that parses out several more values from the header. Again, no validation is performed on these values at this point. It remains to be seen if they are the same fields and will be used in the same way as in httpd.After this function is called, things begin to get interesting in a few ways. After a temporary "upgrade" file is created (but never used; wtf),
/dev/mtd1 device is opened. You'll need to work around the fact that QEMU doesn't provide this device. The following following things will fail if not addressed.First, opening mtd1 will fail if it doesn't already exist. Create an empty file to ensure the
open() operation is successful. |
| Opening /dev/mtd1 with O_RDWR. |
Next, a series of
ioctl()s is performed on the open file descriptor. To understand what these operations do, it's helpful to refer to mtd.c from the OpenWRT source code as a guide.The first
ioctl() will fail in emulation since we're just providing a regular file, not a device node. Patch out this operation with something that puts 0 in $v0, such as xor $v0,$v0. |
| ioctl is patched out. |
This
ioctl() we just patched out obtains, among other things, the erase size (i.e., block size) for the mtd device. We can simulate that result by patching at 0x0042453C where the the erase size is loaded into register $s5.It doesn't matter a great deal what you use for the erase size in emulation. The write loop will write the firmware in blocks of that size, then it will write any remaining fractional block at the end. An actual R6200 device reports a block size of 65536, or 0x10000, so that's a good number to use. Patching this instruction with:
lui $s5, 1loads 1 into the upper half of register $s5 and 0x0 into the lower half, resulting in a value of 0x10000.
 |
| Patch in a constant 0x10000 for mtd1 block size. |
Next, in the basic block starting at 0x004245D0, there are two more
ioctl()s. The first one most likely unlocks the current portion of flash for writing. The return value from it isn't checked, end execution immediately proceeds to the second. Based on the error message, the second one erases the block of flash so it can be rewritten. With our fake /dev/mtd1 there's no need to erase, so we can patch out this operation as before. |
Patch out the ioctl() to erase flash memory. |
Now, having patched out the
ioctl()s that fail in emulation, writing to a regular file should work as normal. There is one more field that, while not validated directly, does affect what data gets written. When analyzing httpd, we discovered the field at offset 28 that contains the size of a theoretical second partition. In stock firmware this field is zeroed out. In upnpd, at 0x004245C0, this value is added to the address of the TRX image, and the result is the start of data that gets written to flash.| The start of firmware data is calculated. |
In other words, the pointer to data that gets written is calculated as:
<Address of firmware image> + <ambit header size> + <partition 2 size> = <start of data to write>
This doesn't make sense and further belies the programmer's confusion over how this algorithm should work and how the firmware should be formatted. At any rate, if we zero out the field at byte 28, everything works fine. The address of the TRX image will be the start of data written to flash.
At this stage
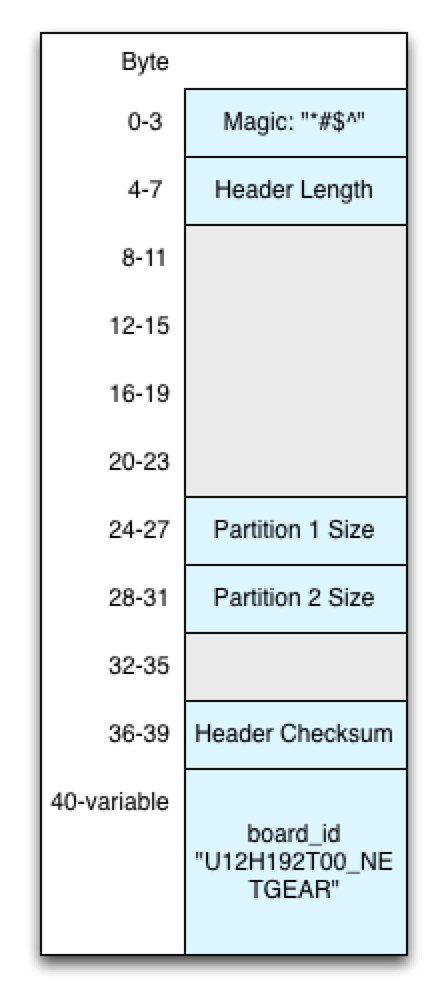
upnpd is ready to write our firmware to /dev/mtd1. Let's have a review of what portions of the ambit header had to be verified before getting here.There's our familiar ambit header. It looks similar to the header diagram from our
httpd analysis, except there's still lot of gray in there. Only six fields have been validated by upnpd up to this point:- Ambit magic number
- Header length
- Header checksum
- TRX image size (partition 1, aka "kernel")
- Partition 2 size (not validated, but affects what gets written to flash)
- Board ID string
upnpd, my QEMU machine rebooted. This is because after the write loop, upnpd triggers a reboot so the new firmware will take effect. Our fake "/dev/mtd1" has even grown to 3.9MB as a result of the firmware writing.zach@devaron $ ls -l mtd1 -rw-r--r-- 1 root 80 3900028 Mar 20 14:30 mtd1
At this point we've successfully exploited the
SetFirmware UPnP SOAP action. We've gone as far as we can go with emulation. From here we'll move to physical hardware to test and develop the deployment of our firmware. In the next post, I'll describe connecting to the R6200 router's debug interface over its UART connection, so get your soldering iron ready.Spoiler: I'll go ahead and say we're not quite home free yet. Don't attempt to generate an image and flash it to your router yet. At best, the write will still fail. At worst, you'll brick it. Besides not having generated a valid squashfs filesystem and TRX image, there at least two more header fields that will trip you up before you're done. Once we get access over UART figured out, it will be possible to recover a bricked device.


