Thursday, June 25, 2015

Broken, Abandoned, and Forgotten Code, Part 9

In the previous part, we switched gears back to the Netgear R6200 upnpd after spending some time analyzing httpd. The HTTP daemon provided an understanding of how the firmware header is supposed to be constructed. We found a header parsing function in upnpd that was similar to its httpd counterpart. So similar that it has the same memcpy() buffer overflow. This overflow was more interesting this time around, as it did not require authentication. Additionally, we discovered a reference to the "Ambit image" via an error message string. Presumably an ambit image is a firmware format analogous to TRX. In this case, however, the ambit image encapsulates a TRX image.

In this part we will identify more fields of the Ambit header, as well as run up against a limitation of QEMU: attempts to open and write to the flash memory device will fail since, in emulation, there is no actual flash memory. We'll need to patch the upnpd binary in order to work around this. I previously covered binary patching for emulation here.

Updated Exploit Code

The janky_ambit_header.py module has been updated to reflect the additional fields we add to the header in this part. You can find the updated code and README in the part_9 directory. Now is a good time to do a pull or to clone the repository from:

We Should Have Checked the Firmware Size Before Now

The sa_CheckBoardID() function, analogous to abCheckBoardID() from httpd, returns success if the following is true:
  • The ambit magic number is found at offset 0.
  • The header size field doesn't overflow during the memcpy() operation
  • The checksum in the ambit header matches the header's actual checksum,
  • The proper board ID string is found and the end of the ambit header.
After sa_CheckBoardID(), at 0x00423CAC, we see several 32-bit fields parsed out. It remains to be seen how these values get used; presumably they are the same fields and get used the same way as in the httpd firmware validation. Then the size field from offset 24 is checked. It must be less than 0x400001, or 4194305, or firmware validation fails.

Check image size < 4MB


Somewhat ironically, this check can never fail, assuming the size field is truthful. If the firmware image is larger than this size, then upnpd will crash, having overflowed the 4MB buffer allocated for base64 decoding. In our proof-of-concept code, the size field contains a bogus value, and execution skips down to an error message.

Error message, image size too large


The error message belies someone's continued confusion over exactly how this capability is supposed to work. If the size validation fails, the error message is "The kernel image is over 512Kbytes!", although the test was against a 4MB upper limit.

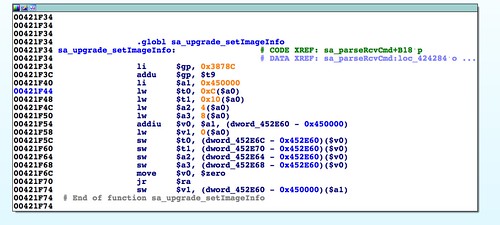
Inserting the proper TRX image size (or "kernel size" as the error message indicates) at offset 24 gets past this step. After the check, a function is called at 0x0042428C, sa_upgrade_setImageInfo(), that parses out several more values from the header. Again, no validation is performed on these values at this point. It remains to be seen if they are the same fields and will be used in the same way as in httpd.

sa_upgrade_setImageInfo()


After this function is called, things begin to get interesting in a few ways. After a temporary "upgrade" file is created (but never used; wtf), /dev/mtd1 device is opened. You'll need to work around the fact that QEMU doesn't provide this device. The following following things will fail if not addressed.

First, opening mtd1 will fail if it doesn't already exist. Create an empty file to ensure the open() operation is successful.

open /dev/mtd1
Opening /dev/mtd1 with O_RDWR.


Next, a series of ioctl()s is performed on the open file descriptor. To understand what these operations do, it's helpful to refer to mtd.c from the OpenWRT source code as a guide.

Calling ioctl on /dev/mtd1


The first ioctl() will fail in emulation since we're just providing a regular file, not a device node. Patch out this operation with something that puts 0 in $v0, such as xor $v0,$v0.

Call to ioctl patched out.
ioctl is patched out.


This ioctl() we just patched out obtains, among other things, the erase size (i.e., block size) for the mtd device. We can simulate that result by patching at 0x0042453C where the the erase size is loaded into register $s5.

Obtain block size for mtd1.


It doesn't matter a great deal what you use for the erase size in emulation. The write loop will write the firmware in blocks of that size, then it will write any remaining fractional block at the end. An actual R6200 device reports a block size of 65536, or 0x10000, so that's a good number to use. Patching this instruction with:

lui $s5, 1

loads 1 into the upper half of register $s5 and 0x0 into the lower half, resulting in a value of 0x10000.

Patch to set block size 0x10000
Patch in a constant 0x10000 for mtd1 block size.


Next, in the basic block starting at 0x004245D0, there are two more ioctl()s. The first one most likely unlocks the current portion of flash for writing. The return value from it isn't checked, end execution immediately proceeds to the second. Based on the error message, the second one erases the block of flash so it can be rewritten. With our fake /dev/mtd1 there's no need to erase, so we can patch out this operation as before.

Patch out memerase ioctl
Patch out the ioctl() to erase flash memory.


Now, having patched out the ioctl()s that fail in emulation, writing to a regular file should work as normal. There is one more field that, while not validated directly, does affect what data gets written. When analyzing httpd, we discovered the field at offset 28 that contains the size of a theoretical second partition. In stock firmware this field is zeroed out. In upnpd, at 0x004245C0, this value is added to the address of the TRX image, and the result is the start of data that gets written to flash.

calculate start of firmware data
The start of firmware data is calculated.


In other words, the pointer to data that gets written is calculated as:

<Address of firmware image> + <ambit header size> + <partition 2 size> = <start of data to write>

This doesn't make sense and further belies the programmer's confusion over how this algorithm should work and how the firmware should be formatted. At any rate, if we zero out the field at byte 28, everything works fine. The address of the TRX image will be the start of data written to flash.

At this stage upnpd is ready to write our firmware to /dev/mtd1. Let's have a review of what portions of the ambit header had to be verified before getting here.

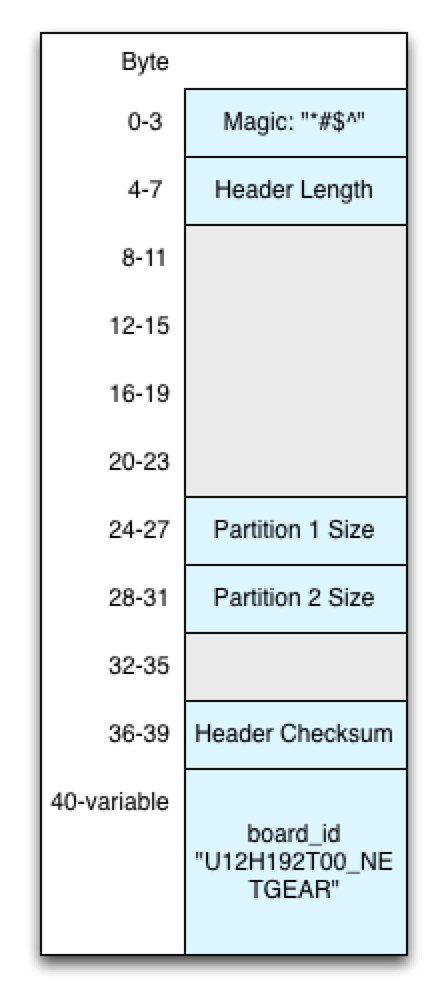
header diagram 2 alternate


There's our familiar ambit header. It looks similar to the header diagram from our httpd analysis, except there's still lot of gray in there. Only six fields have been validated by upnpd up to this point:

  • Ambit magic number
  • Header length
  • Header checksum
  • TRX image size (partition 1, aka "kernel")
  • Partition 2 size (not validated, but affects what gets written to flash)
  • Board ID string
That was easier than expected. When I sent the "firmware image" generated from random data to upnpd, my QEMU machine rebooted. This is because after the write loop, upnpd triggers a reboot so the new firmware will take effect. Our fake "/dev/mtd1" has even grown to 3.9MB as a result of the firmware writing.


zach@devaron $ ls -l mtd1
-rw-r--r-- 1 root 80 3900028 Mar 20 14:30 mtd1

At this point we've successfully exploited the SetFirmware UPnP SOAP action. We've gone as far as we can go with emulation. From here we'll move to physical hardware to test and develop the deployment of our firmware. In the next post, I'll describe connecting to the R6200 router's debug interface over its UART connection, so get your soldering iron ready.

Spoiler: I'll go ahead and say we're not quite home free yet. Don't attempt to generate an image and flash it to your router yet. At best, the write will still fail. At worst, you'll brick it. Besides not having generated a valid squashfs filesystem and TRX image, there at least two more header fields that will trip you up before you're done. Once we get access over UART figured out, it will be possible to recover a bricked device.

Thursday, June 18, 2015

Broken, Abandoned, and Forgotten Code, Part 8

In the previous few posts, we spent time reversing how the Netgear R6200's HTTP daemon parses a firmware header before writing the firmware image to flash. The goal was to work out how the 58-byte firmware header is constructed and how to generate a new one that can replace the header in a stock firmware. In the end we identified the purpose of all but 4 bytes. The regenerated header plus the original TRX firmware image allowed the HTTP daemon, running in emulation, to reach the stage where it would start writing data to the /dev/mtd1 flash partition. Considering this a win, we'll now circle back to analyzing upnpd.

In this and the next part, we'll compare the way upnpd parses and validates the firmware header to that of httpd. Having developed a baseline understanding of how the header is parsed by httpd, analyzing upnpd is much easier.

Updated Exploit Code

As in previous installments, the exploit code has been updated. Since we're switching back to upnpd in order to analyze how it validates the firmware, the repository contains separate modules for that. Look for janky_ambit_header.py and build_janky_fw.py. You can find the updated code and README in the part_8 directory. Now is a good time to do a pull or to clone the repository from:
https://github.com/zcutlip/broken_abandoned

More Firmware Parsing, Pretty Much Like Before

As we discovered in part 4, a firmware larger than 4MB will crash upnpd due to an undersized memory allocation. Obviously we won't be able to strap a header to the front of a stock TRX image like we did with httpd; it's way too big. Shrinking the firmware will be a challenge for later. If it turns out that we can't even get so far as writing the firmware to flash memory without crashing, it won't matter that you were able to shrink and re-pack the firmware. Instead, just dd out a little less than 4MB of random data from /dev/random and prepend a header to it. If you can get upnpd to write that image to flash, you win this stage and may advance to the next level.

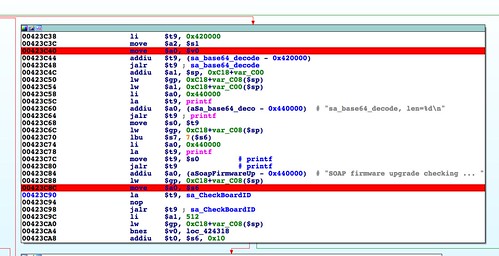
Once we get past the undersized malloc() at 0x00423C24 in sa_parseRcvCmd(), the firmware is successfully base64 decoded out of the SOAP request. Then, at 0x00423C98, a function named sa_CheckBoardID() is called.

Call to sa_CheckBoardID


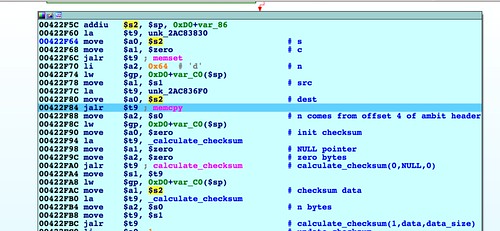
This function should be familiar. It's nearly identical to the abCheckBoardID() function I described in part 5. So identical, in fact, that the buffer overflow via memcpy() I described previously is in this function as well.

sa_CheckBoardID buffer overflow
Buffer overflow due to memcpy() using header size field. Sad trombone.

Even the Buffer Overflow is the Same


To recap, the memcpy() is bounded only by the size value from the header. Since we control that value, we get precise control over how many bytes are copied into the destination buffer.

I didn't go into detail about the buffer overflow before, because I wanted to wait until I could discuss it in the context of upnpd. In the HTTP server, this isn't an interesting vulnerability. In that case, it is a post-authentication vulnerability. You would need to bypass authentication or trick a user into uploading your malicious firmware. If you've accomplished either of those, there are much more useful things you can be doing with your time than exploiting buffer overflows.

In the case of upnpd, this same vulnerability doesn't require authentication, making it much more interesting. Here's what's neat about it:

  • No authentication required.
  • The payload is base64 encoded and decoded for free, so there are no bad bytes to avoid related to the transport protocol.
  • The buffer overflow is via memcpy() rather than a string handling function. There are no bad bytes to avoid related to string handling.
  • The buffer being overflowed is on the stack, making it easy to overwrite the function's return address.
This is a straightforward buffer overflow. If you're new to stack based buffer overflows, or just new to exploiting memory corruption vulnerabilities on MIPS, this is an easy one to practice with, especially if you have the debugging environment I described here set up.

However, as I said in the first part of this series, one of my self-imposed goals was to avoid exploiting bugs along the way. We're trying to flash a firmware without crashing, and any bugs along the way are obstacles to overcome.

Working through this function reveals the same header fields that we discovered in its httpd counterpart: The magic number, the size and checksum of the header, and the board ID string. These fields are found at the same header offsets as before.

Mystery Header Gets a Name

There is one new piece of information, however.

Not ambit image


At 0x00423088 there is an error message that we didn't see in httpd: "Not Ambit image ... reject!!!". This is the first indication of any sort of name for this file format. This explains why you may have noticed references to "ambit" or "ambit header" in previous code fragments I've posted.

In the next part, we get close to writing the firmware image to flash memory. We'll have to do some binary patching to work around the fact that QEMU doesn't actually have flash memory.

Monday, June 08, 2015

Broken, Abandoned, and Forgotten Code, Intermission

We're about halfway through the Broken, Abandoned series, so this is a good time to pause for a minute and take stock. At this point, things have gotten pretty technical; if you've only joined recently, you may be wondering what this series is about. I want to take a moment to summarize where we've been and where we can expect to go from here.

Overview

This series, entitled Broken, Abandoned, and Forgotten Code, is about an unauthenticated firmware update mechanism in the Netgear R6200 wireless router's UPnP service. Bypassing authentication and updating the firmware would be moderately interesting by itself. What makes this particularly interesting, however, is this capability appears only partially implemented. It's not quite dead code; more like zombie code. It's wired up just enough to kind of work. There are many artifacts of incomplete implementation that stand in the way of straightforward exploitation.

The goal: build an exploit that accounts for the many implementation bugs, which then updates the target with a custom firmware, giving us persistent control over the target device. This, of course, requires not just building the exploit, but specially crafting a firmware image.

Where We've Been

Here's a summary of what we've covered in the series up to now.

  • Part 1, part 2: Introduced the hidden SetFirmware SOAP action as well as the weird timing games needed to exploit it. We reverse engineered what HTTP headers are required to exercise this code path.
  • Part 3: We reverse engineered what the body of the SetFirmware SOAP request should look like.
  • Part 4: We discovered a crash when attempting to update to a stock firmware downloaded from Netgear's support website. The crash is due to an undersized memory allocation. We will have to shrink the firmware from nearly 9MB to 4MB in order to exploit the SetFirmware vulnerability.
  • Part 5, part 6, & part 7: It will be necessary to specially craft a firmware image if we are to take control of the target, so we reverse engineered the mystery 58-byte header at the beginning of the stock image. Because upnpd is so broken, we instead analyzed httpd, knowing that it can update a well-formed firmware image without crashing.

    Where We're Going

    From here there are still a number of challenges. We'll need to spend more time analyzing upnpd; it may not even be able to update the firmware without crashing (spoiler alert: it is). Even if it can, there may be differences in the firmware format as expected by upnpd vs the standard format parsed by httpd.

    Assuming we can get through upnpd's update process, there remains the problem from part 4: a firmware image greater than 4MB crashes upnpd. We'll need to spend some time shrinking the firmware from nearly 9MB to 4MB or less.

    Any project involving reverse engineering and customizing firmware will, at some point, result in bricked hardware. We'll devote an installment to discovering the hidden UART connection inside the R6200 that will enable recovery in the likely case of a bad firmware update.

    One installment will cover a upnpd crash after the firmware update process but before reboot. I'll discuss how to customize the firmware header to avoid the crash.

    The stage 1 firmware has a few things it must do autonomously if it is to reboot into a trojan stage 2. I'll discuss those things and how to accomplish them.

    We'll close out with an installment on post-exploitation. Once you're as far as customizing your own firmware and getting it onto your target, the world is your oyster. We'll discuss a simple technique that will yield remote, post-exploitation access, even from behind a firewall.

    While you're waiting here's a video of the exploit in action I shared in the prologue. In the left terminal you see what's going on under the hood via the serial console. In the right terminal, you see the actual exploitation taking place. Also, there's cool music.


    R6200 Firmware Upload from Zach on Vimeo.


    More to Come, so Stay Tuned

    Take a moment to go out to the lobby, stretch your legs, and use the facilities. We've covered a lot, but we're only halfway through. There's a lot more fun on the way, starting with Part 8!

    Thursday, June 04, 2015

    Broken, Abandoned, and Forgotten Code, Part 7

    In the previous post, I finished discussing the abCheckBoardID() function. I called attention to a checksum in the header generated by an unknown algorithm. I provided a python implementation of that algorithm ported from IDA disassembly. In total, I identified four fields parsed by this function, accounting for 30 bytes of the 58 byte header.

    In this part I'll give an overview of the remaining functions that parse and validate the firmware header. By the end we will be able to generate a header that allows the firmware to be programmed to flash memory. I won't discuss each header field in quite as much detail as I did previously, but if you've made it this far, it shouldn't be too hard to understand how each field is used.

    Updated Exploit Code

    The update to the exploit code for Part 6 added a module to regenerate a checksum found in the header. This update populates a couple of additional checksums as well as a few other fields. The code provided for Part 7 is sufficient to generate a firmware header that will pass the web server's validation. Given a valid kernel and filesystem image, you should be able to generate a firmware image that the web interface will happily upgrade to. If you've previously cloned the repository, now would be a good time to do a pull. You can clone the git repo from:
    https://github.com/zcutlip/broken_abandoned

    Of Checksums and Sizes

    After the abCheckBoardID() function (discussed in part 6) there are a few more functions that parse or validate portions of the header. Identifying these fields and their purpose is challenging due to the fact that values may be parsed out in one function, but not used until some other function or functions, if at all.

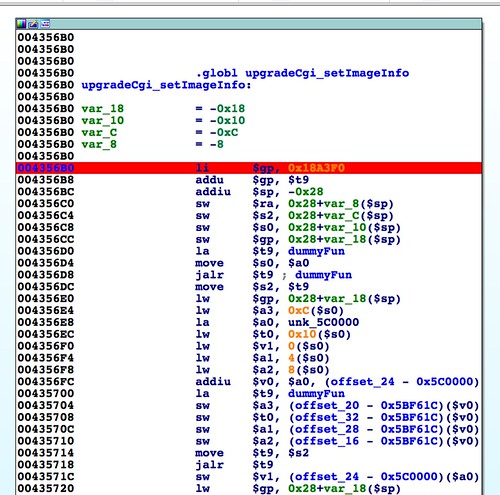
    The two functions that parse out values from the header are upgradeCgi_setImageInfo() at 0x004356B0 and upgradeCgiCheck() at 0x004361F8. The "setImageInfo" function is a short one. It parses several header fields, but it doesn't inspect or use any of them. The values are stored in global variables for later use. You can identify offsets of these fields using string patterns as described previously. As you identify these locations where the parsed values are located, rename the variables in IDA to something more meaningful, so you can identify them later when they are used. I renamed them to correspond with the offsets they were parsed from.

    upgradeCgi_setImageInfo
    Renaming global variables corresponding to header offsets.
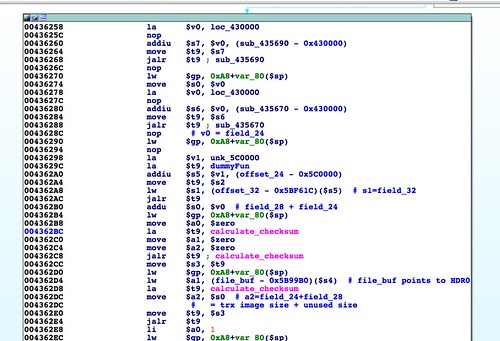
    The upgradeCgiCheck() function validates a few fields parsed out previously. At 0x004362BC we see the return of our friend, calculate_checksum(). This time the checksum is computed across more than just the firmware header. At the "update" step, the data argument points to the "HDR0" portion of the firmware. This suggests the checksum is across the TRX image that follows the 58 byte header. The size argument is the sum of the values found at offsets 24 and 28. Inspecting the values at those positions in a stock firmware, we see 0x00871000 at offset 24, and 0x0 at offset 28. It's clear that bytes 24 - 27 are the size of the firmware image minus the 58 bytes at the start. Based on its use here, the bytes 28 - 31 are also a size of some sort.

    At any rate, the size passed to calculate_checksum() at the update stage at 0x004362DC is the size of the TRX image. At 0x0043630C, the checksum is compared to the value taken from offset 32. We now know three more fields in the firmware header: offsets 24, 28, and 32. That's 42 bytes down, 16 to go.

    checksuming TRX image
    Checksum of the firmware's TRX image.


    We're not done with checksums just yet. The basic block at 0x0043643C is another checksum operation. Once again the data points to "HDR0", but the size is only the value from offset 24. The size from offset 28 is not used this time. The checksum result is the same as before, but this time compared to the value at offset 16. We now know the checksum we compute and store at offset 32 must also be stored at offset 16.

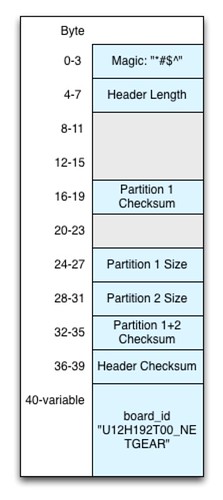
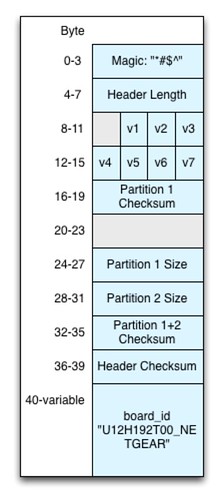
    At this point we can speculate this firmware format supports multiple partitions or sections. The value at offset 24 would be the size of partition 1, and offset 28 would be the size of partition 2. The checksum at offset 16 would be calculated over partition 1, and offset 32's checksum would be calculated over partitions 1 and 2 combined.

    We're now down to 12 unidentified bytes. Let's have a look at an updated header diagram to see how things look.

    header diagram 2
    What we know so far about the firmware header.


    The diagram is starting to fill in, and things are looking quite a bit better.

    Version String

    Moving on, at 0x00436580, more data is parsed out of the firmware image. This time the values are pulled out one byte at a time. This frustrates the technique of using the 3+ byte patterns to identify offsets. Based on the format strings from subsequent sscanf() and sprintf() operations, we can speculate that these values are transformed in some way into the version string displayed in the web interface.

    Although the version string ends up being only cosmetic, and not an essential part of the firmware validation, it's still interesting enough to discuss here. Modifying the version string would be a nice way to visually demonstrate that the target is, in fact, running your custom firmware, and not the stock firmware.
    [Update: Turns out this isn't quite right. There is a string table stored in flash memory that also contains the version string, and that string is displayed in the web interface. The version field in the firmware header is only (as far as I can tell) rendered during the update process so the user can see what version they're updating to.]

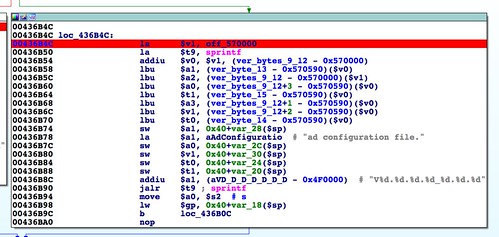
    It took some debugging, but it turns out the single byte values that compose the version string don't actually get used until a few functions later, in upgradeCgi_GetParam() at 0x00436B4C.

    generating firmware version string


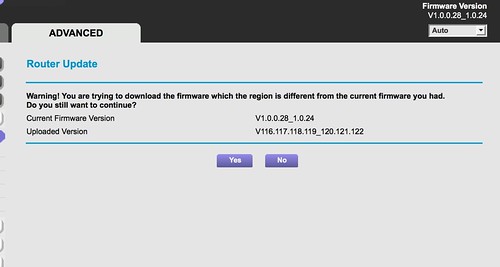
    What is happening here is a version string is being generated to display in the web browser so that the user can confirm what version of the firmware they're about to upgrade to.

    Firmware Version String


    The version string "V65.97.51.65_97.52.65" from the screenshot above appears to be composed of the decimal representations of ASCII characters from Bowcaster's pattern string. We can be sure by replacing bytes 8 - 15 with a string of non-repeating characters: "stuvwxyz". When we do this, the version string becomes "V116.117.118.119_120.121.122". This confirms the hypothesis; these are the decimal representations for t,u,v,w,x,y, and z. Note that "s" is not included. Even though byte 8 was parsed out along with the rest, it appears to go unused.

    Firmware Version String 2

    We can now update the header diagram to reflect the version bytes.
    header diagram 3


    (Mostly) Complete Firmware Header

    The header diagram now has only 4 bytes (5 if you count the unused version byte at offset 8) that haven't been identified. It's unclear what these bytes are for, since they are never inspected. A likely explanation is that a checksum for theoretical partition 2 belongs at offset 20. The stock firmware has 0x0 at offset 20, which jives with a partition 2 size of 0. At any rate, this header is sufficient for execution to reach the point where the uploaded firmware gets written to /dev/mtd1.

    WARNING: If you are debugging httpd on on actual hardware rather than in emulation, there's a chance your router will end up bricked if you attempt to upgrade to a customer firmware image. Eventually, we must test on actual hardware, but before then, I'll describe how to access the device's serial console using a UART to USB cable. Using the serial console, you can recover from a bad firmware update, a feature I had to use many times during my original research.

    In the next part, with a better understanding of the firmware format, we'll loop back to the UPnP daemon and pick up where we left off there. Wouldn't it be nice if we could use the now documented header format to generate a firmware that will work with the UPnP daemon using our existing exploit code?