The
httpd daemon is responsible for so much more than the web interface. This daemon is responsible for a silly amount of system management, including configuring firewall rules, managing the samba and ftp file servers, managing attached USB storage, and many other things. And it does all of this management as part of its initialization, which means lots of opportunities to fail or crash when running in emulation as a standalone service.Running this device’s web server in emulation involves substantially more work, but it is still doable. First we need to figure out how to invoke the httpd program. Below is a script I use to start up httpd in emulation.
#!/bin/sh

# runhttpd.sh
# run with DEBUG=1 to attach gdbserver


ROOTFS=/root/code/wifi-reversing/netgear/r6200/extracted-1.0.0.28/rootfs

DEBUGGER=""
if [ "x1" = "x$DEBUG" ];
then
DEBUGGER="./gdbserver 0.0.0.0:1234"
fi

rm ./tmp/shm_id
rm ./var/run/httpd.pid
ipcrm -S 0x0001e240
for ipc in $(ipcs -m | grep 0x | cut -d " " -f 2); do ipcrm -m $ipc; done

chroot $ROOTFS /bin/sh -c "LD_PRELOAD=/libnvram-faker.so $DEBUGGER /usr/sbin/httpd -S -E /usr/sbin/ca.pem /usr/sbin/httpsd.pem"
I partly based this on the command line arguments that httpd is invoked with on the actual device. The script chroots into the router's filesystem and then runs httpd. Further, if you set DEBUG=1 on the command line, the script will use gdbserver to execute the daemon and wait for a debugger connection on port 1234.
As with the UPnP daemon, an early challenge is the fact that QEMU doesn’t provide NVRAM for configuration parameters, so calls to
nvram_get() will fail. We can work around this with my project nvram-faker. Nvram-faker is loaded using LD_PRELOAD and hooks calls to nvram_get(). It reads a configuration from a text file and prints the results of nvram queries to standard error. Queries for unknown parameters are printed in red, helping to diagnose what parameters are needed that you haven’t yet provided. If you don’t have an instance of the hardware, this is an exercise in guesswork and trial and error. You need to intuit sane values for the queried parameters and iteratively fill in missing parameters as they are queried. If you do have the actual gear, and you can get a shell[1] on the device, you can extract the NVRAM configuration from flash and convert it into an INI file for nvram-faker. I’ll post the nvram configuration I ended up using at the end.When attempting to run
httpd, I found it kept crashing with SIGBUS. It turns out that on startup the daemon wants to open a shared memory segment for IPC. It looks for the file /tmp/shm_id, which may have been created by another process. If it finds that file it attempts to attach to the shared memory segment associated with the ID in the file. If the file doesn’t exist, then httpd opens a new shared memory segment and then writes the ID to that file. The problem is there is no check to see if shmat() failed, returning negative one (cast to a void *). In any case, the program attempts to deference the return value of shmat() at 0x00419308. In the case of failure, 0xffffffff is dereferenced, crashing the program. The crash is SIGBUS rather than SIGSEGV due to the misaligned memory access.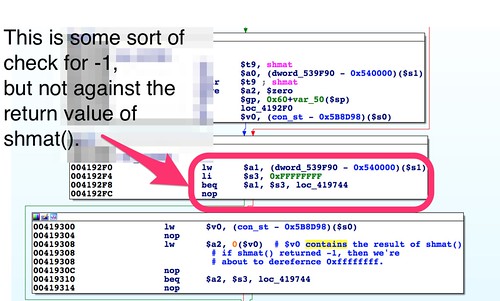
If the http server has previously run and not exited cleanly, then
/tmp/shm_id will hang around. The solution is easy: have our script delete /tmp/shm_id before starting the server.Another problem is that the http daemon…well…daemonizes. As far as I know, there’s no way to have IDA and gdbserver follow fork()s, so this is a problem. If we could get the daemon to run reliably, we could start it, let it daemonize, and then attach to the forked process. However, we’re going to need to do a fair amount of debugging just to get this program running, so letting it start and daemonize isn’t an option.

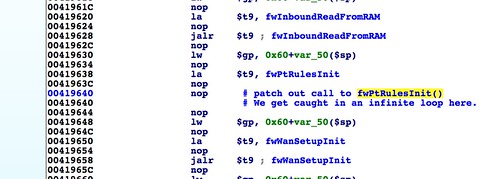
In the above screenshot we see the jump to
daemon() at 0x004183fc. The easiest approach is to patch out the call to daemon().Just a few thoughts about binary patching: It’s important to keep in mind that if you change the binary you’re analyzing, you’re no longer analyzing the same program. Instead you’re analyzing some other, slightly different program, with different behaviors. Hopefully nothing you change will make a material difference, but it’s hard to know. For example, it may be difficult to tell if a function that you patched out would have initialized some global structures that will now result in a crash or a slightly different code path. Just be aware of the ramifications, and patch only when necessary.
The return value of
daemon() is checked and a value of 0 indicates success. A relatively nonintrusive way of replacing a call to daemon() and simulating success is to xor the $v0 register (which contains a function’s return value) with itself. The assembled bytes for the instruction:xor $v0,$v0
are:
00 42 10 26
The target system is little endian, so these bytes must be swapped:
26 10 42 00
I’ll leave the actual method[2] of assembling a single instruction and deriving its corresponding sequence of bytes as an exercise for the reader. If you have a cross compiler set up, one way is to create a source file with your instruction, assemble it with the gnu assembler, and then disassemble it with objdump. Another option is to use this lightweight python module, mips-assembler.
To patch the program using IDA, click on the instruction you want to patch, in this case the jalr to
daemon() at 0x004183fc. Then switch to IDA’s hex view. The corresponding bytes will be highlighted. Right click and select "edit".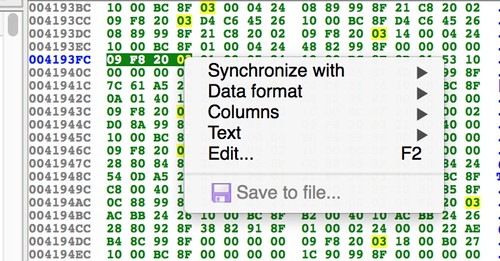
The hex view changes to overwrite mode. Change the selected bytes to the ones corresponding to your patch. Right click again and choose “apply.” When you switch back to disassembly, you should see the patch.

Note that IDA hasn’t actually changed the original binary. In fact, one of IDA’s features is that once you disassemble a file, not only does it not touch the original file again, you don’t even need it. All you need from that point forward is the .idb file. However, IDA does have the ability to apply the patch to the original file. Select the Edit menu, “Patch Program,” then “Apply patches to input file.” IDA will prompt you to name the patch file and whether to make backup copy. This is a relatively new feature, so if you’re new to IDA, know that it wasn’t always this easy. Send Ilfak an email thanking him.
Now you should be able run the patched
httpd without it daemonizing. Set a breakpoint somewhere past the original call to daemon() and verify that IDA stays attached.With the daemon running, you can start the iterative process of building up an NVRAM configuration that will satisfy the many initialization steps. The goal is for execution to reach the
select() at 0x00415564 in the http_d() function.During this process, there was one initialization function that I wasn’t able to get past. The call to
fwPtRulesInit() at 0x00419640 always hung in an endless loop. Since this has to do with firewall policy configuration, I decided it was worth the risk to patch it out with a nop instruction.Here is the configuration I ended up with. I ended up using the complete configuration copied from the hardware's NVRAM. I tweaked a few settings such as LAN IP address, and the HTTP admin's password, but this is mostly a stock configuration[3]. (Apologies to mobile users. This is supposed to be a 500px iframe that shows about 20 lines and scrolls, but for some reason in my mobile browser, the entire 1500+ line configuration is rendered.)
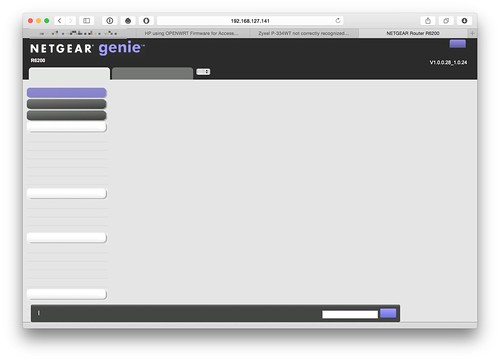
Once I had the trouble spots patched out and had a working configuration, I was able to get the web server running and responding to requests from a web browser. Mostly.
As you can see, the web interface chrome appears to be working, but the text is mostly missing. It turns out there was a bug in libnvram-faker. As the library handles NVRAM queries, it prints to the console the parameters and their values. The problem is it was printing to standard output. The web server executes a number of shell commands using
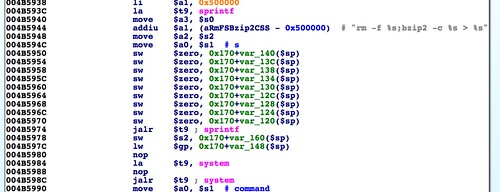
system(). Some of those commands redirect their standard output to a file, which the web server then uses. In particular, at 0x004B5C40, a string table gets generated by a shell command, then read in, and then immediately deleted. Since the file only exists for a moment, it's not obvious this is happening.Below, we see the function
CreateHeader() getting called with two arguments. These are a string table in /www, and a compressed copy of the same file in /tmp.Then in
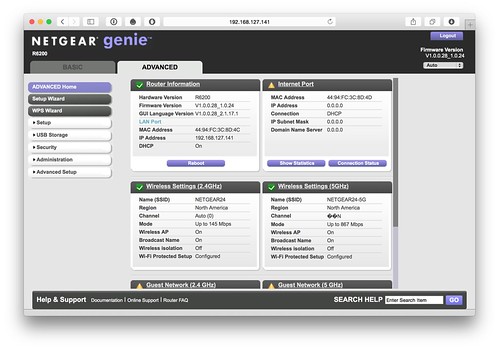
CreateHeader() we see a shell command being generated via sprintf() and then executed via system(). That shell command is bzip2 -c somefile > some_other_file. The resulting file is a redirection of bzip's standard output.Once I noticed this, I set a breakpoint just after the bzip command, and was able to make a copy of the file. When I decompressed it, I saw that it had all of libnvram-faker's output mixed in with the strings. This had the result of breaking the templating system that generates the web interface's HTML and javascript. Once I fixed that in libnvram-faker, I was able to get the web server working.
This should get you started emulating and debugging some more challenging binaries. With enough work you can get fairly complicated programs from an embedded device running in emulation. Sometimes this is convenient, so you don't have to carry actual gear around when you're doing research. Other times, it's necessary; you may not be able to get interactive access to the hardware in order to debug its processes. In that case, emulation may be your only choice.
------------------------
[1] Many devices have a UART connection which will let you connect via minicom or other serial terminal in order to get console access. Further, nearly every consumer Netgear device has a telnet backdoor listening on the local network.
[2] I use a tool that Craig Heffner wrote called “shellgasm.” It’s a nifty python program that calls gcc and objdump from your cross compiler toolchain. It will also turn asm code into a C-style or Python-style byte array that can be used for payloads in buffer overflows and such. Unfortunately it’s not available anywhere. Maybe if you pester Craig, he’ll post it on Github.
[3] This was actually more work than it sounds like. There was a bug in libnvram-faker. It didn't allocate enough memory to accommodate all the lines of the INI file. This resulted in a crash with large configuration files. The crash was difficult to debug, so I mostly worked around it by iteratively uncommenting parts of the file until the web server worked. Just before finishing this post, I finally tracked down the bug, so now I can use the entire 1500+ lines of the default configuration.
