Thursday, May 07, 2015

Broken, Abandoned, and Forgotten Code, Part 3

In the previous posts, I talked about the hidden "SetFirmware" SOAP action in the Netgear R6200's UPnP daemon, and the weird timing games we have play to deal with UPnP daemon's broken networking code. I also discussed the haphazard parsing of the HTTP headers across multiple functions. I made a guess at what headers might get our SetFirmware SOAP request passed to the sa_parseRcvCmd() function where hopefully an encapsulated firmware image will be decoded.

In this post I'll discuss how the sa_parseRcvCmd() function actually parses, or attempts to parse, the SOAP request body.

Updated Exploit Code

Previously, I published a git repository containing proof-of-concept code that demonstrates what I discussed in part 2. The repository has been updated for part 3, so if you've cloned it, now is good time to do a pull. The new code will generate the complete SetFirmware SOAP request to flash an updated firmware to the router. You can get the repo here:

Parsing the SOAP Request Body

The sa_parseRcvCmd() function is large and difficult to describe. Attempting to reverse engineer the entire function would be tiresome.
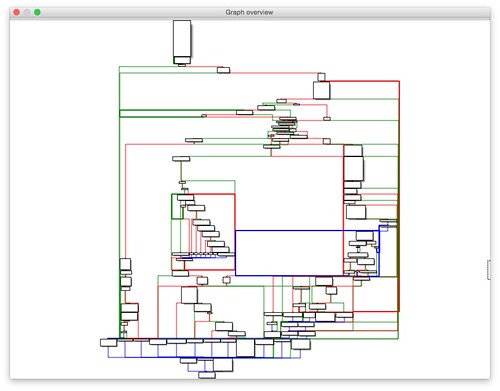
graph view of sa_parseRecvCmd
Graph view of the sa_parseRcvCmd function
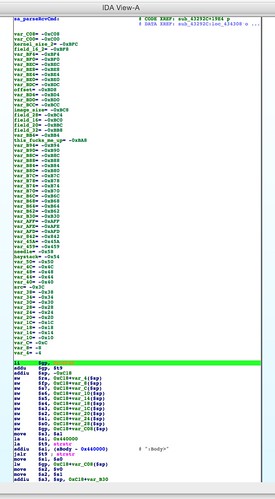
The above figure is a bird's eye view of this function. To give some perspective, the following figure is the first basic block, which includes the function prologue that sets up a long list of local variables in addition to the first bit of parsing of the SOAP request body.

prologue of sa_parseRcvCmd
Check out all those local variables.


Rather than try to understand the entire function, an easier approach is to decide where in the function we want execution to reach and work backwards from there. This way offers a better chance of finding out if the desired code is reachable, and if it is, what paths will lead there.

If we spend some time browsing the disassembly, we start to see what appears to be a group of blocks responsible for decoding the firmware from the SOAP request body and writing it to flash memory.

annotated firmare write


Looking even closer, we can identify the actual block where the firmware is written to flash.
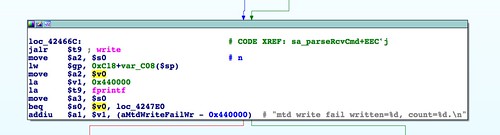
write firmware to flash


It's easy to guess that this block writes to flash memory based on the blocks that lead up to it (an earlier block opens /dev/mtd1 for writing) as well as the error string that will be printed if the write fails. This block at 0x0042466C is our goal and the path that leads to it is how we must get there.

Working backwards, we come to a block at 0x00423C38 that appears, based on symbols and error strings, to base64 decode the firmware image.

base64 decoding firmware


From this we can guess that the firmware image should be base64 encoded into the SOAP request body. We might also guess that the sa_CheckBoardID() function in the above figure performs some sort of parsing of the decoded firmware. Once we've worked out the code path that gets to this block, we'll start working forwards again and spend some time investigating this function.

Working backwards even further, we find a cluster of blocks with many outbound paths. One of these paths (the block at 0x004238C8) leads to the base64 decoding section. This part of the function is particularly tortured, so here's the summary. This cluster appears to be a part of a large loop. On each pass through the loop, a variable is checked against a number of constants. Each comparison, if a match, results in a branch to a different path of execution. The constant that leads to the base64 decoding operation is 0xFF3A. While not actionable at the moment, this is worth noting.

Check for 0xFF3A
Looking for several constants. 0xFF3A leads to firmware decoding.


From there we can go backwards a little further and reach the function prologue, discussed earlier. With a general idea of the path that is required to get the firmware decoded and written, we can start working forwards again. We now have a better idea of what code paths to focus on and what ones can be ignored.

It is at the start of sa_parseRcvCmd() where we find the first hints at how the actual body of the SOAP request should be structured. At the very beginning of this function, a substring search for ":Body>" is performed. This would find the canonical <SOAP-ENV:Body> XML tag that surrounds a SOAP message body. It would also find the non-canonical <HOLY-SHIT-THIS-CODE-IS-SHITTY:Body> XML tag. So, you know, whatever.
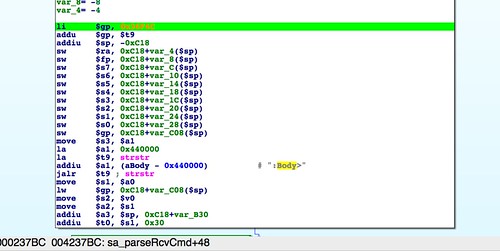
Search for Body xml tag
Naive string search for ":Body>".


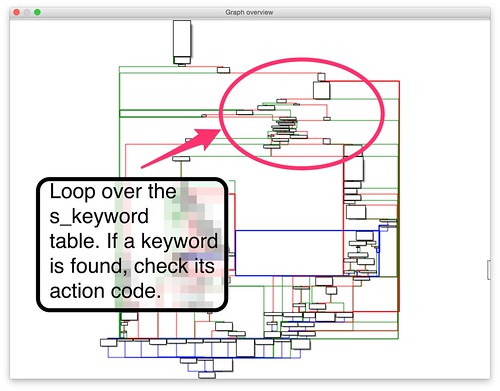
Once the body is located, the function loops over a table of strings, called s_keyword. This is the loop described earlier that checks for a series of constants on each iteration. The s_keyword table is an array of structs that are formed approximately like the following:


struct k_struct
{
    uint32_t action;
    char *keyword;
    uint32_t what_the_shit_is_this;
};

For each of these structures, the request body is searched for an opening and closing XML tag constructed from the corresponding keyword. If a tag is found then the keyword's corresponding action code is checked to determine the code path to take.
s_keword loop

Searching Haystack for s_keyword strings
Perform a strstr() for the first string in the s_keyword table.

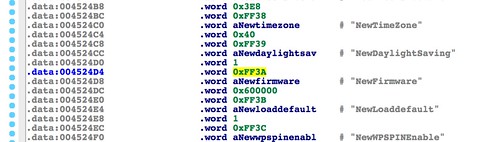
Inspecting the s_keyword table reveals the keyword that corresponds to the magic 0xFF3A action code: "NewFirmware".
NewFirmware in s_keyword table


If a <NewFirmware> tag is found inside the soap body tag, then execution proceeds to allocate memory for the decoded firmware, and then on to writing it to flash memory as discussed above.

In the previous part, I made a guess at what HTTP headers would get the request into the sa_parseRecvCmd function. At this point we now have enough information to speculate as to how the body of the SOAP request should be formed.


POST /soap/server_sa/SetFirmware HTTP/1.1
Accept-Encoding: identity
Content-Length: 102401
Soapaction: "urn:DeviceConfig"
Host: 127.0.0.1
User-Agent: Python-urllib/2.7
Connection: close
Content-Type: text/xml ;charset="utf-8"

<SOAP-ENV:Body>
    <NewFirmware>
        <!-- Base64-encoded firmware image goes here? -->
    </NewFirmware>
</Body>


If this guess is right, the function first looks for the opening Body tag. Then it looks for one of a variety of inner tags, NewFirmware being the one we're interested in. And inside that, hopefully, it will find our base64 encoded firmware image and will decode and write it to flash. Are we almost home free? Stay tuned.

Thursday, April 30, 2015

Broken, Abandoned, and Forgotten Code, Part 2

In the part 1, I showed how the Netgear R6200's upnpd binary contains what appears to be a hidden SOAP action related to the string "SetFirmware". I also showed how we can get into the upnp_receive_firmware_packets() function if we play timing games and send our request in multiple parts.

In this part I'll describe additional timing considerations needed to avoid hanging the server. I'll also discuss sloppy parsing of the SOAP request, and I'll make some guesses as to how that request should be formed.

If you're following along, the first proof-of-concept code is available. Clone my git repo from:
https://github.com/zcutlip/broken_abandoned

Each installment in this series that has new or updated code will have a separate directory in the repository. This week's code is under part_2.

Receiving Firmware Bytes

The conditions I described previously are:
  • The request should be broken up into two or more parts, with the first being no larger than 8,190 bytes.
  • "Content-length:" should be somewhere in the data, presumably in the HTTP headers (because this would make sense), but not necessarily.
  • The content length should be greater than 102,401 bytes.
  • The string "SetFirmware" should be somewhere in the data.
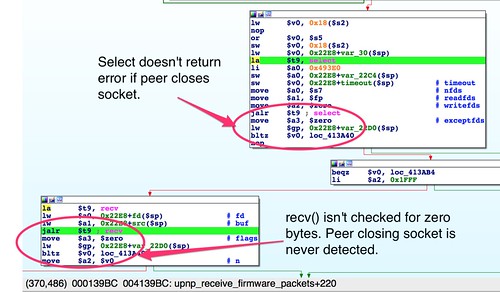
If those conditions are satisfied, then upnp_receive_firmware_packets() gets called from upnp_main() at 0x4144E4. In this function, a select(), recv(), and memcpy() loop receives the remainder of the request. This proceeds fairly sanely, with one problem.

upnp receive firmware select loop
The select() and recv() loop doesn't check for closed connections

If the client closes the connection immediately after sending the request, this function gets caught in an infinite loop. The cause for this is a little tricky to explain.

From the select(2) Linux man page:
A file descriptor is considered ready if it is possible to perform the corresponding I/O operation (e.g., read(2)) without blocking.

If the peer has closed its end of the connection, then select() indicates the socket is ready because a recv() would not block. The way Unix TCP sockets work, when the remote end of a connection closes, a recv() on that socket returns zero. In the loop, the return value from recv() is checked for errors (negative values), but if there are no errors, it is assumed that data was received, and the loop returns to select(). This results in the function looping indefinitely if the client shuts down the connection too soon.

The only two ways this loop ever terminates are (a) if select() or recv() return an error, or (b) if select() returns zero, indicating a timeout with no file descriptors ready for I/O. This means the requesting client must not close the connection immediately after it has sent the request. It should send the request, and then pause before closing the connection. Sleeping a few seconds should suffice.

However, there's an additional implication. Recall from before that we had to sleep 1-2 seconds in upnp_main() in order to get into this function. It turns out that if we slept longer, then the select() would time out, returning zero, and the loop would end before we had sent the rest of the request. So, while it's critical to sleep a second or two, it's also critical to sleep no more than that.

In review, the steps should be:

  • Send 8,190 bytes or fewer, but hold the connection open
  • Sleep 1-2 seconds, but no more
  • Send the rest of the request, but hold the connection open
  • Sleep a few more seconds
  • Close the connection


The following code fragment sends chunks with appropriate sizes and sleep periods to get us into upnp_receive_firmware_packets() and to avoid getting into an infinite loop with select():


def special_upnp_send(addr,port,data):
    sock=socket.socket(socket.AF_INET,socket.SOCK_STREAM)
    sock.connect((addr,port))
    #only send first 8190 bytes of request
    sock.send(data[:8190]) 
    #sleep to ensure first recv()
    #only gets this first chunk.
    time.sleep(2) 
    #Hopefully in upnp_receiv_firmware_packets()
    #by now, so we can send the rest.
    sock.send(data[8190:])  
    #Sleep a bit more so server doesn't end up
    #in an infinite select() loop.
    #Select's timeout is set to 1 sec,
    #so we need to give enough time
    #for the loop to go back to select,
    #and for the timeout to happen,
    #returning an error.
    time.sleep(10)
    sock.close()

More Broken and Lazy Parsing

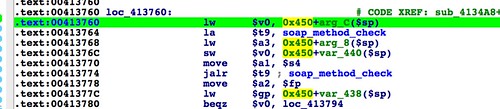
Once the entire request has been received, it is parsed, or "parsed" as it were, piecemeal, across several functions. The upnp_receive_firmware_packets() function calls sub_4134A8(). This function inspects the beginning of the received request (the first 1023 bytes, to be precise) for for the HTTP method. If the request is a POST, the soap_method_check() function is called at 0x413774.

Check for POST HTTP method
Checking for the POST HTTP method


Call to soap_method_check
Calling soap_method_check()


In soap_method_check() several naive stristr() calls search for a series of strings across the entire request buffer. Based on several of the more recognizable strings, such as "Public_UPNP_C1", these strings are UPnP control URLs that might be requested by the POST. Although these strings may be placed literally anywhere (starting to sound familiar?) in the request and still trigger their respective code paths, presumably a typical request would be structured like so:

POST /Public_UPNP_C1 HTTP/1.1

One of the control URLs that is checked is "soap/server_sa". If that URL is found in the request, the function sa_method_check() is called. Note that we still don't know for certain where the UPnP daemon actually expects the "SetFirmware" string to be located. However, based on other, similar string references, it seems likely that this string should be part of the UPnP control URL: "soap/server_sa/SetFirmware".

call to sa_method_check
A call to sa_method_check if "soap/server_sa" is found
The sa_method_check() function loops over a list of valid strings corresponding to the "SOAPAction:" header, and for each string in the list performs a naive stristr() across the entire request buffer. The string "DeviceConfig", if found anywhere in the request, results in a call to sub_43292C(). This enormous function repeatedly calls sa_findKeyword(), passing it the request buffer as well as various keys to be looked up in the "s_Event" dictionary.

graph view of sub_43292C
The enormous graph of sub_43292c(). This function looks for keywords in the SOAP request.


The sa_findKeyword() function searches the request buffer for the corresponding string from the "s_Event" dictionary. The original "SetFirmware" string is referenced by the key 49. If it is found, again, anywhere in the request, the function sa_parseRcvCmd() is called.

search for SetFirmware string
Repeated calls of sa_findKeyword(). Index 49 corresponds to "SetFirmware."


The following HTTP request headers should, based on what we have observed so far, get the request into the sa_parseRcvCmd() function.


request="".join["POST /soap/server_sa/SetFirmware HTTP/1.1\r\n",
                 "Accept-Encoding: identity\r\n",
                 "Content-Length: 102401\r\n",
                 "Soapaction: \"urn:DeviceConfig\"\r\n",
                 "Host: 127.0.0.1\r\n",
                 "Connection: close\r\n",
                 "Content-Type: text/xml ;charset=\"utf-8\"\r\n\r\n"]


Forming an HTTP request that would exercise the proper code path was an exercise in guesswork due to the many naive string searches littered along the way and an absence of anything resembling structured parsing.

It is in the sa_parseRcvCmd() function that an encoded firmware image is extracted and decoded from the request body, and assuming the right conditions are met, written to the router's flash storage, replacing the existing firmware.

Up until now, it has remained at least possible, however improbable, that the vendor may have designed a client to send the magic SOAP requests and to play the timing games necessary to exercise the firmware updating functionality. In the next part I'll start discussing sa_parseRcvCmd(),  a complicated function with lots of code paths and lots of bugs. It is also this function where it becomes even clearer that the firmware updating capability of this UPnP server is not completely implemented and cannot actually work under normal conditions.

Thursday, April 23, 2015

Broken, Abandoned, and Forgotten Code, Part 1

Introduction

This series of posts describes how abandoned, partially implemented functionality can be exploited to gain complete, persistent control of Netgear wireless routers. I'll describe a hidden SOAP method in the UPnP stack that, at first glance, appeared to allow unauthenticated remote firmware upload to the router. After some reverse engineering, it became apparent this functionality was never fully implemented, and could never work properly given a well formed SOAP request and firmware image. If it could work at all, it would be with only the most contrived of inputs.

Someone may have thought shipping dead code was okay because an exploit scenario would be so contrived. Someone may not have considered that contrived inputs are the stock-in-trade of vulnerability researchers.

In this series, I'll describe the process of specially crafting a malicious firmware image and a SOAP request in order to route around the many artifacts of incomplete implementation in order to gain persistent control of the router. I'll discuss reverse engineering the proper firmware header format, as well as the the improper one that will work with the broken code. Together, we'll go from discovery to complete, persistent compromise.

Rules of Engagement

In order to make the challenge more interesting and to more clearly demonstrate the thesis, I decided to not take advantage of any shortcuts by exploiting vulnerabilities in the broken code path. I treated all bugs I encountered along the way as hurdles to overcome. For example, there is a buffer overflow that I will describe in a future post. I could exploit this buffer overflow to subvert the flow of execution and execute shellcode that would write my firmware, but that would be cheating. The point of this project is to show that dead code can represent a powerful attack vector, even when it is non-functional.

Target Device

The device I'll be describing in this series is the Netgear R6200 802.11ac router. Here are some specifics about the router:
  • Linux based
  • Little endian MIPS
  • Firmware version 1.0.0.28
  • Originally released in 2012
  • US$200 retail price when released
I only worked with the 1.0.0.28 firmware, which I believe is the original released version. I haven't looked into later versions. That will remain an exercise for the reader. I will add that as recently as January 2015, I ordered an R6200 from Amazon, and it came with firmware 1.0.0.28 installed.

I <3 UPnP

Universal Plug and Play services on SOHO routers make for a nice attack surface for vulnerability research. UPnP services are often capable of system-level modifications that are protected only by a thin veil of obscurity. When I found strings referencing "firmware" in the Netgear R6200[1] 801.11ac router's UPnP binary I knew this daemon was going to be an interesting target. Most SOHO router exploits do not offer persistence[2], owing to their read-only storage. An unauthenticated firmware upload is an opportunity to persist undetected on the gateway device for months or even years.

Firmware Unpacking and Strings Analysis

Upon unpacking the R6200's firmware, you can easily identify the UPnP daemon as /usr/sbin/upnpd. Source code is not available for this application, so research is an exercise in binary analysis.

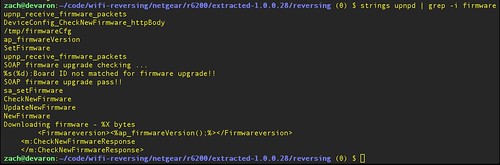
Initial strings analysis of the binary reveals a "SetFirmware" string:

terminal - strings upnpd
Strings analysis on upnpd binary, showing "SetFirmware"


Hopefully this string is somehow related to modifying the device's firmware. Static analysis reveals how the "SetFirmware" string is referenced in the binary:

SetFirmware reference in upnpd
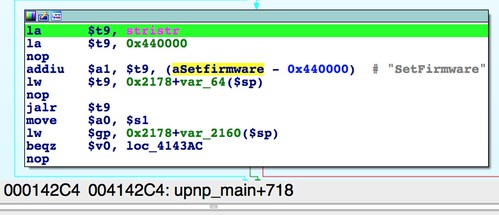
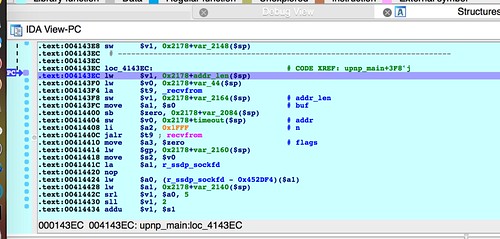
Reference to "SetFirmware" from upnp_main()

As shown in the above screenshot, "SetFirmware" is referenced exactly once, from upnp_main() at offset 0x4142C4.

Lazy Parsing

When upnpd receives a SOAP request, the upnp_main() function does the following:
  • recv() from a TCP socket
  • check that it received (seemingly arbitrarily) 8,190 bytes or fewer.
  • perform a lazy parse of incoming requests by performing stristr() string searches on the received data.
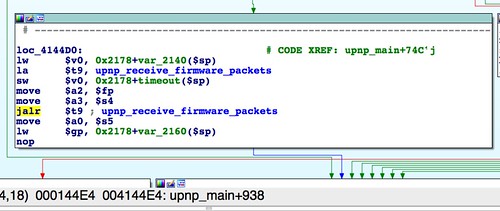
The upnp_main() function searches for the string "Content-length:" literally anywhere (wtf?) in the received data. If the value following "Content-length:" is greater than or equal to (again, seemingly arbitrary) 102401, as checked by atoi() another stristr() is performed, searching for the "SetFirmware" string. Again, this string may be anywhere in the received data. If the string is found, upnp_receive_firmware_packets() is called at 0x4144E4.

call to upnp_receive_firmware_packets()
A call to upnp_receive_firmware_packets()


It's worth noting the implication of these two size checks, the first for 8,190 or less and the second for a content length greater that 102,401. The request must either have a forged content-length header, or the requesting client must avoid sending the entire request in one operation. In the latter case, the request should send no more than 8,190 bytes, pause, then send the rest.

It is also worth noting that at this stage it is unclear how the "SetFirmware" request should be structured. It also is unclear if it should even be a SOAP request (we will proceed on the assumption that it is), or some other protocol. The only things that are known about the request are:
  • The request should be broken up into two or more parts, with the first being no larger than 8,190 bytes.
  • "Content-length:" should be somewhere in the data, presumably in the HTTP headers (because this would make sense), but not necessarily.
  • The content length should be greater than 102,401 bytes.
  • The string "SetFirmware" should be somewhere in the data.

This is the first bug that suggests this code doesn't actually work, at least not naturally. When you send() a request, you should be able to send the entire request in one operation. Your operating system's TCP/IP stack (usually in the kernel) will handle chunking the data as necessary. Further, the remote host's TCP/IP stack will handle unchunking the data as necessary. These details are abstracted from userspace code, and the receiving program should be able continue receiving until the remote end has closed the connection or until some maximum allowable size has been received. We're able to work around this anomalous behavior by sending only a small chunk of the data, then sleeping before sending the rest.

In the next part, I'll describe another bug, this time a misuse of select(), that also suggests this code never actually worked in the wild. I'll go on to describe how to make it work anyway. I'll also discuss how the broken, lazy parsing makes it difficult to know how the SOAP request should be formed such that execution follows a desirable code path.

------------------------------
[1] Although the R6200 was the primary device researched, preliminary analysis of other devices, including the R6300 v1, indicates presence of the same vulnerabilities described on this blog.
[2] It should be noted that non-persistent exploits are attractive in their own right, as the attacker may remove all traces of the compromise from the device by merely rebooting it.

Wednesday, April 22, 2015

Broken, Abandoned, and Forgotten Code: Prologue

A Secret Passage to Persistant SOHO Router Pwnage


Almost two years ago plus a house selling, a cross-country move, a house buying, a job change, and a wedding, I downloaded and unpacked the firmware for Netgear's then-new R6200 wireless router. This was one of Netgear's first entries into the nascent 802.11ac market. At around US$200 at the time, this device was at the high end of the Netgear lineup. Finding some cool vulnerabilities in some of the newest, swankiest, consumer WiFi gear would make for a neat paper, or at least a good blog post or two.

In June 2013, I started investigating the R6200. Right away, there were suspicious strings and code paths in the UPnP daemon that were too interesting ignore. If I was right, I would be able to flash a malicious firmware to the device from the local network without authentication. Answering the sirens' call, I spent a few weeks trying to unravel this shit-show of a daemon. I finally gave up, deciding the code I was investigating was too broken to ever actually work, and was therefore not exploitable.

Fast forward six months to December. Having worked through my anger from wasted weeks of work over the summer, the project was back on my mind. I decided to revisit it, this time with a new approach. My original approach was to reverse engineer what appeared to be a backdoor update capability. I gave up when I realized the backdoor was likely never completely implemented and could never actually work as intended. My new approach was to see if I could specially craft an exploit that would route around all the broken networking code and broken parsing code in order to get the router to accept my firmware without crashing.

Spoiler: In the end I was successful. The project had become interesting enough that I planned to write it up and submit it to a conference. But, well, life happened, and here we are nearly a year and a half later.

What comes next amounts, I think, to the equivalent of a small book describing this project. Over the next 14 or so posts, I'll cover all of the various challenges involved and how I solved them, including the following:
  • Reverse engineering the upnpd binary
  • Broken networking code and how to deal with it
  • Using Bowcaster to reverse engineer an undocumented firmware header
  • Unpacking, modifying, and repacking the firmware
... and many others. I plan to post about one article a week. I'll include complete, working exploit code as well as code to generate proper headers and to repack the firmware.

My hope is that, with the necessary tools and a little prerequisite reversing experience, you can follow along and reproduce this project.

In the mean time, here's a video to give you a tease. The left window is a minicom serial connection showing you what's going on under the hood. The right window is where actual exploitation is happening.


R6200 Firmware Upload from Zach on Vimeo.

Stay tuned. Hopefully it will be fun.

Update: Part 1 is up! Hope you enjoy it!

Friday, February 20, 2015

Bowcaster Feature: multipart/form-data

Need to reverse engineer or exploit a file upload vulnerability in an embedded web server? I added a multipart/form-data class to Bowcaster to help with that. You can have a look here:
https://github.com/zcutlip/bowcaster/blob/master/src/bowcaster/clients/http.py

Here's some background:
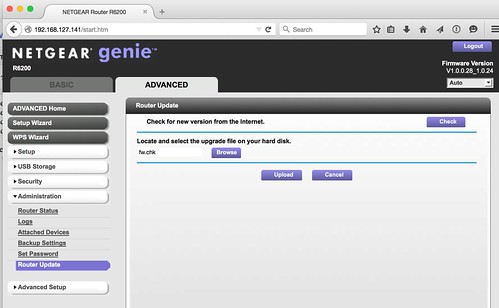
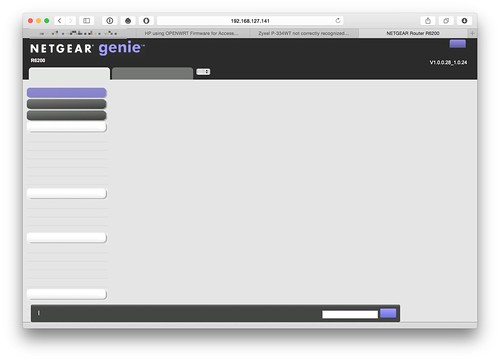
I've been reverse engineering how the Netgear R6200 web server parses a new firmware image when you use the firmware update facility in the web interface. Manually browsing to the router's web interface, then to the firmware update form, then browsing to a firmware file on disk, then clicking "upload" gets really tedious after a few times.

NETGEAR Router R6200 Firmware Upload
Updating the Netgear R6200's firmware through the web interface.


I wanted to use Bowcaster's HttpClient class to do this programmatically. Unfortunately, it lacked the ability to generate a multipart/form-data POST body, so I added a class to help with that. I know; there are 3rd party Python modules to do this already, but I don't want Bowcaster to have any dependencies other than Python, itself.

Anyway, below is an example program that uses the class to upload a firmware image, which you can get here from Bowcaster's example code. In order to identify the fields that need to be populated, I manually uploaded a file through a web browser, and analyzed the POST request in Burp Suite.


#!/usr/bin/env python

"""
Example code to upload a firmware file to the Netgear R6200 firmware update form.
"""

import sys
import os
from bowcaster.common import Logging
from bowcaster.clients import HttpClient
from bowcaster.clients import HTTPError
from bowcaster.clients import MultipartForm

def send_fw(url,fw_file):
    
    logger=Logging(max_level=Logging.DEBUG)
    logger.LOG_INFO("Sending %s" % fw_file)
    logger.LOG_INFO("to %s" % url)

    fw_file_basename=os.path.basename(fw_file)
    
    logger.LOG_INFO("Creating headers.")
    headers={"Accept":
    "text/html,application/xhtml+xml,application/xml;q=0.9,*/*;q=0.8"}
    headers["Accept-Language"]="en-US,en;q=0.5"
    headers["Accept-Encoding"]="gzip, deflate"
    headers["Referer"]="http://192.168.127.141/UPG_upgrade.htm"

    #admin:password
    headers["Authorization"]="Basic YWRtaW46cGFzc3dvcmQ="
    headers["Connection"]="keep-alive"

    logger.LOG_INFO("Creating post data")
    
    mf=MultipartForm()
    mf.add_field("buttonHit","Upgrade")
    mf.add_field("buttonValue","Upload")
    mf.add_field("IS_check_upgrade","0")
    mf.add_field("ver_check_enable","1")
    mf.add_file("mtenFWUpload",fw_file)
    mf.add_field("upfile",fw_file_basename)
    mf.add_field("Upgrade","Upload")
    mf.add_field("progress","")
    post_data=str(mf)
    headers["Content-Length"]=("%s" % len(post_data))
    headers["Content-Type"]=mf.get_content_type()
    client=HttpClient()
    logger.LOG_INFO("Sending request.")
    resp=client.send(url,headers=headers,post_data=post_data,logger=logger)
    
    return resp


def main(fw_file,host=None):
    if not host:
        host="192.168.127.141"
    url="http://%s/upgrade_check.cgi" % host
    resp=send_fw(url,fw_file)
    print resp

if __name__ == "__main__":
    if(len(sys.argv) == 2):
        main(sys.argv[1])
    elif len(sys.argv) == 3:
        main(sys.argv[1],host=sys.argv[2])
    else:
        print("Specify at least firmware file.")
        sys.exit(1)


Saturday, January 31, 2015

Patching, Emulating, and Debugging a Netgear Embedded Web Server

Previously I posted about running and remotely debugging a Netgear UPnP daemon using QEMU and IDA Pro. This time we’ll take on the challenge of running the built-in web server from the Netgear R6200 in emulation.

The httpd daemon is responsible for so much more than the web interface. This daemon is responsible for a silly amount of system management, including configuring firewall rules, managing the samba and ftp file servers, managing attached USB storage, and many other things. And it does all of this management as part of its initialization, which means lots of opportunities to fail or crash when running in emulation as a standalone service.

Running this device’s web server in emulation involves substantially more work, but it is still doable. First we need to figure out how to invoke the httpd program. Below is a script I use to start up httpd in emulation.

#!/bin/sh

# runhttpd.sh
# run with DEBUG=1 to attach gdbserver


ROOTFS=/root/code/wifi-reversing/netgear/r6200/extracted-1.0.0.28/rootfs

DEBUGGER=""
if [ "x1" = "x$DEBUG" ];
then
DEBUGGER="./gdbserver 0.0.0.0:1234"
fi

rm ./tmp/shm_id
rm ./var/run/httpd.pid
ipcrm -S 0x0001e240
for ipc in $(ipcs -m | grep 0x | cut -d " " -f 2); do ipcrm -m $ipc; done

chroot $ROOTFS /bin/sh -c "LD_PRELOAD=/libnvram-faker.so $DEBUGGER /usr/sbin/httpd -S -E /usr/sbin/ca.pem /usr/sbin/httpsd.pem"

I partly based this on the command line arguments that httpd is invoked with on the actual device. The script chroots into the router's filesystem and then runs httpd. Further, if you set DEBUG=1 on the command line, the script will use gdbserver to execute the daemon and wait for a debugger connection on port 1234.

As with the UPnP daemon, an early challenge is the fact that QEMU doesn’t provide NVRAM for configuration parameters, so calls to nvram_get() will fail. We can work around this with my project nvram-faker. Nvram-faker is loaded using LD_PRELOAD and hooks calls to nvram_get(). It reads a configuration from a text file and prints the results of nvram queries to standard error. Queries for unknown parameters are printed in red, helping to diagnose what parameters are needed that you haven’t yet provided. If you don’t have an instance of the hardware, this is an exercise in guesswork and trial and error. You need to intuit sane values for the queried parameters and iteratively fill in missing parameters as they are queried. If you do have the actual gear, and you can get a shell[1] on the device, you can extract the NVRAM configuration from flash and convert it into an INI file for nvram-faker. I’ll post the nvram configuration I ended up using at the end.

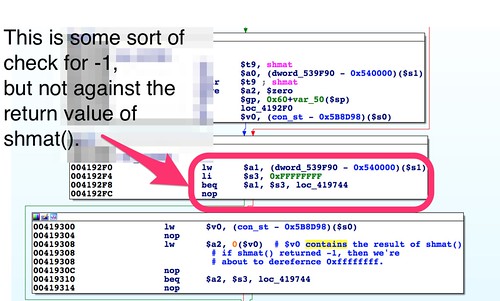
When attempting to run httpd, I found it kept crashing with SIGBUS. It turns out that on startup the daemon wants to open a shared memory segment for IPC. It looks for the file /tmp/shm_id, which may have been created by another process. If it finds that file it attempts to attach to the shared memory segment associated with the ID in the file. If the file doesn’t exist, then httpd opens a new shared memory segment and then writes the ID to that file. The problem is there is no check to see if shmat() failed, returning negative one (cast to a void *). In any case, the program attempts to deference the return value of shmat() at 0x00419308. In the case of failure, 0xffffffff is dereferenced, crashing the program. The crash is SIGBUS rather than SIGSEGV due to the misaligned memory access.

shmat fail

If the http server has previously run and not exited cleanly, then /tmp/shm_id will hang around. The solution is easy: have our script delete /tmp/shm_id before starting the server.

Another problem is that the http daemon…well…daemonizes. As far as I know, there’s no way to have IDA and gdbserver follow fork()s, so this is a problem. If we could get the daemon to run reliably, we could start it, let it daemonize, and then attach to the forked process. However, we’re going to need to do a fair amount of debugging just to get this program running, so letting it start and daemonize isn’t an option.

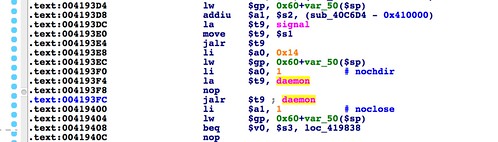
jalr to daemon()

In the above screenshot we see the jump to daemon() at 0x004183fc. The easiest approach is to patch out the call to daemon().

Just a few thoughts about binary patching: It’s important to keep in mind that if you change the binary you’re analyzing, you’re no longer analyzing the same program. Instead you’re analyzing some other, slightly different program, with different behaviors. Hopefully nothing you change will make a material difference, but it’s hard to know. For example, it may be difficult to tell if a function that you patched out would have initialized some global structures that will now result in a crash or a slightly different code path. Just be aware of the ramifications, and patch only when necessary.

The return value of daemon() is checked and a value of 0 indicates success. A relatively nonintrusive way of replacing a call to daemon() and simulating success is to xor the $v0 register (which contains a function’s return value) with itself. The assembled bytes for the instruction:

xor $v0,$v0

are:

00 42 10 26 

The target system is little endian, so these bytes must be swapped:

26 10 42 00 

I’ll leave the actual method[2] of assembling a single instruction and deriving its corresponding sequence of bytes as an exercise for the reader. If you have a cross compiler set up, one way is to create a source file with your instruction, assemble it with the gnu assembler, and then disassemble it with objdump. Another option is to use this lightweight python module, mips-assembler.

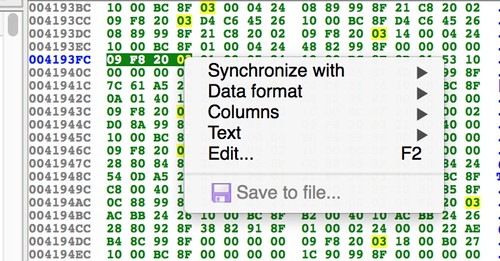
To patch the program using IDA, click on the instruction you want to patch, in this case the jalr to daemon() at 0x004183fc. Then switch to IDA’s hex view. The corresponding bytes will be highlighted. Right click and select "edit".

Hex editing in IDA

The hex view changes to overwrite mode. Change the selected bytes to the ones corresponding to your patch. Right click again and choose “apply.” When you switch back to disassembly, you should see the patch.

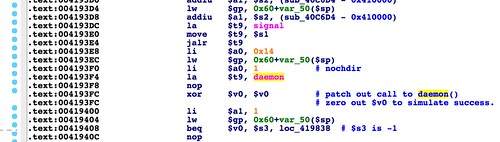
patch out call to daemon()

Note that IDA hasn’t actually changed the original binary. In fact, one of IDA’s features is that once you disassemble a file, not only does it not touch the original file again, you don’t even need it. All you need from that point forward is the .idb file. However, IDA does have the ability to apply the patch to the original file. Select the Edit menu, “Patch Program,” then “Apply patches to input file.” IDA will prompt you to name the patch file and whether to make backup copy. This is a relatively new feature, so if you’re new to IDA, know that it wasn’t always this easy. Send Ilfak an email thanking him.

Now you should be able run the patched httpd without it daemonizing. Set a breakpoint somewhere past the original call to daemon() and verify that IDA stays attached.

With the daemon running, you can start the iterative process of building up an NVRAM configuration that will satisfy the many initialization steps. The goal is for execution to reach the select() at 0x00415564 in the http_d() function.

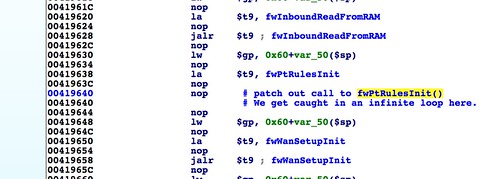
During this process, there was one initialization function that I wasn’t able to get past. The call to fwPtRulesInit() at 0x00419640 always hung in an endless loop. Since this has to do with firewall policy configuration, I decided it was worth the risk to patch it out with a nop instruction.

patch out call to fwPtRulesInit()

Here is the configuration I ended up with. I ended up using the complete configuration copied from the hardware's NVRAM. I tweaked a few settings such as LAN IP address, and the HTTP admin's password, but this is mostly a stock configuration[3]. (Apologies to mobile users. This is supposed to be a 500px iframe that shows about 20 lines and scrolls, but for some reason in my mobile browser, the entire 1500+ line configuration is rendered.)


Once I had the trouble spots patched out and had a working configuration, I was able to get the web server running and responding to requests from a web browser. Mostly.

webserver in emulation

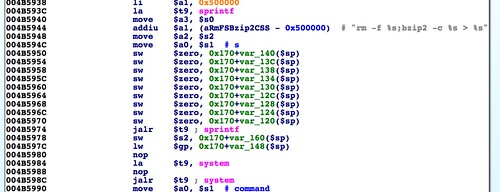
As you can see, the web interface chrome appears to be working, but the text is mostly missing. It turns out there was a bug in libnvram-faker. As the library handles NVRAM queries, it prints to the console the parameters and their values. The problem is it was printing to standard output. The web server executes a number of shell commands using system(). Some of those commands redirect their standard output to a file, which the web server then uses. In particular, at 0x004B5C40, a string table gets generated by a shell command, then read in, and then immediately deleted. Since the file only exists for a moment, it's not obvious this is happening.

Below, we see the function CreateHeader() getting called with two arguments. These are a string table in /www, and a compressed copy of the same file in /tmp.

creating string table

Then in CreateHeader() we see a shell command being generated via sprintf() and then executed via system(). That shell command is bzip2 -c somefile > some_other_file. The resulting file is a redirection of bzip's standard output.

bzip2 stdout


Once I noticed this, I set a breakpoint just after the bzip command, and was able to make a copy of the file. When I decompressed it, I saw that it had all of libnvram-faker's output mixed in with the strings. This had the result of breaking the templating system that generates the web interface's HTML and javascript. Once I fixed that in libnvram-faker, I was able to get the web server working.

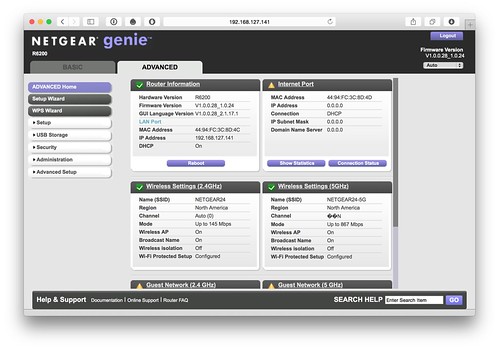
httpd working in emulation

This should get you started emulating and debugging some more challenging binaries. With enough work you can get fairly complicated programs from an embedded device running in emulation. Sometimes this is convenient, so you don't have to carry actual gear around when you're doing research. Other times, it's necessary; you may not be able to get interactive access to the hardware in order to debug its processes. In that case, emulation may be your only choice.

------------------------
[1] Many devices have a UART connection which will let you connect via minicom or other serial terminal in order to get console access. Further, nearly every consumer Netgear device has a telnet backdoor listening on the local network.

[2] I use a tool that Craig Heffner wrote called “shellgasm.” It’s a nifty python program that calls gcc and objdump from your cross compiler toolchain. It will also turn asm code into a C-style or Python-style byte array that can be used for payloads in buffer overflows and such. Unfortunately it’s not available anywhere. Maybe if you pester Craig, he’ll post it on Github.

[3] This was actually more work than it sounds like. There was a bug in libnvram-faker. It didn't allocate enough memory to accommodate all the lines of the INI file. This resulted in a crash with large configuration files. The crash was difficult to debug, so I mostly worked around it by iteratively uncommenting parts of the file until the web server worked. Just before finishing this post, I finally tracked down the bug, so now I can use the entire 1500+ lines of the default configuration.

Saturday, January 03, 2015

Remote Debugging with QEMU and IDA Pro

It's often the case, when analyzing an embedded device's firmware, that static analysis isn't enough. You need to actually execute a binary you're analyzing in order to see how it behaves. In the world of embedded Linux devices, it's often fairly easy to put a debugger on the target hardware for debugging. However it's a lot more convenient if you can run the binary right on your own system and not have to drag hardware around to do your analysis. Enter emulation with QEMU.

An upcoming series of posts will focus on reverse engineering the UPnP daemon for one of Netgear's more popular wireless routers. This post will describe how to run that daemon in system emulation so that it can analyzed in a debugger.

Prerequisites

First, I'd recommend reading the description I posted of my workspace and tools that I use. Here's a link.

You'll need an emulated MIPS Linux environment. For that, I'll refer readers to my previous post on setting up QEMU.

You'll also need a MIPS Linux cross compiler. I won't go into the details of setting this up because cross compilers are kind of a mess. Sometimes you need an older toolchain, and other times you need a newer toolchain. A good starting point is to build both big endian and little endian MIPS Linux toolchains using the uClibc buildroot project. In addition to that, whenever I find other cross compiling toolchains, I save them. A good source of older toolchains is the GPL release tarballs that vendors like D-Link and Netgear make available.

Once you have a cross compiling toolchain for your target architecture, you'll need to build GDB for that target. At the very least, you'll need gdbserver statically compiled for the target. If you want to remotely debug using GDB, you'll need gdb compiled to run on your local architecture (e.g., x86-64) and to debug your target architecture (e.g., mips or mipsel). Again, I won't go into building these tools, but if you have your toolchains set up, it shouldn't be too bad.

I use IDA Pro, so that's how I'll describe remote debugging. However,  if you want to use gdb check out my MIPS gdbinit file: https://github.com/zcutlip/gdbinit-mips

Emulating a Simple Binary

Assuming you've gotten the tools described above set up and working properly, you should now be able to SSH into your emulated MIPS system. As described in my Debian MIPS QEMU post, I like to bridge QEMU's interface to VMWare's NAT interface so I can SSH in from my Mac, without first shelling into my Ubuntu VM. This also allows me to mount my Mac's workspace right in the QEMU system via NFS. That way whether I'm working in the host environment, in Ubuntu, or in QEMU, I'm working with the same workspace.


zach@malastare:~ (130) $ ssh root@192.168.127.141
root@192.168.127.141's password:
Linux debian-mipsel 2.6.32-5-4kc-malta #1 Wed Jan 12 06:13:27 UTC 2011 mips

root@debian-mipsel:~# mount
/dev/sda1 on / type ext3 (rw,errors=remount-ro)
malastare:/Users/share/code on /root/code type nfs (rw,addr=192.168.127.1)
root@debian-mipsel:~# cd code
root@debian-mipsel:~/code#

Once shelled into your emulated system, cd into the extracted file system from your device's firmware. You should be able to chroot into the firmware's root file system. You need to use chroot since the target binary is linked against the firmware's libraries and likely won't work with Debian's shared libraries.


root@debian-mipsel:~# cd code/wifi-reversing/netgear/r6200/extracted-1.0.0.28/rootfs/
root@debian-mipsel:~/code/wifi-reversing/netgear/r6200/extracted-1.0.0.28/rootfs# file ./bin/ls
./bin/ls: symbolic link to `busybox'
root@debian-mipsel:~/code/wifi-reversing/netgear/r6200/extracted-1.0.0.28/rootfs# file ./bin/busybox
./bin/busybox: ELF 32-bit LSB executable, MIPS, MIPS32 version 1 (SYSV), dynamically linked (uses shared libs), stripped
root@debian-mipsel:~/code/wifi-reversing/netgear/r6200/extracted-1.0.0.28/rootfs# chroot . /bin/ls -l /bin/busybox
-rwxr-xr-x    1 10001    80         276413 Sep 20  2012 /bin/busybox
root@debian-mipsel:~/code/wifi-reversing/netgear/r6200/extracted-1.0.0.28/rootfs#

In the above example, I have changed into the root directory of the extracted file system. Then using the file command I show that busybox is a little endian MIPS executable. Then I chrooted into the extracted root directory and ran bin/ls, which is a symlink to busybox.

If you attempt to simply start a chrooted shell with "chroot .", it won't work. Your user's default shell is bash, and most embedded devices don't have bash.


root@debian-mipsel:~/code/wifi-reversing/netgear/r6200/extracted-1.0.0.28/rootfs# chroot .
chroot: failed to run command `/bin/bash': No such file or directory
root@debian-mipsel:~/code/wifi-reversing/netgear/r6200/extracted-1.0.0.28/rootfs#

Instead you can chroot and execute bin/sh:

root@debian-mipsel:~/code/wifi-reversing/netgear/r6200/extracted-1.0.0.28/rootfs# chroot . /bin/sh


BusyBox v1.7.2 (2012-09-20 10:26:08 CST) built-in shell (ash)
Enter 'help' for a list of built-in commands.

#
#
# exit
root@debian-mipsel:~/code/wifi-reversing/netgear/r6200/extracted-1.0.0.28/rootfs#

Hardware Workarounds

Even with the necessary tools and emulation environment set up and working properly, you can still run into roadblocks. Although QEMU does a pretty good job of emulating the core chipset, including the CPU, there is often hardware the binary you're trying to run is expecting that QEMU can't provide. If you try to emulate something simple like /bin/ls, that will usually work fine. But something more complicated such as the UPnP daemon will almost certainly have particular hardware dependencies that QEMU isn't going to satisfy. This is especially true for programs whose job it is to manage the embedded system's hardware, such as turning wireless adapters on or off.

The most common problem you will run into when running system services such as the web server or UPnP daemon is the lack of NVRAM. Non-volatile RAM is usually a partition of the device's flash storage that contains configuration parameters. When a daemon starts up, it will usually attempt to query NVRAM for its run-time configuration. Sometimes a daemon will query NVRAM for tens or even hundreds of parameters.

To work around the lack of NVRAM in emulation, I wrote a library called nvram-faker. The nvram-faker library should be preloaded using LD_PRELOAD when you run your binary. It will intercept calls to nvram_get(), normally provided by libnvram.so. Rather than attempting to query NVRAM, nvram-faker will query an INI-style configuration file that you provide.

The included README provides a more complete description. Here's a link to the project:

Even with NVRAM solved, the program may make assumptions about what hardware is present. If that hardware isn't present, the program may not run or, if it does run, it may behave differently than it would on the target hardware. In this case, you may need to patch the binary. The specifics of binary patching vary from one situation to another. It really depends on what hardware is expected, and what the behavior is when it is absent. You may need to patch out a conditional branch that is taken if hardware is missing. You may need to patch out an ioctl() to a special device if you're trying to substitute a regular file for reading and writing. I won't cover patching in detail here, but I did discuss it briefly in my BT HomeHub paper and the corresponding talk I gave at 44CON. Here is a link to those resources:
http://shadow-file.blogspot.com/2013/09/44con-resources.html


Attaching the Debugger

Once you've got your binary running in QEMU, it's time to attach a debugger. For this, you'll need gdbserver. Again, this tool should be statically compiled for your target architecture because you'll be running it in a chroot. You'll need to copy it into the root directory of the extracted filesystem.


# ./gdbserver
Usage: gdbserver [OPTIONS] COMM PROG [ARGS ...]
 gdbserver [OPTIONS] --attach COMM PID
 gdbserver [OPTIONS] --multi COMM

COMM may either be a tty device (for serial debugging), or
HOST:PORT to listen for a TCP connection.

Options:
  --debug               Enable general debugging output.
  --remote-debug        Enable remote protocol debugging output.
  --version             Display version information and exit.
  --wrapper WRAPPER --  Run WRAPPER to start new programs.
  --once                Exit after the first connection has closed.
#

You can either attach gdbserver to a running process, or use it to execute your binary directly. If you need to debug initialization routines that only happen once, you'll want to do the latter.

On the other hand, you may want to wait until the daemon forks. As far as I know there's no way to have IDA follow forked processes. You need to attach to them separately. If you do it this way, you can attach to the already running process from outside the chroot.

The following shell script will execute upnpd in a chroot. If DEBUG is set to 1, it will attach to upnpd and pause for a remote debugging session on port 1234.


#!/bin/sh
ROOTFS="/root/code/wifi-reversing/netgear/r6200/extracted-1.0.0.28/rootfs"
chroot $ROOTFS /bin/sh -c "LD_PRELOAD=/libnvram-faker.so /usr/sbin/upnpd"

#Give upnpd a bit to initialize and fork into the background.
sleep 3;

if [ "x1" = "x$DEBUG" ];
then

 $ROOTFS/gdbserver --attach 0.0.0.0:1234 $(pgrep upnpd)
fi

You can create a breakpoint right before the call to recvfrom() and then verify the debugger breaks when you send upnpd an M-SEARCH packet.

break before recvfrom()


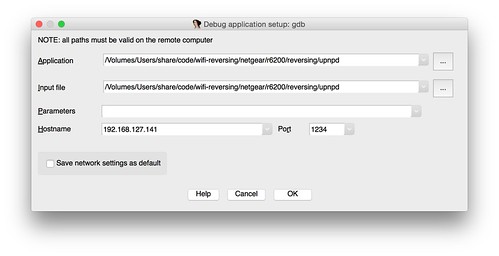
Then, in IDA, go to Process Options under the Debugger menu. Set "hostname" to the IP address of your QEMU system, and set the port to the port you have gdbserver listening on. I use 1234.

Debug application setup: gdb


Accept the settings, then attach to the remote debugging session with IDA's ctrl+8 hotkey. Hit ctrl+8 again to resume execution. You should be able to send an M-SEARCH packet[1] and see the debugger hit the breakpoint.

debugger hits breakpoint in upnp_main()

There is obviously a lot more to explore, and there are lots of situations that can come up that aren't addressed here, but hopefully this gets you started.

[1] I recommend Craig Heffner's miranda tool for UPnP analysis:
https://code.google.com/p/miranda-upnp/

Tuesday, September 23, 2014

Exploit Tunneling and Callback

A few years ago, when I worked for my previous employer, I put together a proof-of-concept that was to be part of a client demo. I thought it was kind of cool, so I recorded a screencast of it in action. I've had the video sitting on my laptop ever since, not really sure what to do with it. I finally decided to post it.

In the video, what you see is a custom exploit script that exploits a buffer overflow in the web interfaces of several D-Link webcams. The neat part is that it tunnels the exploit and callback through each successive webcam. It works basically like this:

  1. Exploit webcam 1.
  2. Webcam 1 phones home, then downloads and executes a two-stage payload.
  3. The payload proxies all packets destined to a certain port between the exploit host and the next webcam in the chain. It does this in both directions.
  4. Tunneling through webcam 1, exploit webcam 2.
  5. Like before, webcam 2 phones home, tunneled through webcam 1, and downloads and executes a two-stage payload.
  6. Again, the payload proxies packets, this time between webcam 1 and the thrid webcam.
  7. Exploit webcam 3, tunneling through webcams 1 and 2.
  8. Webcam 3 executes a traditional payload, resulting in a connect-back shell. The shell connects back through webcams 2 and 1 to the exploit host.
  9. Root prompt on webcam 3.
I put this together pre-Bowcaster, so it's a little raw. But it was all groundwork for that framework, so Bowcaster has much of the same capability shown in the video.

As an aside, one of the nice things about exploiting these inexpensive consumer devices, besides the fact they are soft targets, usually unmonitored, and ubiquitous, is they generally don't have a writeable file system. This means you can reboot them, leaving behind no trace that you were ever there.

Anyway, here's the video. It has cool music.

Friday, May 16, 2014

Infiltrate 2014

Here are some additional resources I may have mentioned in my Infiltrate 2014 presentation.

White Paper: SQL Injection to MIPS Overflows - Part Deux
Slides: SQL Injection to MIPS Overflows - Part Deux

Original white paper from Black Hat USA 2012:
SQL Injections to MIPS Overflows: Rooting SOHO Routers

Proof of Concept Exploit code:
Here's my Github repository for proof-of-concept exploit code.  In it, you'll find the exploit code for the Netgear WNDR 3700v3 that I demoed at Infiltrate, among a few others. The white paper is in there as well.
https://github.com/zcutlip/exploit-poc

Bowcaster:
I talked about my Python API/Framework for developing buffer overflows. In particular it includes payloads for MIPS Linux.
https://github.com/zcutlip/bowcaster

Monday, December 30, 2013

Emulating and Debugging Workspace

A grad student emailed me in response to my Netgear auth bypass post.  He's working on a research project and wanted to know if I knew of any resources or techniques to use emulation for executing and debugging the net-cgi binary in the Netgear firmware.  It turns out I've got all the resources to do just that.  I replied with a description of my workspace and some links to resources I use, and, in many cases, have developed.  I thought this might make an interesting blog post, but I don't really have time to write it up all blog-post-like.  Instead I'll just paste in my email.  Maybe it'll be useful to other people as well.

Hello,

I think the best approach is to describe how I set up my tool chain and environment.  Hopefully that will be helpful for you.

To start with, I do my work in an Ubuntu VM.  Specifically 12.04.  I don't think the exact release matters, but I know 12.04 works with my tools.

I keep a set of cross compilers in my path for various architectures. In my opinion, building with a cross compiler is faster and easier than building with gcc inside QEMU.  I recommend building a set of cross-compiling toolchains using Buildroot.  Buildroot uses a Linux Kernel-style menuconfig build system.  I don't have anything written up on building cross compilers, but I could probably send you my buildroot configuration if you need it, and if I can find it.

You can download the firmware for the router from Netgear's support website.
Here's a link to the firmware:
http://support.netgear.com/product/wndr3700v4
In order to unpack the firmware, I recommend my colleague, Craig Heffner's tool, Binwalk:
https://code.google.com/p/binwalk/
Binwalk will analyze a binary file and describe the subcomponents it finds within, such as filesystems, compressed kernel, etc. Additionally, it can unpack the subcomponents it finds, assuming it knows how.
Install binwalk in your Ubuntu environment using the "debian_quick_install.sh" installation script, which will apt-get install a number of dependencies.
Rather than describe binwalk's usage, I'll refer you to the wiki:
https://code.google.com/p/binwalk/wiki/Usage?tm=6
Also, in your Ubuntu environment you'll need a Debian MIPS QEMU system that you can use to emulate the firmware's binaries.

I found lots of information about running Debian in QEMU, but most of it was incomplete, and a lot of it was inconsistent, so I've written a blog post describing how I set up my QEMU systems:
http://shadow-file.blogspot.com/2013/05/running-debian-mips-linux-in-qemu.html
This is just personal, but I like to export my workspace to the QEMU machines via NFS.  In fact, I export my workspace from my Mac via NFS, and my Ubuntu VMs and Debian QEMU VMs all mount the same directory. That way I'm not having to copy firmware, scripts and debuggers around.

Once logged into your QEMU VM, you can chroot into the router's firmware and run some of its binaries:

firmware_rootfs # chroot . /bin/sh
#

The simple ones, such as busybox, will run with no problem.  The web server, upnp server, etc. are more complicated because they make a lot of assumptions about the router's specific hardware being present.

One of the problems you run into has to do with queries to NVRAM for runtime configuration.  Obviously, your Debian MIPS Linux has no NVRAM, so these queries will fail.  For that, I have a project called "nvram-faker":
https://github.com/zcutlip/nvram-faker
You build the library for your target and preload it using the LD_PRELOAD environment variable.  It intercepts calls to nvram_get and provides answers based on the contents an nvram.ini file that you provide. It prints all the nvram queries to stdout, and colorizes the ones that it couldn't find in the .ini file.  Obviously it takes some guesswork to provide sane configuration parameters.

Sometimes you can skip running the web server and just run the cgi binaries from a shell script.  Most cgi binaries take their input from the web server as a combination of standard input and environment variables.  They send their response to the web server over standard output.

I hope this helps.  Let me know if I can help any other way.

Zach 

Saturday, December 07, 2013

BayThreat 2013 Presentation - Additional Resources

For my presentation at BayThreat, entitled "BT Wireless Routers: Adventures in Reversing and Exploiting", rather than have one or two or three slides packed with hard to read URLs, I included a single slide with a link to this post.  Here you'll find links to additional resources that I may have referenced in my talk.

White paper: Reverse Engineering and Exploiting the BT HomeHub 3.0b (pdf)
Slides: BT Wireless Routers: Adventures in Reversing and Exploiting

BT HomeHub 3.0b specifications
Here's a walkthrough I wrote on getting Debian MIPS Linux up and running in QEMU system emulation.  I use QEMU & Debian Linux to run and analyze binaries that I find in firmware.
QEMU/Debian MIPS Linux walkthrough

Often binaries found in firmware won't play nicely in emulation because they make a lot of assumptions about the underlying hardware which QEMU can't satisfy.  The most common case of this is an application querying NVRAM for configuration parameters.  Here's a library I wrote to intercept those queries and provide answers from an INI-style configuration file.
NVRAM "faker" library for use in emulation

Bowcaster is an exploit development API that I wrote to ease development of buffer overflow exploits.  It grew out of all the tools and techniques Craig Heffner and I developed for exploiting embedded devices.  It primarily targets MIPS Linux, since there support for that architecture was almost non-existent.  I plan to add support for other architectures as I have time.
Bowcaster

Here's my Github repository for proof-of-concept exploit code.  In it, you'll find the exploit code for the BT HomeHub 3.0b that I demoed at BayThreat, among a few others.
Proof-of-Concept exploit code

In the presentation I mentioned how exploiting buffer overflows on MIPS Linux is a bit different that other, more familiar architectures.  I wasn't able to go into details; that could make an entire presentation in itself.  However, I mentioned my Black Hat USA 2012 presentation, where I did describe some of the mechanics of exploiting MIPS Linux buffer overflows.  Here's the video of that presentation, entitled "From SQL Injection to MIPS Overflows: Rooting SOHO Routers".


SQL Injection to MIPS Overflows - Zachary Cutlip - Black Hat USA 2012 from Zach on Vimeo.

I hope these resources are useful.  If you came to this article because you saw my BayThreat talk and demo, I hope you enjoyed it!  Be sure to get in touch and share your thoughts!  Twitter or my email are best.

Twitter: @zcutlip
Email: uid000 at gmail

Cheers!
Zach